The Ultimate Guide to German Custard Grid Cake Rahmkuchen
There is something deeply comforting about a classic, bakery-style cake that combines a plush, golden sponge with pockets of rich, creamy custard. This traditional German Custard Grid Cake, often referred to as a variation of Rahmkuchen or Bienenstich-inspired cream cakes, is a staple in European bakeries for a good reason. It features a soft, melt-in-your-mouth cake base topped with a beautifully piped grid of vanilla custard. As it bakes, the batter rises up around the custard, creating a stunning quilted or pillowy pattern that holds velvety cream in every single bite. Finished with a delicate dusting of powdered sugar, this elegant yet straightforward sheet cake is perfect for weekend family gatherings, afternoon tea, or holiday dessert tables.
What makes this recipe an absolute game-changer for home bakers is its incredible textural contrast. Instead of layering a cake with frosting after it cools, the creamy element is baked directly into the structure. This keeps the sponge exceptionally moist and infuses the entire dessert with a rich vanilla aroma. If you are looking to elevate your standard sheet cake routine into something sophisticated, visually striking, and universally loved, this step-by-step guide will help you master the perfect custard grid cake from scratch.
The Secret Behind the Quilted Custard Grid
The distinctive pillow-like appearance of this cake relies on a simple principle of baking science: relative density and oven rise. The cake batter is light, aerated, and contains leavening agents like baking powder, which causes it to expand rapidly when exposed to heat. The vanilla custard, on the other hand, is dense, thick, and heavy.
When you pipe a cross-hatch or grid pattern of custard over the raw batter, it acts as a weighted barrier. As the cake bakes and expands, the unweighted square sections of batter puff up dramatically, while the custard-lined grids sink slightly into the crumb. This creates a gorgeous, uniform quilted pattern naturally in the oven, ensuring that every slice contains a perfect balance of fluffy cake and rich, creamy custard filling.
Selecting High-Quality Ingredients for a Bakery-Style Finish
Because this cake focuses on clean, classic flavors like butter, eggs, and vanilla, the quality of your base ingredients will directly impact the final taste and texture. Choosing the right components ensures your sponge stays tender and your custard remains velvety smooth without turning watery.
Achieving the Perfect Sponge Cake Consistency
To support a heavy grid of custard without collapsing completely, the cake base needs to be soft yet structurally sound. A standard sponge or enriched butter-cake batter works best. Using room temperature ingredients is essential here; room temperature eggs and liquids emulsify much better into the creamed butter and sugar, trapping tiny air pockets that contribute to a uniform, fine-grained crumb. Unbleached all-purpose flour provides just enough gluten structure to hold the quilted shape beautifully while maintaining a delicate, tender texture.
Crafting a Stable, Pipeable Vanilla Custard
The custard grid must be thick enough to hold its shape during piping and baking. A runny pastry cream will bleed into the batter, destroying the distinctive grid visual. To achieve the perfect stability, a combination of milk, egg yolks, sugar, and cornstarch is cooked on the stovetop until it reaches a thick, pudding-like consistency. The cornstarch acts as a stabilizer, ensuring the custard sets perfectly in the oven without separating or becoming rubbery. Adding real vanilla bean paste or a high-quality pure vanilla extract will elevate the custard from simple sweetness to a rich, aromatic experience.
Complete Ingredients Checklist
Gather these simple kitchen staples before you begin mixing. This recipe is designed for a standard 9×9 inch square baking pan or a small rectangular sheet pan, yielding roughly 12 to 16 generous squares.
For the Thick Vanilla Custard Grid:
- Whole Milk: 1.5 cups (approx. 360 ml) for a rich, creamy base.
- Granulated Sugar: 1/3 cup (approx. 65 grams).
- Cornstarch: 3 tablespoons (essential for thickening and heat stability).
- Egg Yolks: 2 large yolks (adds wealth, color, and structure).
- Pure Vanilla Extract or Vanilla Bean Paste: 1.5 teaspoons.
- Unsalted Butter: 1 tablespoon (stirred in at the end for a glossy finish).
For the Fluffy Cake Base:
- All-Purpose Flour: 2 cups (approx. 250 grams), sifted.
- Baking Powder: 2 teaspoons.
- Fine Sea Salt: 1/4 teaspoon.
- Unsalted Butter: 1/2 cup (113 grams), softened to room temperature.
- Granulated Sugar: 3/4 cup (approx. 150 grams).
- Large Eggs: 3 rooms-temperature eggs.
- Whole Milk or Sour Cream: 1/2 cup (approx. 120 ml) to add moisture to the crumb.
- Powdered Sugar: 2 tablespoons for a beautiful final dusting.
Step-by-Step Instructions for German Custard Grid Cake
Follow these detailed, chronological instructions to ensure your custard sets beautifully and your cake rises into perfect, golden pillows.
Step 1: Preparing the Pastry Custard
Before mixing your cake batter, you must prepare the custard so it has time to cool slightly. In a medium saucepan, whisk together the granulated sugar and cornstarch until no lumps remain. Pour in the cold whole milk and egg yolks, whisking vigorously until the mixture is completely smooth and uniform. Place the saucepan over medium heat and cook, stirring constantly with a silicone spatula or whisk, making sure to scrape the bottom and corners of the pan to prevent scorching. As it heats, the mixture will suddenly thicken into a dense, smooth pudding. Once it bubbles, remove it from the heat, stir in the vanilla extract and one tablespoon of butter until melted, and transfer the custard to a bowl. Cover the surface directly with plastic wrap to prevent a skin from forming, and let it cool to room temperature.
Step 2: Preparing Your Baking Pan
Preheat your oven to 350°F (175°C) and position the oven rack in the center. Line a 9×9 inch square baking pan with high-quality parchment paper. Ensure the paper extends slightly up the sides of the pan; these parchment “slings” make it incredibly easy to lift the delicate, custard-filled cake out of the pan once it is baked and cooled, preventing the sides from sticking or breaking.
Step 3: Mixing the Aerated Cake Batter
In a separate medium bowl, whisk together the sifted all-purpose flour, baking powder, and fine sea salt; set aside. In a large mixing bowl or the bowl of a stand mixer fitted with the paddle attachment, beat the softened unsalted butter and granulated sugar together on medium-high speed for about 3 to 4 minutes until the mixture looks pale, light, and fluffy. Add the eggs one at a time, beating well after each addition to ensure proper emulsification. Reduce the mixer speed to low and add the flour mixture in three parts, alternating with the milk or sour cream, starting and ending with the dry ingredients. Mix just until combined and no streaks of dry flour remain; overmixing at this stage will develop excess gluten, leading to a tough, dense cake.
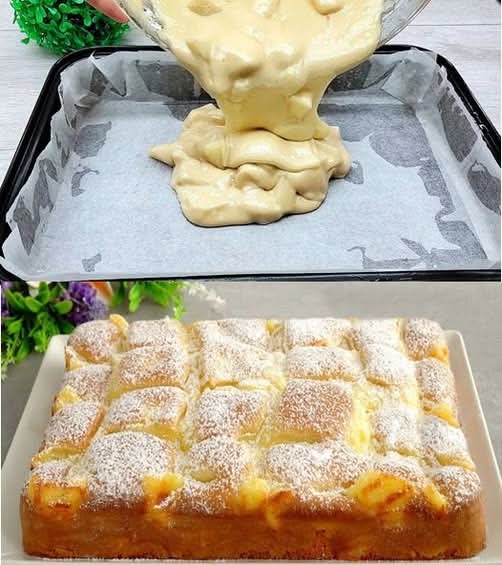
Step 4: Layering and Piping the Custard Grid
Scrape the smooth, thick cake batter out of the bowl and into your prepared parchment-lined baking pan. Use an offset spatula to spread the batter into an even, uniform layer, smoothing out the surface completely. Next, spoon your cooled vanilla custard into a pastry piping bag fitted with a medium round tip (or simply snip off the corner of a sturdy zip-top freezer bag). Hold the bag at a 45-degree angle and carefully pipe straight, parallel lines of custard diagonally across the surface of the batter, spacing them about 1.5 inches apart. Repeat the process in the opposite direction to create a beautiful, uniform diamond or square grid pattern over the raw cake base.
Step 5: Baking to Golden Perfection
Place the pan into the preheated oven and bake for 30 to 35 minutes. Keep an eye on the oven through the glass door; you will see the batter between the custard lines rise up beautifully, forming golden, rounded pillows. The cake is done when a toothpick inserted into the center of a sponge section comes out clean, and the custard grid looks set and lightly golden around the edges. Avoid opening the oven door frequently during the first 20 minutes of baking, as this can cause temperature drops that impact the uniformity of the rise.
Step 6: Cooling and the Final Flourish
Remove the pan from the oven and place it on a wire cooling rack. Allow the cake to cool completely inside the pan for at least 45 to 60 minutes. Because the custard retains heat and moisture, slicing it while hot will cause the cream pockets to run. Once the cake is completely cool to the touch and the custard has fully set, carefully use the parchment paper handles to lift the entire cake out of the pan and place it onto a serving platter. Just before slicing, dust the top generously with powdered sugar through a fine-mesh sieve, creating a striking contrast against the golden baked sponge and cream.
Expert Tips for the Ultimate Custard Cake Success
Baking with custard requires a small amount of finesse. Use these insider tips to guarantee a flawless presentation and a perfect textural result every single time you bake.
Preventing a Soggy Sponge Base
Because custard contains moisture from milk and eggs, it can occasionally create a slightly wet layer directly beneath the grid if the cake is underbaked. To prevent this, ensure your custard has cooled to a thick, holdable state before piping it onto the raw batter. If the custard is still warm, it will melt into the batter rather than sitting neatly on top. Additionally, substituting a portion of the milk in your cake batter with sour cream or heavy cream adds fat instead of water, creating a barrier that keeps the crumb tender and structurally sound without absorbing excess moisture from the topping.
Achieving Clean, Bakery-Style Slices
Slicing through a cake with distinct textures—fluffy sponge combined with soft, creamy custard—can sometimes result in messy edges. To get perfect, sharp bakery-style squares, ensure the cake is completely cooled or even chilled in the refrigerator for 30 minutes before cutting. Use a long, sharp chef’s knife. Wipe the blade clean with a damp warm cloth or paper towel between every single cut. This prevents the residual custard from smearing across the clean sponge sections, keeping your quilted design looking sharp and beautiful on the serving plate.
Creative Recipe Variations to Try
Once you master the foundational vanilla custard grid cake, you can easily customize the flavors to match the season or your personal preferences.
- The Berry Fusion: Drop fresh raspberries, blueberries, or sliced strawberries into the open squares of the grid before baking. The fruit will soften and release its juices, adding a tart, vibrant contrast to the sweet vanilla custard.
- Almond Crunch Topping: Mimic the traditional German Bienenstich (Bee Sting Cake) by sprinkling a handful of sliced almonds and a touch of coarse sugar over the top of the cake right before it goes into the oven. The almonds toast beautifully around the custard grids, adding an incredible crunch.
- Chocolate Custard Grid: Substitute 2 tablespoons of the flour in the cake base with high-quality cocoa powder, or add melted dark chocolate to your pastry cream to create a stunning chocolate-on-vanilla or double-chocolate custard grid cake.
Conclusion
Baking an artisanal dessert that looks like it stepped out of a professional pastry case does not require complex techniques or hours of assembly. This German Custard Grid Cake proves that thoughtful layering and a basic understanding of baking textures can turn simple ingredients into a stunning visual masterpiece. The combination of a plush, buttery sponge and a rich, velvety vanilla custard grid creates a comforting dessert that satisfies both texture and flavor cravings simultaneously. By baking the cream directly into the cake, you unlock an ultra-moist finish that stays fresh and delicious for days. Whether you serve it alongside a fresh cup of coffee or present it as the centerpiece of a special celebration, this beautiful quilted cake is guaranteed to impress your guests and become a highly requested favorite in your baking repertoire.