The Ultimate Guide to Easy Glass Bowl Seeded Bread
There is nothing quite like the aroma of freshly baked bread wafting through your home. For many, the idea of baking bread from scratch feels intimidating, conjuring up images of hours spent kneading dough, monitoring precise fermentation temperatures, and cleaning up a flour-dusted kitchen. However, this revolutionary glass bowl seeded bread recipe changes everything. By eliminating the traditional kneading process and utilizing small, heat-resistant glass bowls for both proofing and baking, this method streamlines home baking into an accessible, low-mess joy. Whether you are a seasoned baker looking for a convenient weekday loaf or a complete beginner eager to slice into your very first homemade creation, this recipe delivers a perfect, golden crust and a tender, nutrient-dense crumb every single time.
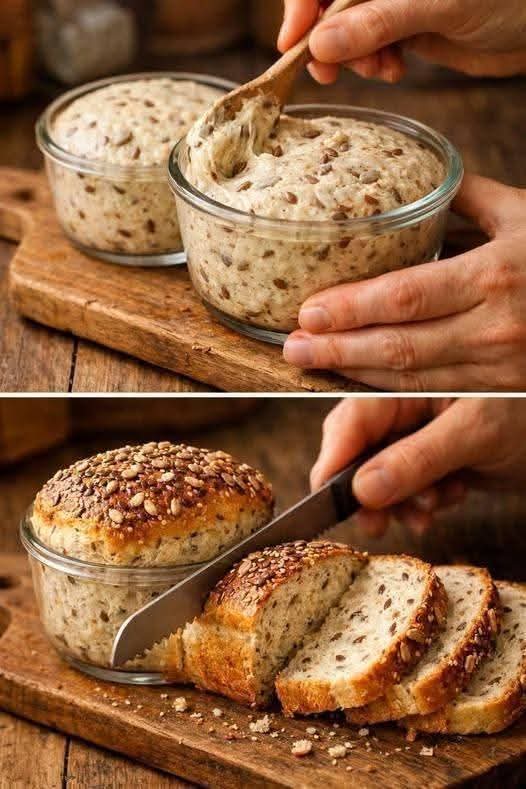
The secret to this bread’s incredible texture and flavor lies in its high hydration level and the addition of a robust blend of seeds. Flaxseeds, sunflower seeds, and sesame seeds are incorporated directly into the dough and generous sprinkled on top, creating a beautiful contrast between the soft, airy interior and the crunchy, nutty crust. Baking the bread directly in glass bowls ensures even heat distribution, allowing the dough to rise vertically and form a perfectly uniform, sliceable shape that is ideal for morning toast, sandwiches, or pairing with warm winter soups.
Why Bake Bread in Glass Bowls?
Baking bread in glass containers, such as tempered glass or heatproof ramekins, offers several distinct advantages over traditional metal loaf pans. First and foremost, glass conducts heat incredibly evenly, which helps prevent the bottom of your loaf from burning before the center is fully cooked through. This uniform heat transfer promotes an even rise and helps develop a gorgeous, consistent golden-brown crust all the way around the loaf.
Another major benefit is visibility. When you use clear glass bowls, you can easily monitor the fermentation and proofing stages without disturbing the dough. You can see exactly how the air pockets are forming along the sides of the bowl and precisely when the dough has doubled in size. Furthermore, because the dough proofs and bakes in the exact same vessel, you significantly reduce the amount of kitchen cleanup required, making this an incredibly efficient baking method for busy households.
Choosing the Right Ingredients for Maximum Flavor and Nutrition
To achieve the perfect balance of a light, chewy crumb and a rich, nutty flavor profile, selecting high-quality ingredients is essential. Because this is a minimal-effort recipe, each component plays a critical role in the final structure and taste of the bread.
The Power of High-Protein Flour
The foundation of any great loaf of bread is the flour. For this no-knead glass bowl method, using unbleached bread flour with a high protein content (around 12% to 14%) is highly recommended. Protein is what reacts with water to create gluten networks, which give the bread its structure, chewiness, and ability to trap gas bubbles. While all-purpose flour can be used in a pinch, bread flour provides the necessary strength to support the heavy weight of the added seeds, ensuring your loaf rises beautifully instead of turning out dense and heavy.
Selecting and Prepping Your Seed Blend
Seeds do more than just add a delightful crunch to your bread; they infuse each bite with healthy fats, fiber, and essential minerals. For this recipe, a mixture of flaxseeds, sesame seeds, sunflower seeds, and pumpkin seeds works beautifully. Incorporating a portion of the seeds directly into the wet dough allows them to soften slightly during the proofing process, integrating seamlessly into the crumb. Reserving a generous handful to press onto the top of the dough just before baking creates a stunning, artisanal crust that toasts up beautifully in the oven.
Complete Ingredients Checklist
Before you begin mixing, gather all your ingredients to ensure a smooth, uninterrupted baking process. This recipe makes two small, individual-sized glass bowl loaves, which are perfect for slicing and sharing.
- Bread Flour: 3 cups (approx. 360 grams), unbleached and high-protein.
- Warm Water: 1.5 cups (approx. 350 ml), heated to between 105°F and 110°F to properly activate the yeast.
- Active Dry Yeast or Instant Yeast: 2.25 teaspoons (one standard packet).
- Honey or Maple Syrup: 1 tablespoon to feed the yeast and add a subtle depth of sweetness.
- Salt: 1.5 teaspoons of fine sea salt or kosher salt for flavor development and gluten strengthening.
- Mixed Seeds: 1/2 cup total (a combination of flaxseeds, sunflower seeds, chia seeds, and sesame seeds), plus 2 tablespoons extra for the topping.
- Olive Oil or Melted Butter: 1 tablespoon for greasing the glass baking bowls.
Step-by-Step Instructions for Glass Bowl Seeded Bread
Follow these detailed steps carefully to achieve a flawless rise and an incredible, crispy crust. The beauty of this recipe is its simplicity, but paying close attention to timing and temperature will ensure absolute success.
Step 1: Activating the Yeast
In a large mixing bowl, combine the warm water and the tablespoon of honey. Stir gently until the honey is fully dissolved. Sprinkle the active dry yeast evenly over the surface of the water. Let the mixture sit undisturbed for approximately 5 to 10 minutes. You will know the yeast is alive and active when a thick, frothy, and foamy layer forms on the surface of the water, accompanied by a distinct, pleasant yeasty aroma. If your water does not foam, your yeast may be expired or the water may have been too hot, and you will need to restart this step with fresh yeast.
Step 2: Mixing the No-Knead Dough
Once your yeast mixture is nice and frothy, add the fine sea salt and 1/2 cup of your mixed seed blend directly into the liquid. Stir briefly to distribute the seeds. Next, begin adding the bread flour one cup at a time, stirring continuously with a sturdy wooden spoon or a silicone spatula. Because this is a high-hydration, no-knead recipe, the dough will look quite shaggy, wet, and sticky. Keep stirring until all traces of dry flour disappear and a cohesive, sticky dough forms. Do not be tempted to add excess flour; the wet consistency is exactly what allows the dough to develop gluten naturally without physical kneading.
Step 3: The First Proof
Scrape down the sides of your mixing bowl. Cover the bowl tightly with a sheet of plastic wrap or a damp, clean kitchen towel to prevent the surface of the dough from drying out and forming a hard skin. Place the bowl in a warm, draft-free area of your kitchen. Allow the dough to ferment and rise for about 1 to 1.5 hours, or until it has clearly doubled in size and looks noticeably puffy, bubbly, and full of air.
Step 4: Preparing the Glass Bowls and Shaping
While the dough finishes its first rise, prepare your heatproof glass baking bowls. Use a pastry brush to generously coat the entire interior of two small glass bowls with olive oil or melted butter. This step is absolutely crucial to prevent the sticky dough from adhering permanently to the glass during the baking process. Punch down the risen dough gently to release excess gas. Divide the dough evenly into two portions using a dough scraper or a oiled spatula. Place one portion of dough directly into each greased glass bowl. The dough will still be quite sticky and loose, which is perfectly normal.
Step 5: The Second Rise and Top Seeding
Using the back of a damp spoon, gently smooth out the top surface of the dough in each glass bowl so it sits evenly. Generously sprinkle the remaining two tablespoons of mixed seeds over the top of each loaf, pressing down very lightly with your fingers or a spoon so the seeds adhere firmly to the wet dough. Cover the glass bowls loosely with a light kitchen towel and let them proof for a second time for about 30 to 45 minutes. During this time, the dough will expand, filling out the shape of the glass bowls and rising up toward the rims.
Step 6: Baking to Golden Perfection
While the loaves are completing their second rise, preheat your oven to 400°F (200°C). Once the oven is fully heated, place the uncovered glass bowls side by side on the center rack. Bake for approximately 30 to 35 minutes. Because you are using glass, you can easily look through the oven door to check on the progress. The bread is done when the top crust turns a deep, golden brown and the seeds are beautifully toasted. To verify doneness, carefully remove a bowl using oven mitts and tap the top crust; it should sound completely hollow.
Expert Tips for the Perfect Loaf
Achieving artisanal results at home is easy when you know a few simple baker’s secrets. Implement these tips to elevate your glass bowl seeded bread to the next level.
Managing Oven Moisture
If you want an exceptionally crispy, crackly crust that rivals your favorite local bakery, introduce moisture into your oven during the first fifteen minutes of baking. You can achieve this easily by placing a shallow metal baking pan on the bottom rack of your oven while it preheats. Right after you place your glass bowls on the center rack, carefully pour one cup of hot water into the hot metal pan on the bottom rack and quickly close the oven door. The resulting burst of steam keeps the surface of the dough pliable, allowing for maximum expansion and creating a beautifully thin, crispy exterior crust.
The Importance of Cooling Before Slicing
As tempting as it is to slice into a steaming hot loaf of bread straight out of the oven, exercising patience is vital. When you remove the bread from the oven, the interior crumb is still technically finishing its cooking process via trapped residual steam. If you cut into the loaf immediately, that steam escapes prematurely, which can collapse the delicate air pockets and result in a gummy, dense, and wet texture. Allow the loaves to sit inside the glass bowls for about 5 minutes, then gently tip them out onto a wire cooling rack. Let them cool completely for at least 30 to 45 minutes before slicing.
Delicious Ways to Serve and Store Your Seeded Bread
This versatile glass bowl seeded bread pairs beautifully with an endless variety of sweet and savory accompaniments, making it an excellent staple for any meal of the day.
Serving Suggestions
Because of its high seed content and sturdy texture, this bread makes an extraordinary base for gourmet avocado toast. Slice the cooled bread thinly, toast it until golden and crunchy, and top with mashed avocado, a squeeze of fresh lemon juice, a drizzle of extra virgin olive oil, and a pinch of red pepper flakes. It is also spectacular when sliced and served warm alongside a hearty bowl of vegetable soup, beef stew, or slathered with homemade berry jam and salted butter for a comforting afternoon treat.
Proper Storage Guidelines
To keep your homemade bread tasting as fresh as possible, store any leftovers correctly. Because this recipe contains absolutely no artificial preservatives or chemical additives, it will dry out faster than store-bought varieties. Wrap the completely cooled loaves tightly in plastic wrap, aluminum foil, or store them inside an airtight bread box at room temperature for up to three days. Avoid storing homemade bread in the refrigerator, as the cold environment accelerates staling and dries out the crumb. If you cannot finish the loaves within a few days, slice the bread completely, place the slices into a heavy-duty freezer bag, and freeze them for up to three months. You can pop individual slices directly from the freezer straight into your toaster for a quick and convenient breakfast.
Conclusion
Baking your own artisanal bread does not require specialized equipment, hours of intense physical labor, or a culinary degree. This glass bowl seeded bread recipe proves that with just a handful of simple ingredients, a couple of heatproof glass bowls, and a bit of patience, anyone can create a spectacular, bakery-quality loaf right in their own kitchen. The combination of nutrient-rich seeds, a beautifully aerated interior crumb, and a shattering, golden crust makes this no-knead method a true game-changer for home cooks everywhere. By bypassing the messy kneading process and utilizing the even heat distribution of everyday glass bowls, you can effortlessly integrate fresh, wholesome, homemade bread into your weekly routine. Gather your flour, activate your yeast, and enjoy the immensely satisfying experience of slicing into a warm, crunchy loaf of bread that you made completely from scratch.