The Ultimate Pan-Seared Cheese Breakfast Bread A Flaky Melt in Your Mouth Morning Treat
There is nothing quite like the smell of fresh dough hitting a hot skillet to wake up the senses. While standard toast or a plain bagel often serves as the morning default, the Pan-Seared Cheese Breakfast Bread offers an elevated, artisanal experience that is surprisingly easy to achieve in your own kitchen. This bread is defined by its incredible texture: a crisp, golden-brown exterior that shatters into delicate, buttery layers, revealing a warm, gooey cheese center. It sits somewhere between a savory pastry and a traditional flatbread, making it the perfect versatile canvas for a high-protein breakfast. Whether you are fueling up for a busy workday or enjoying a slow Sunday brunch, this cheese-stuffed bread provides a satisfying, hearty start that feels far more indulgent than its simple ingredient list suggests.
Why This Pan-Seared Bread is the Perfect Breakfast Solution
Breakfast often requires a balance between speed and nutrition. This recipe excels because the dough can be prepared in advance, allowing you to simply sear and serve when time is tight. Unlike oven-baked breads that can take nearly an hour, pan-searing takes only minutes, giving you that “fresh from the bakery” taste with stovetop convenience. Furthermore, this bread is a fantastic way to incorporate more wholesome fats and protein into your morning routine. By using high-quality cheeses and natural oils, you create a meal that keeps you full and focused until lunch. It’s also an incredibly kid-friendly option; the interactive “pull-apart” layers make it a fun and engaging way for families to eat together.
The Science of the Layers: Lamination for Beginners
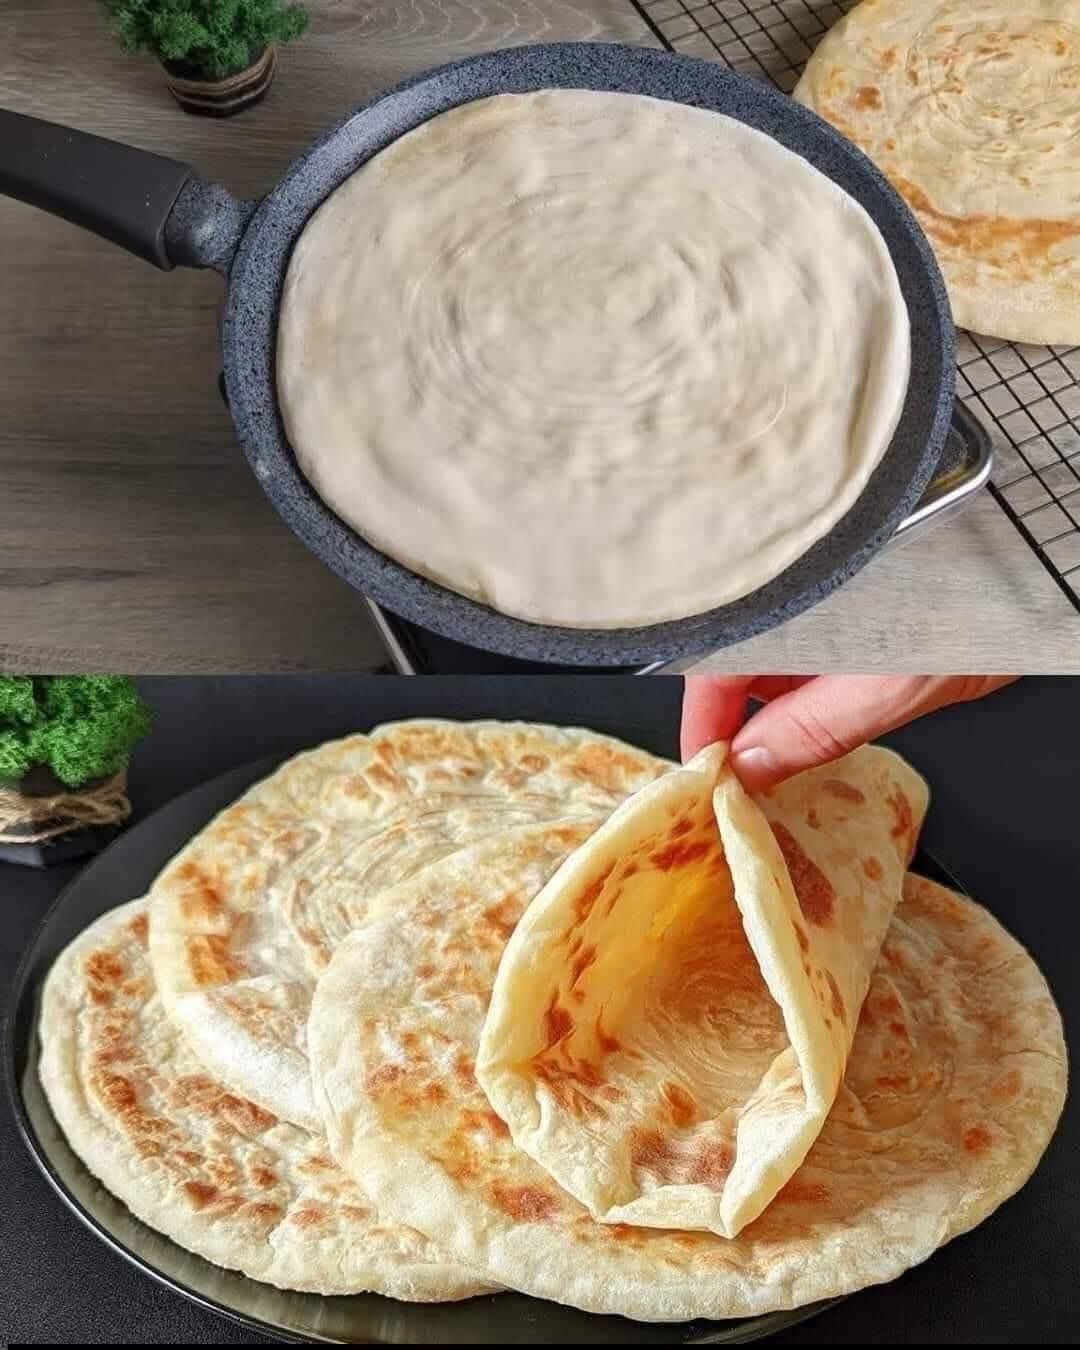
The secret to those beautiful, visible rings in the dough is a simplified lamination process. By rolling the dough thin, brushing it with a touch of oil, and rolling it into a spiral before flattening it again, you trap air and fat between thin sheets of flour. When the heat from the pan hits the dough, the moisture creates steam, pushing those layers apart. This creates the “flaky” effect that is often associated with much more difficult French pastries like croissants, but with a fraction of the technical difficulty.
Why Skillet Cooking Beats the Oven
Cooking this breakfast bread in a pan provides a unique “sear” that an oven simply cannot replicate. The direct contact with the hot surface creates “leopard spots”—those little charred bits of flavor that add a smoky, toasted depth to the bread. It also allows you to monitor the cheese melt perfectly, ensuring the interior is molten while the outside remains perfectly crisp.
Essential Ingredients for Cheese-Stuffed Breakfast Bread
You don’t need an expensive pantry to make world-class breakfast bread. Most of these ingredients are likely already in your kitchen.
- All-Purpose Flour: This provides the necessary structure and gluten for a stretchy, easy-to-work dough.
- Warm Water: Warmth is key for relaxing the gluten, making the dough easier to roll out into those thin, translucent layers.
- Salt and a Pinch of Sugar: Salt is for flavor, while the sugar helps the bread achieve a beautiful golden-brown color in the pan.
- Melting Cheese: Mozzarella is the gold standard for that classic “cheese pull,” but a sharp cheddar or a salty feta can add a sophisticated twist.
- Oil or Ghee: Used for both the dough layers and the searing process. Ghee provides a wonderful nutty aroma if you have it on hand.
- Optional Aromatics: Consider adding finely chopped green onions, a dash of garlic powder, or even a sprinkle of red pepper flakes into the layers for an extra morning kick.
Step-by-Step: Mastering the Pan-Seared Technique
Achieving that perfect flatbread look requires a little bit of patience and a few key movements.
- Prepare the Dough: Combine your flour, salt, sugar, and warm water. Knead until smooth—about 8 minutes. The dough should be soft and elastic, not sticky.
- The Crucial Rest: Let the dough rest for at least 30 minutes. This is the most important step; it prevents the dough from snapping back when you try to roll it out thin.
- The Spiral Fold: Roll a piece of dough into a very thin, large circle. Brush with oil and sprinkle your shredded cheese across the surface. Roll the circle up like a cigar, then twist that “cigar” into a tight spiral shape.
- Final Flattening: Gently roll the spiral flat again. You will see the cheese and the layers of dough trapped in a concentric circle pattern.
- The Searing Process: Heat a non-stick or cast-iron skillet over medium heat with a tiny bit of oil. Place the bread in the pan and cover it with a lid for the first 2 minutes. The lid traps steam, ensuring the cheese melts and the interior dough cooks through.
- The Golden Finish: Remove the lid, flip the bread, and cook for another 2-3 minutes until both sides are golden and crispy.
Customizing Your Breakfast Bread
One of the best things about this recipe is how easily it adapts to your personal taste or what you have left in the fridge.
The Protein Boost
To make this a more substantial meal, try adding very thin slices of smoked turkey or a layer of cooked, crumbled bacon inside the folds along with the cheese. The saltiness of the meat pairs perfectly with the buttery dough.
The “Green” Variation
If you want to sneak some vegetables into your morning, finely chopped spinach or kale can be folded into the layers. The steam inside the bread will perfectly wilt the greens, creating a “spanakopita” style breakfast that is packed with nutrients.
Professional Tips for Success
If your bread feels a bit tough, it might be because the heat was too low, causing the bread to dry out before it browned. Keep your heat at a steady medium; you want to hear a gentle sizzle the moment the dough touches the pan. If you are making a large batch for the family, keep the finished breads in a warm oven (around 170°F) on a wire rack. Avoid stacking them directly on a plate while hot, as the steam from the bottom breads will make the top ones soggy. The wire rack allows air to circulate, keeping that crust shatteringly crisp.
Storing and Reheating
This bread is a meal-prep dream. You can shape the spirals, wrap them in plastic, and keep them in the fridge overnight. In the morning, just roll them flat and hit the pan. If you have already cooked leftovers, the best way to reheat them is back in a dry skillet or a toaster oven. Avoid the microwave, as it will make the beautiful layers chewy rather than crisp.
Conclusion: Elevate Your Morning Routine
The Pan-Seared Cheese Breakfast Bread is a testament to the idea that breakfast doesn’t have to be complicated to be extraordinary. By mastering a few simple folding techniques and understanding the power of a hot skillet, you can transform basic pantry staples into a gourmet meal. This bread offers a satisfying combination of textures and flavors that will satisfy everyone at the table. It’s hearty, comforting, and infinitely customizable. Next time you’re tempted to reach for a box of cereal, try your hand at this flaky, cheesy masterpiece instead. Once you taste the difference of fresh, pan-seared dough, your breakfast standards will be changed forever.