Vanilla Cupcakes Recipe The Ultimate Guide to Soft Fluffy Bakery Style Cupcakes at Home
Few desserts are as universally loved as vanilla cupcakes. Simple, elegant, and endlessly versatile, vanilla cupcakes are the foundation of countless celebrations, from birthdays and weddings to casual afternoon treats with tea or coffee. This classic vanilla cupcakes recipe delivers soft, fluffy, moist cupcakes with a delicate crumb and rich vanilla flavor, just like the ones you see in bakeries. Whether you are a beginner baker or an experienced home cook, this detailed guide will help you master perfect vanilla cupcakes every single time while also giving you tips, variations, storage advice, and decorating ideas to elevate your baking skills.
Why This Vanilla Cupcakes Recipe Works
This vanilla cupcakes recipe is carefully balanced to create cupcakes that rise beautifully, stay moist for days, and have a tender, fine crumb. The combination of butter for flavor, sugar for sweetness and structure, eggs for richness, milk for moisture, and high-quality vanilla extract creates a classic taste that never goes out of style. Proper mixing techniques and baking temperatures ensure that the cupcakes bake evenly without sinking or drying out.
Ingredients for Classic Vanilla Cupcakes
Dry Ingredients
All-purpose flour provides the perfect structure for light yet sturdy cupcakes. Baking powder is used as the leavening agent to help the cupcakes rise evenly. A pinch of salt enhances the overall flavor and balances the sweetness.
Wet Ingredients
Unsalted butter adds richness and a smooth mouthfeel. Granulated sugar sweetens the cupcakes and helps incorporate air when creamed with butter. Eggs bind the ingredients together and contribute to the soft texture. Whole milk adds moisture and tenderness, while pure vanilla extract delivers that iconic vanilla aroma and flavor.
Exact Vanilla Cupcakes Recipe Ingredients
2 cups all-purpose flour
2 teaspoons baking powder
1/4 teaspoon salt
1/2 cup unsalted butter, softened
1 cup granulated sugar
2 large eggs, room temperature
1 cup whole milk, room temperature
2 teaspoons pure vanilla extract
Step-by-Step Instructions for Perfect Vanilla Cupcakes
Preparing the Batter
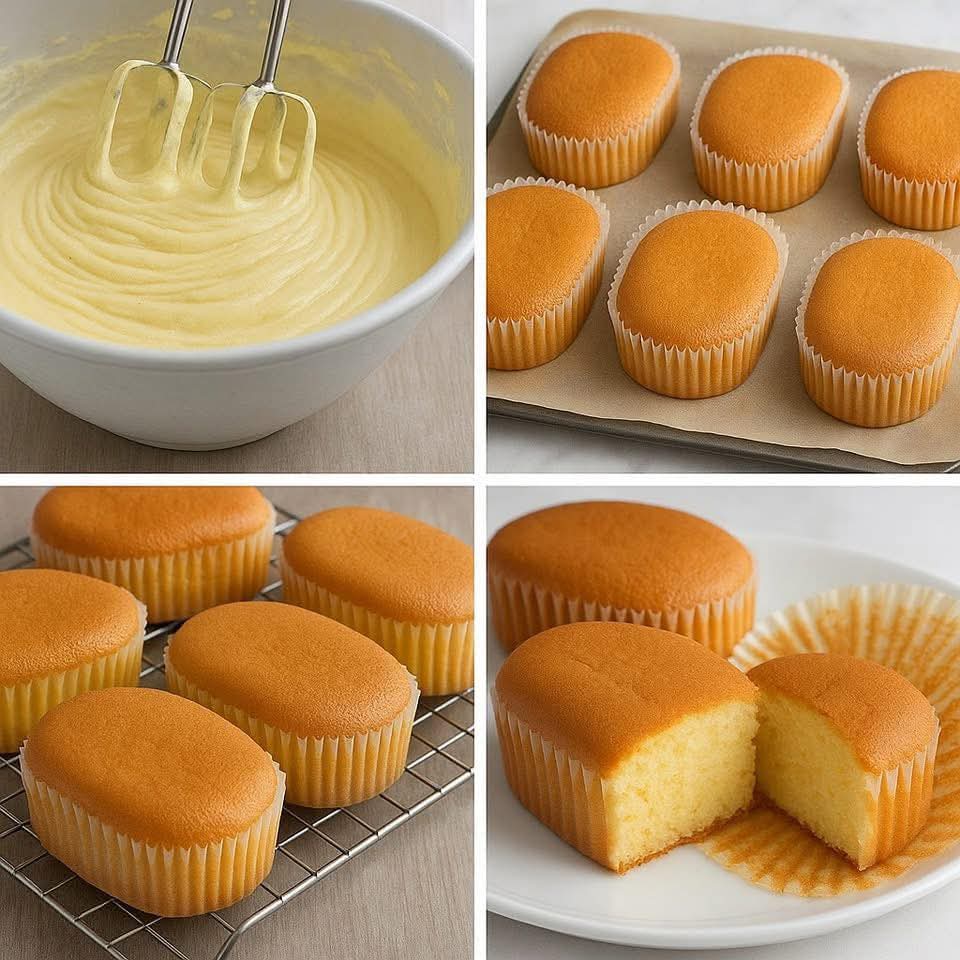
Start by preheating your oven to 180°C (350°F) and lining a muffin pan with cupcake liners. In a medium bowl, whisk together the flour, baking powder, and salt until well combined. Set aside. In a large bowl, cream the softened butter and sugar together using a hand mixer or stand mixer until light, pale, and fluffy. This step is crucial because it incorporates air into the batter, resulting in lighter cupcakes.
Add the eggs one at a time, beating well after each addition. This helps emulsify the batter and prevents curdling. Mix in the vanilla extract until evenly distributed. Gradually add the dry ingredients in three parts, alternating with the milk. Begin and end with the dry ingredients, mixing on low speed just until combined. Avoid overmixing, as this can lead to dense cupcakes.
Baking the Cupcakes
Divide the batter evenly among the cupcake liners, filling each about two-thirds full. This allows room for the cupcakes to rise without overflowing. Bake in the preheated oven for 18 to 22 minutes, or until a toothpick inserted into the center comes out clean or with a few moist crumbs. Remove the cupcakes from the oven and let them cool in the pan for 5 minutes before transferring them to a wire rack to cool completely.
How to Get Soft and Fluffy Vanilla Cupcakes Every Time
Achieving bakery-style vanilla cupcakes is all about technique. Always use room temperature ingredients to ensure smooth mixing and proper emulsification. Measure your flour accurately using the spoon-and-level method to avoid adding too much, which can make cupcakes dry. Do not overmix the batter once the flour is added, as this develops gluten and results in a tougher texture. Baking at the correct temperature and avoiding overbaking are also key to maintaining moisture.
Best Vanilla Frosting for Vanilla Cupcakes
Vanilla cupcakes pair beautifully with many types of frosting, but classic vanilla buttercream remains the most popular choice. Its creamy texture and sweet flavor complement the light vanilla sponge perfectly.
Simple Vanilla Buttercream Frosting
Unsalted butter is beaten until creamy, then powdered sugar is added gradually for sweetness and structure. A splash of milk or cream creates a smooth, spreadable consistency, while vanilla extract enhances the flavor. This frosting can be piped or spread easily and holds its shape well.
Vanilla Cupcake Variations You’ll Love
Chocolate Chip Vanilla Cupcakes
Fold in mini chocolate chips to the batter before baking for a delightful contrast of flavors and textures.
Lemon Vanilla Cupcakes
Add lemon zest and a tablespoon of lemon juice to the batter for a fresh, citrusy twist that pairs beautifully with vanilla.
Vanilla Cupcakes with Fruit Filling
Core the cupcakes after baking and fill them with strawberry jam, raspberry compote, or pastry cream for a surprise center.
Gluten-Free Vanilla Cupcakes
Substitute the all-purpose flour with a high-quality gluten-free baking blend designed for cakes. Ensure all other ingredients are gluten-free.
Decorating Ideas for Vanilla Cupcakes
Vanilla cupcakes are a blank canvas for creative decoration. Pipe buttercream in swirls using a star tip for a classic bakery look. Top with sprinkles, edible pearls, or chocolate shavings for added texture. Fresh berries or a drizzle of caramel or chocolate sauce can instantly elevate their appearance. For special occasions, use themed cupcake toppers or colored frosting to match the celebration.
How to Store Vanilla Cupcakes Properly
Unfrosted vanilla cupcakes can be stored in an airtight container at room temperature for up to two days. Frosted cupcakes should be stored in a cool place or refrigerated if the frosting is perishable. Bring refrigerated cupcakes to room temperature before serving to restore their soft texture and full flavor. Vanilla cupcakes also freeze well. Wrap them individually in plastic wrap and store in a freezer-safe container for up to three months.
Common Mistakes to Avoid When Making Vanilla Cupcakes
Overmixing the batter is one of the most common mistakes and leads to dense cupcakes. Using cold ingredients can cause the batter to curdle and bake unevenly. Opening the oven door too early may cause cupcakes to sink in the center. Overbaking dries out cupcakes, so always check for doneness a few minutes before the suggested baking time ends.
Nutritional Information for Vanilla Cupcakes
Vanilla cupcakes are an indulgent treat meant to be enjoyed in moderation. Each cupcake provides carbohydrates for energy, fats for richness, and a small amount of protein from eggs and milk. You can reduce sugar slightly or use lighter frosting options if desired, but the classic version is all about balance and enjoyment.
Frequently Asked Questions About Vanilla Cupcakes
Can I use oil instead of butter?
Yes, vegetable oil can be used for extra moisture, but butter provides superior flavor. A combination of both can also work well.
Can I make vanilla cupcakes ahead of time?
Absolutely. Bake the cupcakes a day in advance and frost them on the day of serving for the best texture and appearance.
Why did my cupcakes sink in the middle?
This usually happens due to overmixing, opening the oven door too early, or underbaking.
Conclusion: The Perfect Vanilla Cupcakes for Any Occasion
This vanilla cupcakes recipe is a timeless classic that belongs in every baker’s collection. With its soft, fluffy texture, rich vanilla flavor, and endless customization options, it is perfect for birthdays, holidays, parties, or simple everyday treats. By following the tips and techniques in this guide, you can confidently bake bakery-style vanilla cupcakes at home that look beautiful, taste incredible, and impress anyone who takes a bite. Whether you enjoy them plain, frosted, or filled, these vanilla cupcakes are guaranteed to become a favorite in your kitchen.