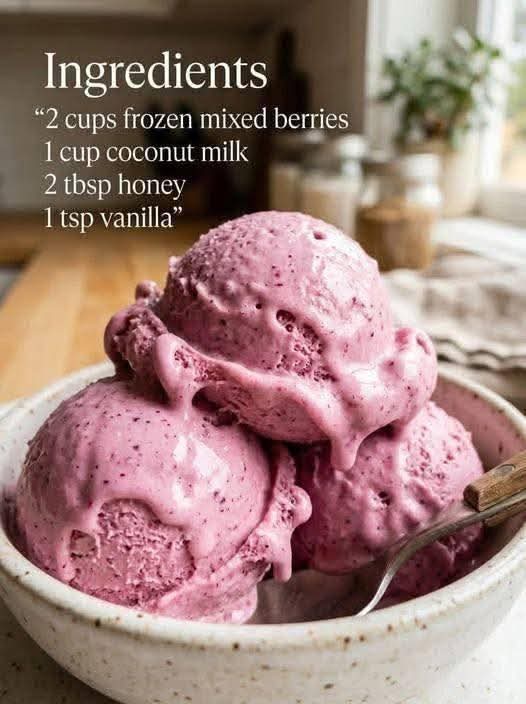
Ultimate 4 Ingredient Mixed Berry Nice Cream Recipe Easy Vegan Ice Cream
When the temperature rises or a late-night sweet craving strikes, few things are as satisfying as a cold, refreshing scoop of gourmet ice cream. However, traditional dairy ice cream is often packed with heavy cream, refined white sugars, and artificial stabilizers that can leave you feeling sluggish, bloated, or guilty about your dietary choices. If you are searching for a wholesome, plant-based alternative that delivers the exact same velvety texture and decadent mouthfeel without any of the dairy or guilt, making homemade mixed berry “nice cream” is the ultimate culinary solution. This comprehensive guide will show you how to transform four simple, natural pantry ingredients into a vibrant, purple scoop of pure frozen bliss that outshines anything in the grocery store freezer aisle.
Mastering a fast, blender-based frozen dessert recipe is a fantastic milestone for any home cook, holistic wellness enthusiast, or digital food publisher looking to connect with an audience hungry for vibrant, health-conscious comfort foods. The true magic of this recipe lies in its sheer simplicity and its accessibility. You do not need an expensive, bulky electric ice cream maker, nor do you need to spend hours cooking a delicate egg-custard base on the stovetop. By combining the natural freezing power of frozen mixed berries with the rich fats of coconut milk, this recipe yields a luxurious, soft-serve style texture in under five minutes flat. It is a clean, raw, and gluten-free treat that rewards your body with antioxidants while thoroughly satisfying your sweet tooth.
Why This 4-Ingredient Mixed Berry Nice Cream Works So Beautifully
The exceptional success of this dairy-free nice cream recipe comes down to a fundamental rule of food science: balancing ice and fat. Traditional nice creams rely entirely on frozen bananas as their creamy base, which is fantastic but always leaves behind a prominent banana flavor that can mask other delicate fruits. Our formula moves past the banana trend by utilizing high-quality canned coconut milk as the foundational lipid source. Coconut milk contains natural, healthy fats that surround the tiny ice crystals from the frozen berries, mimicking the smooth texture of heavy dairy cream and preventing the mixture from turning into a coarse, icy slush.
From a flavor perspective, this recipe achieves a brilliant, multi-dimensional balance between tartness and natural sweetness. Frozen mixed berries—typically a beautiful combination of strawberries, blueberries, raspberries, and blackberries—introduce a bright, refreshing acidity and a deep, royal purple hue. By pairing this natural tartness with raw honey and a splash of real vanilla extract, you soften the sharp edges of the fruit, creating a smooth, rounded flavor profile. The result is a beautifully balanced, premium frozen dessert that tastes like a high-end artisanal gelato rather than a simple blended fruit smoothie.
The Essential Ingredients for a Perfect Dairy-Free Scoop
The Berry Base: Frozen Mixed Berries
The absolute star of this recipe is the bag of frozen mixed berries, which acts as both the flavor foundation and the physical structure of the nice cream. Using frozen berries is completely non-negotiable here; they provide the thousands of microscopic ice crystals needed to build a thick, spoonable texture right inside your blender. A standard blend containing sweet blueberries, tart raspberries, deep blackberries, and classic strawberries gives you a broad spectrum of flavors and a massive dose of health-boosting antioxidants and vitamins with every single bite.
The Cream Factor: Full-Fat Coconut Milk
To achieve a genuinely luxurious, gourmet ice cream texture that feels indulgent on the tongue, the liquid you use to blend matters immensely. Full-fat canned coconut milk is the ultimate plant-based cream substitute because of its high fat content and naturally subtle sweetness. Before opening the can, give it a vigorous shake to ensure the thick coconut cream layer is completely emulsified with the watery liquid below. Avoid using carton-style coconut milk drinks from the dairy aisle, as they are heavily diluted with water and will cause your nice cream to turn out icy and thin.
Natural Liquid Gold and Warm Vanilla Notes
Instead of relying on processed cane sugars or high fructose syrups, this clean recipe utilizes raw honey to gently elevate the natural sweetness of the berries. Honey functions beautifully in frozen desserts because it remains fluid even at sub-zero temperatures, which naturally keeps the nice cream softer and easier to scoop. For a fully vegan variation, you can easily substitute pure maple syrup or agave nectar in an equal ratio. Finally, a single teaspoon of real vanilla extract introduces an aromatic warmth that ties the creamy coconut and tart berry notes together into a cohesive, comforting dessert.
Step-by-Step Instructions for Making Five-Minute Nice Cream
Step 1: Prepping Your Blender or Food Processor
To begin, ensure your high-speed blender container or food processor bowl is completely clean and dry. Working with a high-powered appliance is highly recommended for this recipe, as breaking down rock-hard frozen berries requires an engine with sufficient torque and sharp blades. If your blender comes equipped with a heavy-duty tamper tool, keep it close at hand; this tool will be essential for safely pushing the frozen fruit down into the spinning blades without needing to stop the machine constantly to scrape down the sides.
Step 2: Layering the Ingredients for an Optimal Blend
Open your bag of frozen mixed berries and measure out two level cups, pouring them directly into the bottom of the blender container. Next, pour in one cup of well-shaken, full-fat canned coconut milk, followed by two tablespoons of honey and one teaspoon of pure vanilla extract. Pouring the liquids directly over the frozen berries is a vital step; it allows the liquid to seep down into the gaps between the fruit, creating an immediate lubrication zone around the blade assembly that prevents the motor from stalling when you turn the machine on.
Step 3: Blending to a Thick Soft-Serve Consistency
Secure the lid tightly onto your blender and start the machine on its absolute lowest speed setting. As the blades begin to catch the fruit, gradually increase the speed to medium-high. Use your blender tamper to firmly push the ingredients from the corners of the container down toward the center. Within thirty to sixty minutes of continuous blending, you will hear the pitch of the motor shift as the ingredients transform from a noisy, clumpy texture into a smooth, silent vortex. Stop blending the absolute second you see a glossy, uniform, thick soft-serve consistency with no whole berries remaining. Over-blending will generate friction heat, causing your dessert to melt into a liquid smoothie.
Step 4: Serving Immediately or Hardening for Scooping
At this exact moment, your mixed berry nice cream is at an ideal, velvety soft-serve stage. You can immediately scoop it directly out of the blender into chilled bowls and enjoy it with a spoon for a light, refreshing treat. If you prefer a traditional, firm ice cream texture that can be rolled into beautiful, solid spheres using a professional ice cream scoop, use a silicone spatula to transfer the thick mixture out of the blender and into a metal loaf pan or an airtight freezer-safe container. Smooth the top flat, cover it securely, and place it in the freezer to harden for approximately one to two hours.
Pro Tips for the Creamiest Frozen Dessert
Keep Your Serving Bowls in the Freezer
Because this natural nice cream contains absolutely no chemical stabilizers, artificial emulsifiers, or gums to preserve its structure, it is highly sensitive to ambient room temperatures and will melt significantly faster than commercial store-bought ice cream. To combat this and give yourself more time to savor your creation, place your ceramic or glass serving bowls directly into the freezer for fifteen minutes before you begin blending. Serving your nice cream into a frosted, ice-cold bowl keeps the base firm and structurally intact from the very first spoonful to the very last.
Soften Hardened Nice Cream on the Counter
If you leave your mixed berry nice cream in the freezer for longer than a few hours, or store it overnight, the lack of heavy dairy sugars means it will freeze into a very solid block. Do not panic or try to force a metal spoon into the hardened dessert. Simply remove the container from the freezer and let it sit undisturbed on your kitchen counter at room temperature for five to ten minutes before serving. This brief resting period allows the healthy fats in the coconut milk to soften naturally, restoring that gorgeous, scoopable, velvety deli texture perfectly.
Experiment with Creative Texture Mix-Ins
Once you have mastered the foundational four-ingredient base, you can use this recipe as a launchpad for incredible flavor and texture variations. If you love a bit of texture contrast in your frozen desserts, stop the blender during the final ten seconds of blending and toss in a handful of dark chocolate chips, raw cacao nibs, unsweetened shredded coconut flakes, or a scoop of homemade fruit and nut granola. Briefly pulse the blender a few times to fold the mix-ins throughout the purple cream without pureeing them completely.
Troubleshooting Common Nice Cream Issues
| Problem | Likely Cause | Simple Solution |
|---|---|---|
| Blender blades are spinning but not catching | Air pocket formed around the blade assembly | Stop machine, use a spatula or tamper to press fruit down, or add 1 extra tablespoon of coconut milk. |
| Nice cream turned out too thin or runny | Over-blending generated too much friction heat | Stop blending immediately once smooth; freeze the mixture in a metal pan for 30 minutes to firm up. |
| Texture feels icy rather than creamy | Used low-fat or carton coconut milk | Always use premium canned full-fat coconut milk for the necessary lipid structure. |
| Flavor is muted or flat | Berries were under-ripe when frozen | Add an extra teaspoon of honey or a tiny squeeze of fresh lemon juice to brighten the fruit notes. |
Elegant Presentation and Storage Solutions
Beautiful Garnish and Topping Ideas
This mixed berry nice cream is visually stunning on its own due to its intense, natural berry pigmentation, but a few simple garnishes can transform it into a restaurant-quality showstopper. Top your scoops with a scattering of fresh, glossy red raspberries and a few blueberries to hint at the flavors hidden inside. A sprig of fresh green mint adds a beautiful color contrast and an aromatic freshness, while a delicate drizzle of extra honey or a dusting of shaved dark chocolate over the top creates an elegant, irresistible presentation that is perfect for summer dinner parties or social media content.
Proper Long-Term Freezer Storage Guidelines
While nice cream is undeniably at its absolute peak of flavor and texture on the day it is freshly blended, you can easily store any leftover portions for future enjoyment. Transfer the nice cream into an airtight, shallow container and press a layer of plastic wrap directly onto the surface of the cream before sealing the lid; this step is crucial as it prevents ambient moisture from forming frost or freezer burn over the top. Stored properly, your healthy berry nice cream will remain delicious and safe to consume for up to two full weeks, providing a ready-to-scoop, nutritious dessert whenever a craving arises.
Conclusion
Creating your own 4-ingredient mixed berry nice cream is a deeply satisfying, effortless way to indulge your love for frozen treats while prioritizing clean, plant-based nutrition. By combining the natural antioxidant power of frozen summer berries with the rich, velvety structure of premium coconut milk, you eliminate the need for dairy, refined sugars, and hours of tedious preparation. Whether you are whipping up a rapid soft-serve treat to cool down on a warm afternoon or scooping elegant, deep-purple rounds for a family gathering, this foolproof recipe delivers an unparalleled combination of vibrant flavor and silky texture. Load up your blender, pour in the golden honey, and enjoy the clean, refreshing satisfaction of a truly wholesome homemade masterpiece.