The Ultimate French Apple Cake Custardy Easy and Elegant
There is something uniquely comforting about a dessert that transforms humble, everyday ingredients into a masterpiece of texture and flavor. This French apple cake does exactly that. Unlike traditional American apple cakes that feature a dense, spiced crumb packed with a few fruit chunks, this European classic flips the ratio entirely. It is a dessert where the apples take center stage, held together by a rich, velvety batter that bakes into a delicate, custard-like consistency. If you have been searching for a reliable, show-stopping dessert that requires zero complex baking skills, this recipe is your answer.
Every single slice offers a beautiful contrast between tender, thinly sliced apples and a melt-in-your-mouth cake base. It is elegant enough to serve at a formal dinner party, yet simple enough to whip up on a casual Sunday afternoon. Because it relies heavily on fresh fruit, it tastes remarkably light, making it the perfect sweet finale to any meal. In this comprehensive guide, we will break down everything you need to know to achieve the perfect bake, from selecting the absolute best apple varieties to mastering the signature custardy texture.
Why This Apple Cake Recipe Works So Well
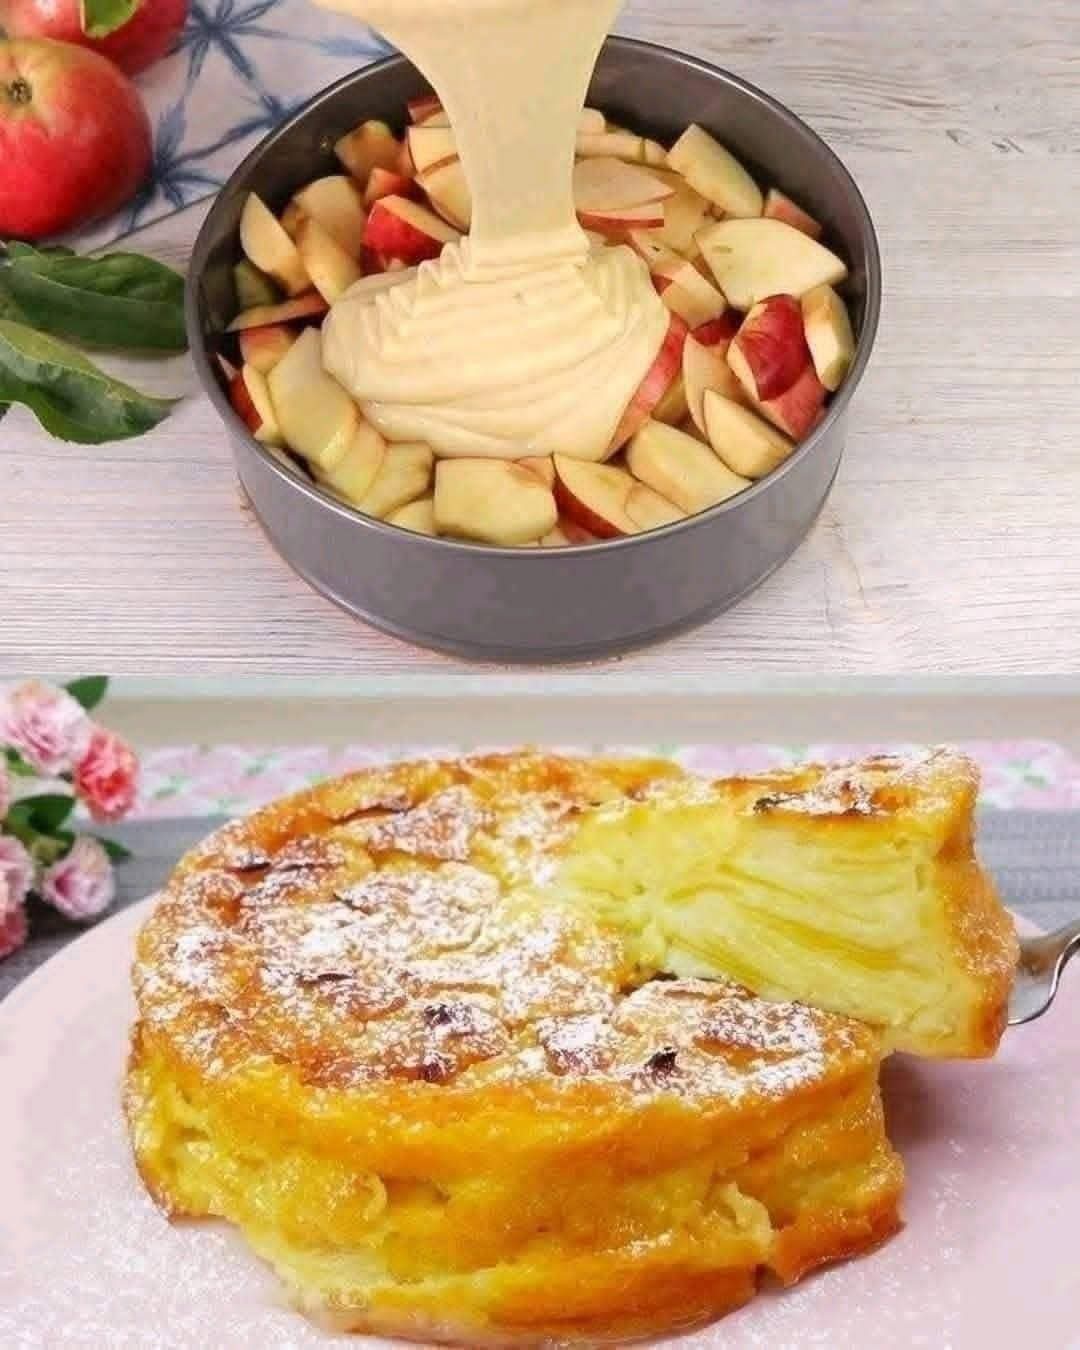
The secret to this cake lies in its brilliant technique. Instead of folding apples into a thick dough, you slice the fruit thin and submerge it in a loose, crepe-like batter. As the cake bakes in the oven, the apples release their natural sugars, softening into tender layers while the batter fills the gaps, baking up into a delicate, custardy structure.
It is also an incredibly forgiving recipe. You do not need an electric mixer, a fancy stand mixer, or any advanced pastry techniques to pull it off. A simple hand whisk and a couple of mixing bowls are all it takes to prepare the batter. Furthermore, this recipe relies on pantry staples that you likely already have in your kitchen, meaning you can satisfy your dessert cravings at a moment’s notice without making an extra trip to the grocery store.
Choosing the Best Apples for Baking
The choice of fruit is the most critical factor in determining the success of your cake. Because apples make up the vast majority of this dessert, you want a variety that can hold its shape during baking without turning into applesauce, while still delivering a balanced flavor profile.
Top Apple Varieties to Use
- Honeycrisp: These are exceptional for baking because they offer a perfect balance of sweet and tart flavors while maintaining a wonderful, crisp texture that resists breaking down completely.
- Granny Smith: If you prefer a dessert that is not overly sweet, Granny Smith apples provide a sharp, bright tartness that cuts through the richness of the egg-and-butter batter beautifully.
- Braeburn or Jonagold: Both of these varieties handle oven heat incredibly well, offering a classic, robust apple flavor and a firm texture that creates beautiful layers inside the cake.
Varieties to Avoid
It is best to steer clear of softer varieties like Red Delicious, McIntosh, or Gala for this particular recipe. These apples tend to become overly mealy, mushy, and watery when exposed to prolonged heat. Using them will introduce too much moisture into the cake, which can prevent the custard batter from setting properly, leaving you with a soggy center rather than a creamy, structured slice.
Essential Kitchen Tools for Success
Before you begin gathering your ingredients, it helps to ensure you have the right tools ready on your counter. Having these items on hand will make the preparation process smooth, quick, and efficient.
- Springform Pan: A 8-inch or 9-inch springform pan is highly recommended for this recipe. The removable sides allow you to release the delicate, fruit-heavy cake cleanly without having to flip it upside down, which would ruin the beautiful, golden top.
- Mandoline Slicer or Sharp Chef’s Knife: Consistency is key when slicing your fruit. A mandoline ensures perfectly even, thin slices that bake at the identical rate, though a sharp knife and a steady hand work just fine.
- Whisk and Mixing Bowls: You will need one large bowl for tossing the apples and another medium bowl for assembling your liquid ingredients and flour.
- Parchment Paper: Lining the bottom and sides of your baking pan prevents the natural sugars from the apples from sticking, ensuring a flawless release every time.
Ingredients You Will Need
To create this rustic, elegant dessert, you will need a handful of simple, high-quality ingredients. Ensure your cold items are brought to room temperature before you start, as this helps the batter emulsify smoothly.
- Fresh Apples: 4 to 5 large apples, peeled, cored, and sliced very thin.
- All-Purpose Flour: 1 cup, leveled correctly to provide just enough structure to bind the fruit.
- Granulated Sugar: 3/4 cup, adjusted slightly depending on how naturally sweet your chosen apples are.
- Unsalted Butter: 1/2 cup (1 stick), melted and cooled slightly to add richness and a velvety mouthfeel.
- Whole Milk: 1/2 cup, room temperature, which forms the hydrating liquid base for the custard.
- Large Eggs: 2 or 3 eggs, room temperature, providing structure, lift, and the signature creamy texture.
- Baking Powder: 1 teaspoon, to give the thin batter just a slight, delicate lift around the fruit.
- Pure Vanilla Extract: 1 to 2 teaspoons, to impart a warm, aromatic background flavor.
- Salt: 1/4 teaspoon, to balance the sweetness and enhance the natural fruit flavors.
- Powdered Sugar: For dusting over the cooled cake before serving.
Step-by-Step Instructions: How to Bake the Perfect Custard Apple Cake
Step 1: Prep Your Oven and Pan
Preheat your oven to 350°F (175°C). Position your oven rack right in the center to ensure even heat distribution. Lightly grease the bottom and sides of your springform pan with butter or non-stick spray, then line the bottom with a round of parchment paper.
Step 2: Slice the Apples
Peel your apples thoroughly, cut them into quarters, and carefully remove the cores. Using your mandoline or a sharp knife, cut the apples into very thin slices, roughly an eighth of an inch thick. Place the sliced fruit into a large mixing bowl and set it aside.
Step 3: Whisk the Dry Ingredients
In a medium bowl, whisk together the all-purpose flour, baking powder, and salt until completely combined and free of any large clumps. Set this dry mixture aside for a moment.
Step 4: Build the Custard Batter
In a separate bowl, vigorously whisk the eggs and granulated sugar together until the mixture turns pale yellow, slightly thickened, and frothy. Whisk in the melted butter, whole milk, and vanilla extract until smooth. Slowly add the dry flour mixture to the wet ingredients, whisking gently just until a smooth, lump-free, liquid batter forms.
Step 5: Combine Batter and Fruit
Pour the liquid batter directly over your bowl of sliced apples. Using a large rubber spatula, very gently fold the apples into the batter. Ensure that every single slice is thoroughly coated. The mixture will look like a mountain of apples with just a small amount of liquid holding them together; this is exactly how it should look.
Step 6: Assemble and Bake
Transfer the coated apple slices into your prepared springform pan, smoothing down the top with your spatula so the fruit lays flat and even. Pour any remaining batter from the bowl evenly over the top. Place the pan in the preheated oven and bake for 50 to 60 minutes. The cake is done when the top turns a beautiful, deep golden brown and a toothpick inserted into the center comes out clean with no wet, unbaked batter attached.
Step 7: Cool and Release
Remove the cake from the oven and place the pan on a wire cooling rack. Allow it to cool inside the pan for at least 30 minutes. Once the cake has cooled and firmed up slightly, gently run a thin knife along the inside edge to loosen any stuck spots, then unlatch and remove the springform ring. Allow the cake to cool completely to room temperature before transferring it to a serving plate.
Pro Tips for the Absolute Best Results
Achieving the perfect balance between fruit and custard requires attention to a few small details. Follow these professional tips to elevate your baking results instantly.
Don’t Overmix the Batter
When adding your dry ingredients to the wet egg mixture, whisk only until the flour disappears. Overmixing develops the gluten in the flour, which can turn a delicate, creamy custard texture into a tough, rubbery cake.
Let the Cake Cool Completely
It can be incredibly tempting to slice into this fragrant cake while it is hot out of the oven, but patience pays off. As the cake cools, the internal custard sets and stabilizes. Slicing it warm will cause it to lose its shape and fall apart; cooling guarantees clean, beautiful, defined layers of apple in every single portion.
Customize Your Flavor Profile
While vanilla is classic, you can easily customize the flavor to match your personal preferences. Add a pinch of ground cinnamon or nutmeg for a cozy, warm autumn vibe. You can also swap out a tablespoon of the milk for dark rum, brandy, or calvados to infuse the custard with a sophisticated, traditional European twist.
How to Serve and Present Your French Apple Cake
Presentation adds an extra layer of enjoyment to any homemade dessert. Right before you intend to cut and serve the cake, place a small amount of powdered sugar into a fine-mesh strainer and dust it generously over the entire top surface. This creates a gorgeous, rustic contrast against the deep golden crust.
For a truly indulgent experience, serve each slice with a dollop of softly whipped heavy cream, a scoop of premium vanilla bean ice cream, or a generous drizzle of warm caramel sauce. The cake pairs wonderfully with a hot cup of black coffee, an espresso, or a glass of chilled dessert wine.
Troubleshooting Common Baking Issues
- The top is browning too quickly, but the center is still wet: This can happen if your oven runs slightly hot. Simply tent a piece of aluminum foil loosely over the top of the cake pan during the last 15 to 20 minutes of baking to protect the surface while allowing the center to cook through.
- The cake turned out soggy or watery: This is typically caused by using overly juicy, soft apple varieties or slicing the apples too thick. Ensure you stick to firm baking apples and slice them thin so excess moisture evaporates cleanly during the baking process.
- The cake won’t release from the pan: Make sure you line the bottom with parchment paper and grease the sides well. Running a thin plastic spatula or knife around the perimeter before opening the springform latch resolves this issue easily.
Storage and Reheating Guidelines
If you happen to have leftover cake, it stores beautifully. Wrap the cake pan tightly with plastic wrap or transfer individual slices to an airtight container.
Refrigeration
Because of the high egg and milk content in the custard base, this cake must be stored in the refrigerator. It will keep beautifully for up to 3 to 4 days. In fact, many bakers find that the flavors deepen and the texture improves after a day in the fridge.
Freezing
Freezing is not recommended for this particular dessert. The delicate, creamy custard structure tends to break down upon thawing, releasing moisture and leaving the cake with a spongy, watery texture.
Reheating
You can enjoy leftovers straight from the refrigerator, as the cold emphasizes the creamy, custard-like texture. However, if you prefer it warm, simply place a slice on a microwave-safe plate and heat it on low power for 15 to 20 seconds, or warm it in a 300°F (150°C) oven for about 8 minutes until heated through.
Conclusion: A Simple Dessert Worth Sharing
Baking a spectacular dessert does not require hours of meticulous kitchen labor or specialized pastry training. This French apple cake relies on simple techniques, easily accessible pantry staples, and a generous amount of fresh fruit to create something truly extraordinary. By prioritizing the correct apple varieties, slicing your fruit thinly, and letting the cake cool properly before serving, you will achieve an elegant, custardy dessert that will impress anyone who takes a bite. Gather your ingredients, dust off your springform pan, and enjoy the process of creating a classic sweet treat that celebrates the comforting flavor of fresh apples.