Homemade Tutti Frutti Liquid Extract The Ultimate Guide to Making and Using Vibrant Fruit Syrup
Finding unique, flavorful, and visually stunning ingredients to elevate your home baking and beverage game can completely transform your kitchen creations. If you are looking for a way to add an explosion of tropical flavor and a burst of festive color to your recipes, learning how to make a homemade tutti frutti liquid extract is the perfect project. This versatile, vibrant syrup captures the essence of candied fruits suspended in a luscious, naturally sweet base. It bridges the gap between a rich fruit coulis, a mixologist’s simple syrup, and a concentrated baking extract.
Making your own extracts and fruit syrups at home allows you to bypass the artificial preservatives, high-fructose corn syrup, and synthetic food dyes that dominate store-bought options. Instead, you get a clean, intensely aromatic liquid that carries the nostalgic, sweet flavor of classic tutti frutti. Whether you want to drizzle it over warm pound cakes, stir it into refreshing summer mocktails, or bottle it up as beautiful, handcrafted gifts for friends and family, this comprehensive guide will take you through every step of the process.
Below, you will find everything you need to know about crafting this stunning golden elixir, from selecting the perfect base fruits to mastering the preservation techniques that keep your bottles fresh for months.
What is Tutti Frutti Liquid Extract?
To appreciate this recipe, it helps to understand what “tutti frutti” actually means. Originating from the Italian phrase for “all fruits,” tutti frutti traditionally refers to a colorful mixture of various chopped fruits, often candied or macerated in brandy, sugar, and spices. In many parts of the world, particularly in India and Europe, tutti frutti consists of small, brightly dyed cubes of candied papaya or watermelon rind used to speckle cakes, cookies, and ice cream.
A tutti frutti liquid extract takes those beloved flavor profiles and concentrates them into a pourable, highly aromatic syrup. Instead of a clear, alcohol-based extract like standard vanilla, this recipe creates a rich, textured fruit nectar packed with tiny, colorful gems of suspended fruit. The golden-orange base liquid is typically made from a blend of citrus, passionfruit, or mango, while the suspended multi-colored pearls provide delightful bursts of texture and flavor with every pour.
The result is a multi-sensory ingredient that adds visual appeal, tropical aromatics, and a balanced sweetness to a wide variety of culinary applications. It is thick enough to hold the fruit pieces in a beautiful suspension, yet fluid enough to pour cleanly from a classic glass bottle.
The Secret to Achieving the Perfect Texture and Color
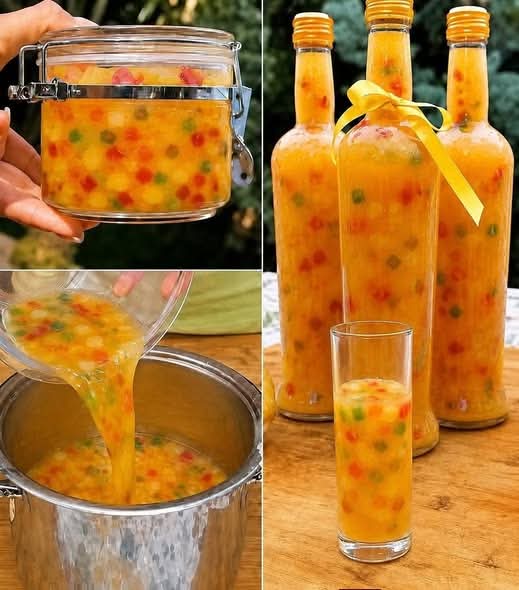
The most striking feature of this homemade extract is its appearance. When properly prepared, the liquid displays an opaque, glowing amber or deep orange color, dotted with tiny red, green, and yellow fruit pieces that remain evenly distributed throughout the bottle rather than sinking immediately to the bottom. Achieving this requires understanding a bit of kitchen science regarding liquid density.
If you simply mix chopped fruit into water or thin juice, gravity will pull the fruit to the bottom of the container within seconds. To keep the colorful pieces suspended, the base liquid must be gently thickened into a light syrup. This is accomplished by simmering the fruit juices with sugar and utilizing natural pectin, or by adding a very small amount of natural thickener, such as cornstarch or agar-agar, during the reduction phase.
The thickness should mimic a high-quality maple syrup or a light cordial. When you shake or tip the bottle, the suspended pieces should glide elegantly through the fluid. Additionally, choosing a bright orange or yellow fruit base—such as fresh mango puree, orange juice reduction, or passionfruit nectar—gives the extract its characteristic sunny glow, making it look like liquid sunshine on your kitchen counter.
Ingredients You Will Need
Crafting this extract requires a balance of aromatic base liquids, sweetening agents, and the signature multicolored fruit pieces. Gathering high-quality ingredients ensures your final product has a bright flavor profile without any chemical aftertaste.
The Aromatic Liquid Base
- 2 cups Freshly Squeezed Orange Juice: Provides a bright, citrusy foundation and natural acidity.
- 1 cup Mango Puree or Passionfruit Nectar: Gives the extract its rich, tropical aroma, deep golden color, and necessary body.
- 1/2 cup Water: Used to balance the sugars and control the reduction process.
- 1 tablespoon Lemon Juice: Adds a necessary touch of sharp acidity to balance the sweetness and preserve the natural colors of the fruit.
The Sweetener and Accents
- 1.5 cups Granulated White Sugar: Essential for creating the syrup consistency, enhancing shelf life, and locking in the fruit flavors.
- 1 teaspoon Pure Vanilla Extract: Adds a warm, comforting undertone that rounds out the sharp tropical notes.
- A pinch of Sea Salt: Just enough to amplify the natural fruit flavors without making the syrup taste salty.
The Tutti Frutti Inclusion Pieces
- 1.5 cups Mixed Candied Fruits (Tutti Frutti Peels): Finely minced into tiny, uniform cubes. You will want an equal mix of bright red, green, and yellow pieces. If you cannot find pre-made candied tutti frutti pieces, you can use finely chopped dried papaya, pineapple, and cherries soaked in warm water to rehydrate slightly before using.
Step-by-Step Guide to Making Tutti Frutti Liquid Extract
Follow these detailed steps carefully to ensure your syrup reduces to the correct consistency and your inclusions stay perfectly suspended.
Preparing the Fruit Base
Start by thoroughly washing your citrus fruits before juicing. Strain the fresh orange juice through a fine-mesh sieve to remove any heavy pulp, ensuring your final extract remains smooth and professional in texture. In a large, heavy-bottomed stainless steel saucepan, combine the strained orange juice, mango puree (or passionfruit nectar), water, and fresh lemon juice. Stir the liquids together until completely uniform.
Simmering and Reducing the Syrup
Place the saucepan over medium-high heat and bring the liquid mixture to a gentle boil. Once bubbling, stir in the granulated white sugar and the pinch of sea salt. Stir continuously for two to three minutes until the sugar crystals are completely dissolved.
Reduce the heat to low, allowing the liquid to drop to a steady, gentle simmer. Let the mixture simmer uncovered for approximately 15 to 20 minutes. Stir occasionally to prevent the sugars from scorching on the bottom of the pan. As the water evaporates, you will notice the liquid deepening in color and taking on a sleek, glossy sheen. To test the thickness, dip a metal spoon into the syrup; it should lightly coat the back of the spoon without running off instantly.
Incorporating the Colors and Aromatics
Once the syrup has reached the desired consistency, remove the saucepan from the heat source entirely. Stir in the vanilla extract, letting its warmth bloom through the tropical base. Next, add the finely minced multicolored candied fruit pieces to the hot liquid.
Stir the mixture gently but thoroughly to ensure the fruit gems are separated and distributed evenly throughout the golden syrup. Let the entire mixture sit in the pan for about 10 minutes. During this cooling phase, the dried or candied fruit pieces will absorb a small amount of the hot liquid, plumping up slightly and integrating into the density of the syrup.
Cool and Adjust
Allow the extract to cool completely to room temperature right in the pan. As it cools, the natural sugars and fruit pectins will set further, locking the colorful fruit pieces into their suspended state. Take a ladle and scoop a small amount to check the distribution. If the fruit pieces sink directly to the bottom after cooling, the syrup may be slightly too thin. You can remedy this by returning it to low heat with an extra tablespoon of sugar or a tiny splash of cornstarch slurry (1 teaspoon cornstarch dissolved in 1 teaspoon cold water) and simmering for another 2 to 3 minutes before cooling again.
Proper Sterilization and Bottling Techniques
Because this recipe relies on fresh fruit juices, maintaining impeccable hygiene during the bottling process is crucial for preventing spoilage and ensuring a long shelf life.
Sterilizing Your Glassware
Select high-quality, clear glass bottles with tight-fitting lids, swing-tops, or corks. Clear glass is highly recommended so that you can see the gorgeous colors of the suspended fruits inside. Before filling, wash the bottles, caps, and funnels thoroughly in warm, soapy water.
To sterilize, place the glass bottles into a large pot of boiling water for at least 10 minutes. Carefully remove them with clean tongs and let them air-dry upside down on a fresh paper towel. Alternatively, you can run your glassware through a high-heat sanitizing cycle in your dishwasher. Make sure the bottles are completely dry and cooled to room temperature before filling them.
Filling the Bottles
Using a sterilized, wide-mouth funnel, give your room-temperature tutti frutti extract one final, thorough stir to ensure the fruit pieces are perfectly distributed. Slowly ladle or pour the liquid into your prepared bottles. Leave about a half-inch of headspace at the top of each bottle to allow for any expansion.
Wipe the rims of the bottles with a clean, damp cloth to remove any sticky syrup residue before sealing them tightly. If you notice the fruit settling slightly right after pouring, simply turn the sealed bottle upside down and back upright a few times to redistribute the contents evenly.
How to Correctly Store Your Homemade Extract
To preserve the bright flavors and dazzling colors of your homemade tutti frutti liquid extract, proper storage conditions are essential.
Refrigeration is Key
Unlike commercial extracts made with high percentages of alcohol, this fruit juice-based syrup should be kept in the refrigerator. The cool temperature keeps the fruit pieces firm, prevents the natural juices from fermenting, and maintains the ideal thickness of the syrup. When stored in an airtight glass bottle in the back of the fridge, your extract will remain fresh, vibrant, and delicious for up to 2 to 3 months.
Can You Freeze It?
If you have made a large batch and want to preserve it for up to 6 months, you can freeze it. However, avoid freezing it inside narrow-necked glass bottles, as the liquid will expand and cause the glass to crack. Instead, freeze the syrup in durable, freezer-safe silicone molds or wide-mouthed plastic jars. When you are ready to use it, thaw it completely in the refrigerator and give it a vigorous shake to restore its uniform texture and fruit suspension.
Signs of Spoilage
Before using your extract, always give the bottle a quick look. If you notice any signs of mold growth around the rim, an unusually bubbly or fizzy texture (which indicates fermentation), or a sour, off-putting aroma, it is time to discard the batch and start fresh.
Creative Ways to Use Tutti Frutti Extract in Your Kitchen
Now that you have a stunning batch of golden, fruit-filled extract ready in your refrigerator, it is time to explore the endless culinary possibilities it offers. This ingredient functions as a flavor enhancer, a glaze, and a beautiful garnish all at once.
Elevating Baked Goods and Desserts
- Pound Cakes and Sponge Cakes: Poke small holes into a freshly baked vanilla or lemon pound cake and pour a generous amount of tutti frutti liquid over the top. The cake will absorb the tropical juices, keeping it incredibly moist while leaving a gorgeous speckling of colorful fruit on top.
- Cookie and Pastry Glazes: Mix two tablespoons of the clear liquid base with a cup of powdered sugar to create a glossy, colorful glaze for sugar cookies, danishes, or homemade baked donuts.
- Ice Cream and Yogurt Toppings: Drizzle the extract directly over a scoop of vanilla bean ice cream, frozen yogurt, or a morning bowl of Greek yogurt for an instant fruit-flavored upgrade.
Crafting Refreshing Drinks and Cocktails
- Tropical Summer Mocktails: Add two tablespoons of the extract to a glass packed with crushed ice, top it off with sparkling water or ginger ale, and garnish with a sprig of fresh mint for a quick, family-friendly summer drink.
- Festive Party Punches: Stir a whole bottle of the extract into a large punch bowl combined with pineapple juice, lemon-lime soda, and white grape juice to create an eye-catching party beverage where the colorful fruit pieces float beautifully throughout the bowl.
- Vibrant Cocktails: Use this liquid as a flavorful alternative to simple syrup in classic rum, vodka, or gin cocktails, adding a beautiful tropical twist and a pop of festive color to your home bar creations.
Troubleshooting Common Issues
Even experienced home cooks can run into slight consistency issues when dealing with fruit reductions. Here is how to fix the most common problems quickly.
Problem: The Fruit Pieces All Sink to the Bottom
- The Cause: Your syrup base is too thin or watery, meaning it lacks the density required to fight gravity and hold the weight of the candied fruit pieces.
- The Solution: Pour the extract back into a saucepan, add 2 to 3 tablespoons of sugar, and simmer it for an additional 5 minutes to reduce it further. Alternatively, whisk a teaspoon of cornstarch into a tablespoon of cold juice, stir it into the simmering syrup, and let it cook until it thickens slightly. Let it cool completely before rebottling.
Problem: The Extract is Too Thick to Pour
- The Cause: The syrup was boiled for too long, causing too much water to evaporate, or it was cooked over heat that was too high, turning the sugars toward a hard-candy stage.
- The Solution: Place the thickened mixture back into a saucepan over very low heat. Add a few tablespoons of warm water or fresh orange juice, stirring gently until the syrup thins out to a manageable, pourable consistency.
Problem: The Colors of the Fruit Pieces are Fading
- The Cause: Prolonged exposure to direct sunlight or overheating can break down the natural and food-grade pigments inside candied fruits.
- The Solution: Always store your finished bottles in a dark refrigerator rather than leaving them on a sunny kitchen counter. Additionally, ensure you always add the lemon juice called for in the recipe, as its natural citric acid acts as a stabilizer to help keep the colors looking sharp and bright.
Why Homemade Beats Store-Bought Every Time
Taking the time to create your own specialty ingredients like this tutti frutti liquid extract brings a profound sense of satisfaction to your culinary journey. Store-bought fruit syrups are frequently loaded with artificial flavorings designed to mimic fruit, along with stabilizers that give the liquid an unappealing, gel-like texture.
When you make it yourself, you are using the real power of citrus juices, pure vanilla, and genuine tropical fruit bases. You control the sweetness, the quality of the ingredients, and the cleanliness of the preparation.
Plus, the visual payoff of seeing those beautiful glass bottles lined up in your refrigerator—glowing with a warm amber light and packed with festive, floating gems—is unmatched. It is a simple, rewarding kitchen project that instantly injects professional flair, vibrant color, and incredible flavor into your daily cooking, baking, and entertaining.