The Ultimate One Pan Caramelized Apple Skillet Cake Recipe
There is a timeless comfort found in the aroma of warm cinnamon and baked apples wafting through a home. While elaborate layered cakes and intricate pastries have their place, sometimes the most satisfying desserts are those born from simplicity and a single cast-iron skillet or frying pan. This Caramelized Apple Skillet Cake—often referred to as an “upside-down” style stovetop cake—is the perfect marriage of rustic charm and gourmet flavor. It features tender, spice-kissed apple slices nestled beneath a soft, golden sponge that absorbs all the juices from the fruit as it bakes. The result is a dessert that is as beautiful to look at as it is delicious to eat.
Why This One-Pan Apple Cake is a Game Changer
In the modern kitchen, efficiency is just as valuable as flavor. What makes this recipe stand out is its “one-pan” philosophy. Traditional baking often involves multiple mixing bowls, cake tins, and a significant amount of cleanup. This method allows you to sauté and caramelize the apples directly in the same pan used for baking (or stovetop finishing). This process ensures that none of the delicious caramel created from the butter, sugar, and apple juices is lost. Everything stays in the pan, creating a self-saucing effect that keeps the cake incredibly moist for days.
The Magic of Caramelization
The secret to the deep, complex flavor of this cake lies in the initial step: caramelizing the apples. By cooking the apple wedges in butter and sugar before adding the batter, you trigger the Maillard reaction. This transforms the tartness of the raw fruit into a rich, honey-like sweetness with notes of toasted nuts and butterscotch. When the creamy batter is poured over these hot, bubbling apples, it sears the bottom layer, creating a distinct boundary between the fruit and the sponge that prevents the cake from becoming “soggy” while still remaining tender.
Versatility for Every Occasion
Whether you are looking for a show-stopping Sunday brunch centerpiece or a quick weeknight treat to use up a few stray apples in the fruit bowl, this recipe fits the bill. It is sophisticated enough to serve to guests with a dollop of whipped cream or a scoop of vanilla bean ice cream, yet simple enough that children can help with the stirring and pouring. Because it uses pantry staples like flour, eggs, and sugar, it is a high-reward dessert that doesn’t require a special trip to the grocery store.
Ingredients You Will Need
To achieve the perfect texture and flavor profile, it is important to choose ingredients that balance sweetness with structure.
- Apples: Use firm, tart varieties like Granny Smith, Honeycrisp, or Braeburn. These hold their shape during the cooking process and provide a necessary acidic contrast to the sweet batter.
- Unsalted Butter: High-quality butter provides the fat necessary for both the caramelization and the cake’s tender crumb.
- Granulated and Brown Sugar: We use a mix here. Brown sugar adds moisture and molasses depth to the apples, while white sugar keeps the cake light.
- All-Purpose Flour: This provides the structural foundation for the sponge.
- Large Eggs: Room temperature eggs emulsify better, leading to a more even rise.
- Warm Spices: Cinnamon is the star, but a pinch of nutmeg or ground cloves adds a “bakery-style” complexity.
- Baking Powder: To give the cake its fluffy, airy lift.
- Milk or Yogurt: This adds moisture and a slight tang that complements the fruit.
Choosing the Best Apples for Baking
Not all apples are created equal when it is time to hit the heat. “Eating apples” like Red Delicious tend to turn into mush when cooked, losing their structural integrity. For this skillet cake, you want an apple that offers a “bite.” Granny Smith is the gold standard because its high acidity prevents the dessert from becoming cloyingly sweet. If you prefer something a bit sweeter, Honeycrisp offers a fantastic crunch that survives the caramelization process beautifully. Regardless of the variety, ensure you peel and slice them into even wedges—about half an inch thick—to ensure they cook at the same rate.
Step-by-Step Instructions: From Pan to Plate
Step 1: Preparing the Apple Base
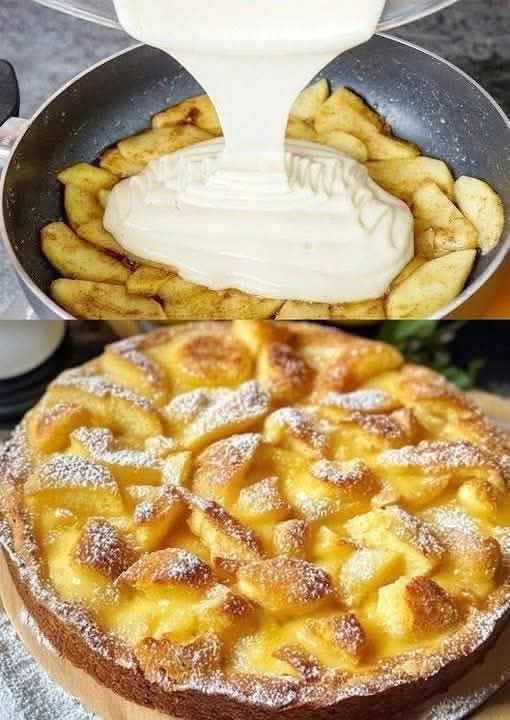
Place your skillet over medium heat and melt a generous knob of butter. Once bubbling, add your sliced apples and sprinkle them with brown sugar and a teaspoon of cinnamon. Sauté the apples for about 5–7 minutes. You are looking for them to become slightly translucent and for the sugar to turn into a thick, bubbling syrup. Once the apples are tender but not falling apart, arrange them in an even, circular pattern across the bottom of the pan.
Step 2: Mixing the Golden Batter
In a medium bowl, whisk together your eggs and granulated sugar until the mixture is pale and frothy. Slowly pour in your melted butter and milk, whisking constantly. Sift in the flour, baking powder, and a pinch of salt. Fold the dry ingredients into the wet until just combined—be careful not to overmix, as this can lead to a tough, dense cake. The batter should be thick, smooth, and pourable, resembling a heavy cream or pancake mix.
Step 3: The Pour and the Bake
Carefully pour the batter over the caramelized apples, starting from the center and moving outward. Use a spatula to gently spread the batter to the edges of the pan, ensuring all the apples are covered. If you are finishing this on the stovetop, cover the pan with a tight-fitting lid and turn the heat to low. Cook for 10–15 minutes until the top is set. If you prefer the oven method, slide the skillet into a preheated 350°F (175°C) oven for 20–25 minutes. The cake is done when a toothpick inserted into the center comes out clean.
Secrets to a Perfect Flip
The most exciting (and sometimes nerve-wracking) part of an upside-down cake is the reveal. To ensure your cake comes out in one beautiful piece, follow these pro tips:
- The Cooling Window: Let the cake sit in the pan for exactly 5 minutes after taking it off the heat. If you flip too soon, the caramel will be too liquid and run everywhere. If you wait too long, the sugar will harden and stick to the pan.
- Loosen the Edges: Run a thin knife or offset spatula around the perimeter of the cake to ensure no batter has stuck to the sides.
- The Commitment Flip: Place a large flat plate over the top of the skillet. Using oven mitts, firmly grasp both the skillet handle and the plate. In one swift, confident motion, invert the pan. Give the bottom of the skillet a few gentle taps before slowly lifting it away to reveal the glistening, caramelized apple crown.
Serving and Storage Suggestions
Elegant Presentation
To elevate this rustic dish, give it a light dusting of powdered sugar while it is still warm. This highlights the textures of the apples and the golden sponge. For a truly decadent experience, serve it alongside a dollop of crème fraîche or a salted caramel drizzle. The slight sourness of the crème fraîche cuts through the sweetness of the caramelized fruit perfectly.
Storing and Reheating
If you happen to have leftovers, this cake stores remarkably well. Keep it in an airtight container at room temperature for up to two days, or in the refrigerator for up to five. Because of the high fruit and moisture content, it actually stays softer than most traditional cakes. To reheat, simply pop a slice in the microwave for 15 seconds or place it in a toaster oven to crisp up the edges of the apples once more.
Frequently Asked Questions
Can I use a different fruit?
Certainly! This technique works beautifully with pears, peaches, or even pineapple. Just ensure the fruit is ripe but firm. Pears, in particular, pair wonderfully with ginger and cardamom if you want to switch up the spice profile.
My cake didn’t rise, what happened?
The most common culprit for a flat cake is expired baking powder or overmixing the batter. Ensure your leavening agents are fresh and only mix until the flour streaks disappear. Additionally, make sure your eggs are at room temperature to allow for maximum aeration during the whisking phase.
Is a cast-iron skillet necessary?
While a cast-iron skillet provides the best heat retention and a beautiful crust, any oven-safe non-stick frying pan will work. If you are using a thinner pan, keep a closer eye on the heat to prevent the sugar from burning.
Conclusion: The Ultimate Crowd-Pleaser
This One-Pan Caramelized Apple Skillet Cake is more than just a recipe; it is a testament to the idea that the best flavors often come from the simplest methods. It celebrates the natural sweetness of the harvest and the cozy appeal of home baking without the stress of complicated techniques. Whether you’re a seasoned baker or a novice in the kitchen, the sight of those golden, syrup-soaked apples emerging from the pan is guaranteed to bring a smile to your face. It is a dish that honors tradition while fitting perfectly into a busy modern lifestyle. So, the next time you find yourself with a few extra apples and a craving for something warm, reach for your favorite skillet and create a masterpiece that will have everyone asking for seconds.