Mini Cheeseburger Hand Pies The Ultimate Family Friendly Finger Food
When it comes to crowd-pleasing snacks, it is hard to beat the classic flavors of a juicy cheeseburger. But what if you could take those savory elements—seasoned beef and melted cheese—and wrap them in a flaky, buttery crust? Enter the Mini Cheeseburger Hand Pies. These portable pockets of joy are the perfect solution for game day appetizers, busy weeknight dinners, or even a fun addition to a school lunchbox.
Hand pies, also known as empanadas or pasties depending on where you are in the world, have been a culinary staple for centuries. By shrinking them down into “mini” versions, you create a versatile dish that is easy to handle and even easier to eat. This recipe skips the mess of a traditional burger bun and replaces it with a refrigerated pie crust, resulting in a gourmet-style snack that takes less than an hour to prepare.
In this detailed guide, we will explore how to create the perfect cheeseburger filling, the secret to a golden-brown crust, and the best ways to customize your hand pies to satisfy every member of the family.
Why You Will Love These Cheeseburger Hand Pies
There are several reasons why this recipe is destined to become a favorite in your household.
Maximum Convenience with Pantry Staples
This recipe is designed for the modern, busy cook. By using high-quality refrigerated pie crusts and pre-shredded cheese, you significantly cut down on prep time without sacrificing the “homemade” taste. Most of the ingredients are likely already in your refrigerator or pantry.
Perfectly Portable and Mess-Free
Traditional burgers can be messy, with toppings sliding out and juices dripping everywhere. Hand pies seal all that flavor inside a secure crust. This makes them the ideal food for parties where guests are standing, or for toddlers who tend to take burgers apart piece by piece.
Endless Customization
While we are focusing on the classic cheeseburger profile today, the “hand pie” format is incredibly forgiving. You can easily adapt the filling to include your favorite burger toppings, from bacon and jalapeños to mushrooms and Swiss cheese.
Essential Ingredients for Hand Pie Success
To achieve that perfect balance of savory beef and flaky crust, you need the right building blocks.
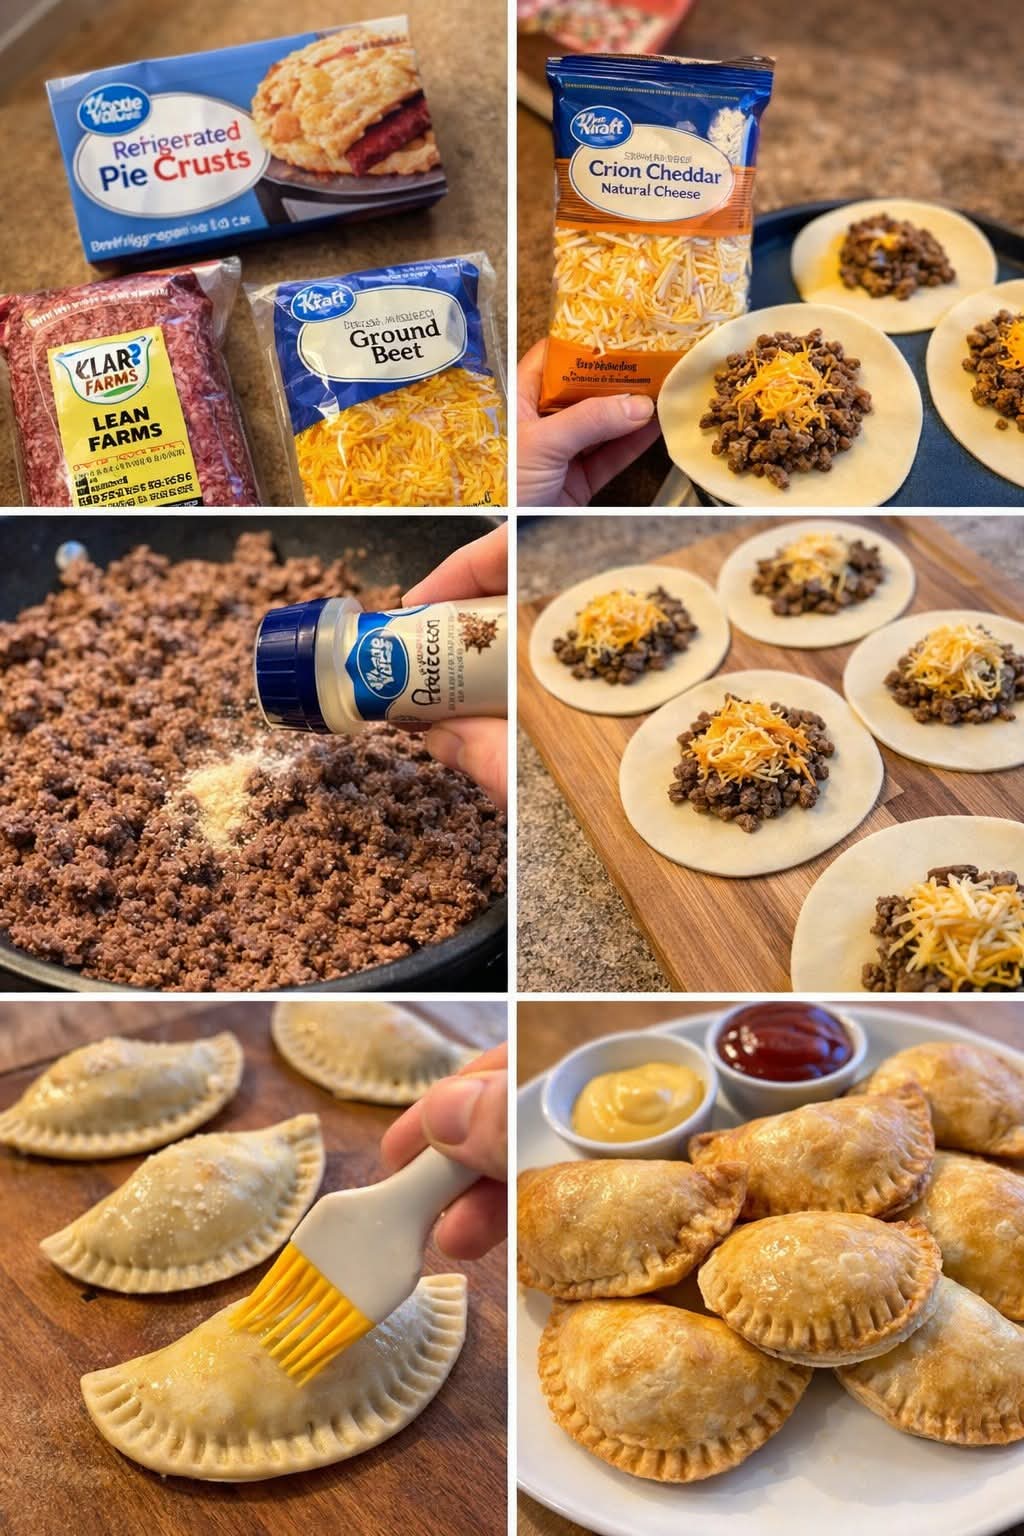
The Crust: Refrigerated Pie Crusts
Using a store-bought, refrigerated pie crust is the ultimate time-saver. These crusts are designed to be sturdy enough to hold a meat filling while remaining light and flaky once baked. Ensure they are at room temperature before you start working with them to prevent cracking.
The Filling: Lean Ground Beef
For hand pies, lean ground beef (90/10 or 93/7) is the best choice. Since the beef is sealed inside the dough, you want to minimize excess grease that could make the bottom of the pie soggy.
The Cheese: Shredded Cheddar
A sharp cheddar or a “Colby Jack” blend provides that iconic cheeseburger tang. Shredded cheese is preferred over slices because it melts more evenly and mixes into the meat better during the assembly process.
The Seasonings: Simple and Savory
A high-quality burger seasoning or a simple blend of garlic powder, salt, and pepper is all you need. Since the pie crust adds a buttery richness, you don’t want to over-complicate the spice profile of the beef.
The Finishing Touch: Egg Wash
A simple egg wash (one egg beaten with a teaspoon of water) is the secret to that professional, bakery-style golden sheen. Without it, your pies may look pale and dull even when fully cooked.
How to Make Mini Cheeseburger Hand Pies: Step-by-Step
Creating these savory pockets is a simple process that can be broken down into three main phases: filling, assembly, and baking.
1. Prepare the Beef Filling
Start by browning your ground beef in a skillet over medium heat. As it cooks, break it into very small crumbles. Drain any excess fat thoroughly. While the meat is still warm, add your seasonings—garlic powder, salt, and pepper—to ensure they are well incorporated. Let the meat cool slightly before moving to the next step; adding piping hot meat to cold dough can cause the crust to tear.
2. Cut the Dough Circles
Unroll your refrigerated pie crusts on a lightly floured surface. Use a round biscuit cutter or even a wide-mouth glass (about 3 to 4 inches in diameter) to cut out circles. You should be able to get several circles out of each crust. Don’t be afraid to re-roll the scraps once to get a few extra pies!
3. Assembly and Stuffing
Place a spoonful of the seasoned beef in the center of each dough circle. Top the beef with a generous pinch of shredded cheddar cheese. Be careful not to overfill; if the filling touches the edges of the circle, you won’t be able to get a good seal.
4. Seal the Edges
Fold the dough over to create a half-moon shape. Use your fingers to press the edges together firmly. For that classic look and an extra-secure seal, use the tines of a fork to “crimp” the edges. This prevents the cheese from leaking out as it melts in the oven.
5. The Egg Wash and Bake
Place the hand pies on a parchment-lined baking sheet. Brush the tops of each pie with your egg wash. This is also the time to add a tiny sprinkle of sesame seeds or coarse salt if you want to mimic a burger bun. Bake in a preheated oven at 400°F for about 12–15 minutes, or until the crust is a beautiful golden brown.
Pro-Tips for the Perfect Hand Pie
Follow these expert tips to ensure your first batch is a total success.
Prevent the “Soggy Bottom”
If you are worried about the bottom of your pies getting soft, you can pre-bake the baking sheet for a few minutes before placing the pies on it. Additionally, ensuring your meat is well-drained and slightly cooled is the best defense against a soggy crust.
Use a Small Amount of Filling
It is tempting to pack as much meat as possible into the dough, but “less is more” when it comes to sealing. A small, centered mound allows the dough to stretch and seal without stress, preventing the pies from bursting open during the baking process.
Don’t Skip the Steam Vent
While not strictly necessary for very small pies, poking one or two tiny holes in the top of each pie with a toothpick allows steam to escape. This helps keep the crust crisp and prevents the pie from puffing up too much.
Creative Variations to Try
The cheeseburger hand pie is just the beginning. Once you have the technique down, you can experiment with these fun variations.
The Bacon Cheeseburger Pie
Add finely chopped, crispy bacon bits to the beef mixture before assembling. The smokiness of the bacon adds an incredible layer of flavor.
The “Everything” Burger Pie
Stir in a teaspoon of yellow mustard, a dash of Worcestershire sauce, and some finely diced dill pickles into the beef filling. It tastes exactly like a classic fast-food burger in a flaky crust.
Mushroom and Swiss Hand Pies
Swap the cheddar for Swiss cheese and add some sautéed, finely chopped mushrooms to the beef. This creates a more “adult” version of the snack that is great for dinner parties.
Serving Suggestions: What to Dip With?
Part of the fun of hand pies is the dipping! Treat these like mini burgers and serve them with a variety of sauces.
Classic Condiments
Ketchup and yellow mustard are the obvious choices and never disappoint. You can serve them in small individual ramekins for easy dipping.
Special “Burger” Sauce
Mix together mayonnaise, ketchup, a splash of pickle juice, and a pinch of paprika to create a “secret sauce” that pairs perfectly with the beef and cheese filling.
Side Dishes
To make this a full meal, serve the hand pies alongside a batch of crispy french fries, a vinegar-based coleslaw, or even some fresh celery and carrot sticks with ranch dressing.
Storage and Reheating Tips
These hand pies are excellent for meal prepping as they store and reheat remarkably well.
Refrigerating
Store any leftover hand pies in an airtight container in the fridge for up to 4 days.
Freezing
You can freeze these pies either before or after baking. To freeze unbaked, place them on a tray until solid, then transfer to a freezer bag. Bake from frozen, adding about 5–8 minutes to the total baking time.
Reheating for Maximum Crunch
To keep the crust flaky, avoid the microwave if possible. Reheat the pies in an air fryer at 350°F for 3-4 minutes or in a toaster oven. This will restore the “fresh-baked” crunch that the microwave would otherwise turn soggy.
Frequently Asked Questions (FAQs)
Can I use puff pastry instead of pie crust?
Absolutely! Puff pastry will result in a much lighter, airier, and more “shattered” crust. It is a delicious variation, though the pies will be a bit more delicate.
What if my dough is sticking to the counter?
Make sure to lightly dust your work surface and your rolling pin with flour. If the dough gets too warm and becomes sticky, pop it back into the fridge for 10 minutes to firm up.
Can I make these in the air fryer?
Yes! Hand pies cook beautifully in the air fryer. Cook at 375°F for 8–10 minutes, or until golden. Make sure not to crowd the basket so the air can circulate around the entire pie.
Conclusion
Mini Cheeseburger Hand Pies are the perfect intersection of convenience and comfort. They take the flavors we all know and love and package them into a sophisticated, easy-to-serve format that works for almost any occasion. Whether you are hosting a large party or just looking for a way to spice up your Tuesday night dinner, these savory pastries are sure to satisfy. With their flaky crusts, melty cheese, and seasoned beef, they prove that the best things really do come in small packages. Grab a box of pie crust and some ground beef this weekend and discover your new favorite snack!