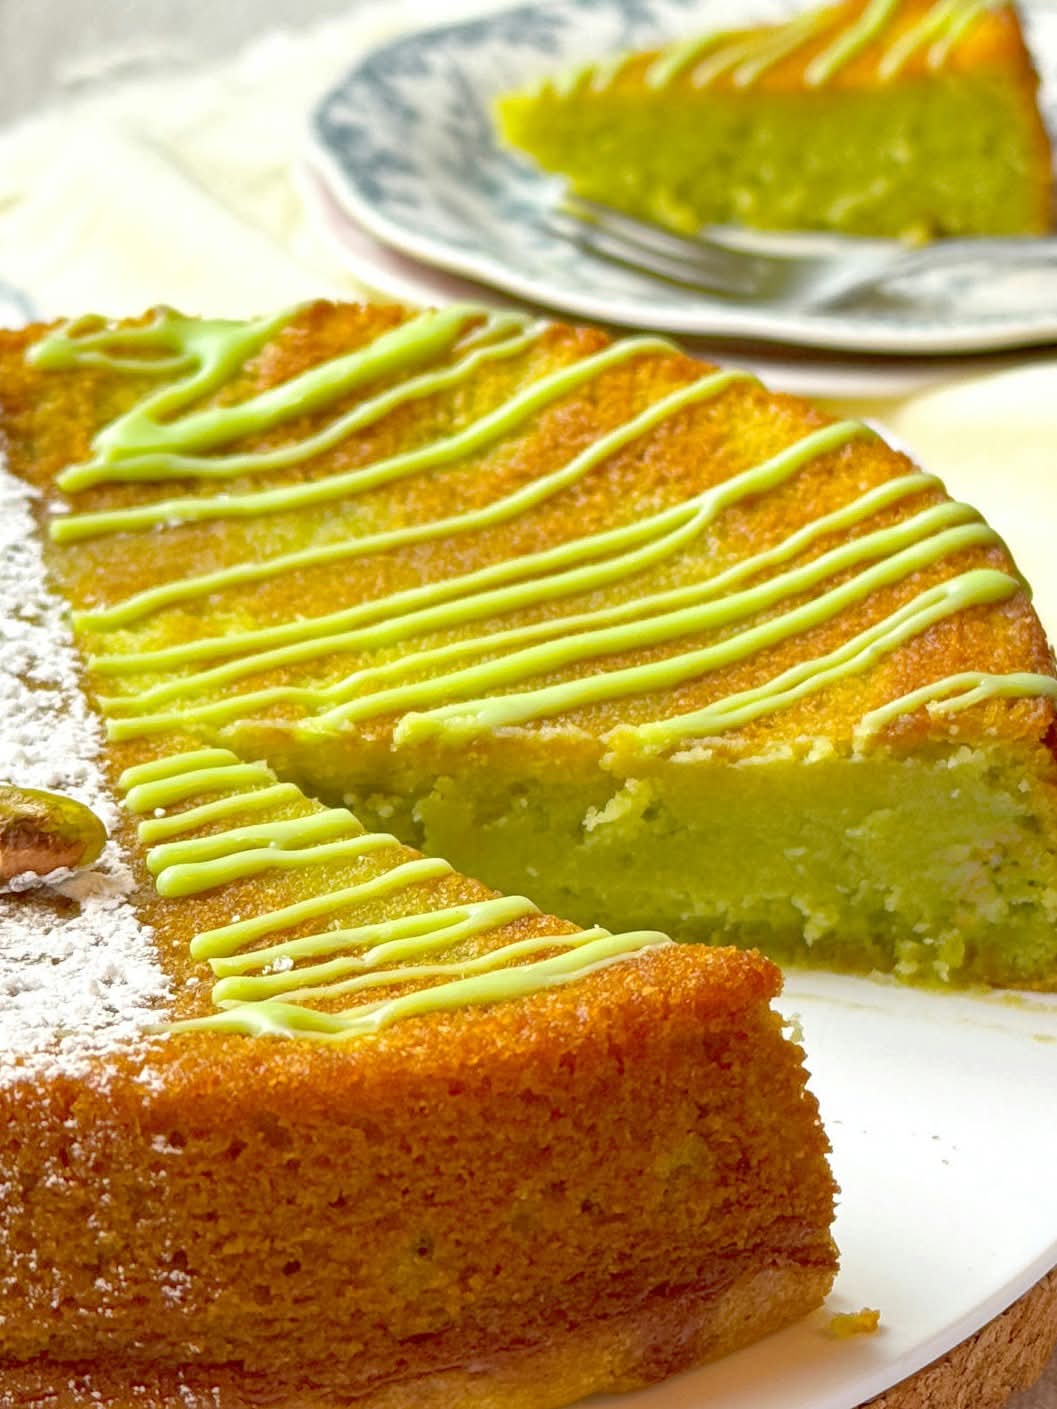
Pistachio Caprese Cake: A Gluten-Free Italian Masterpiece of Rich, Nutty Elegance
Imagine a cake that breaks every convention. It requires no flour, rises without chemical leaveners, and derives its profound depth not from chocolate, but from the earthy, sophisticated flavor of finely ground pistachios. This is the Torta Caprese, a legendary Italian dessert from the Isle of Capri, traditionally made with almonds or chocolate. In this exquisite variation, we celebrate the humble pistachio, transforming it into a cake of stunning beauty and even more incredible texture. Dense yet impossibly moist, rich yet not overly sweet, the Pistachio Caprese Cake is a gluten-free wonder that relies on the magic of whipped egg whites and nut flour to achieve its sublime consistency. Its top crackles delicately, giving way to a fine, tender crumb that melts on the tongue, releasing a buttery, nutty flavor accentuated by a hint of citrus. Often served simply with a dusting of powdered sugar or a dollop of whipped cream, it is a dessert of understated elegance, perfect for those who appreciate nuanced flavors and luxurious textures. Whether you’re catering to gluten-free diets or simply seeking a sophisticated, foolproof dessert that will dazzle at any gathering, this guide will lead you through the simple alchemy of creating a Pistachio Caprese Cake that is as stunning to behold as it is unforgettable to taste.
The Unconventional Genius of the Caprese Method: Why No Flour Works
To understand the beauty of this cake, you must first abandon standard baking expectations. The Caprese method is a study in culinary physics and chemistry. Without gluten from flour to provide structure, the cake depends on two key elements: the body provided by very finely ground nuts (in this case, pistachios) and the lift created by expertly whipped egg whites. The nuts are processed until they reach a texture akin to fine flour, releasing their natural oils which contribute immense moisture and flavor. The egg yolks are whipped with sugar until pale and thick, creating a stable, emulsified base. The stiffly whipped egg whites are then folded in with great care, trapping millions of tiny air bubbles that expand in the oven’s heat, causing the cake to rise gently and setting into a delicate, porous structure. The result is a cake that is simultaneously dense from the nuts and airy from the eggs—a textural paradox that is utterly delightful. This process, while simple, demands attention to detail, particularly in the whipping and folding stages, to ensure the characteristic moist, tight crumb and the signature domed, cracked top.
Pistachio Caprese Cake Recipe
This recipe yields one stunning 9-inch cake, serving 10-12 people. It is deceptively simple, requiring fewer than 10 ingredients, yet the result is profoundly elegant. Using high-quality, unsalted pistachios is non-negotiable for the best flavor and vibrant green hue.
Ingredients
· 2 ½ cups (300g) shelled, unsalted pistachios (plus extra for garnish)
· 1 cup (225g) unsalted butter, at room temperature (plus more for greasing)
· 1 ¼ cups (250g) granulated sugar
· 4 large eggs, separated, at room temperature
· Zest of 1 lemon or orange (optional, but recommended for brightness)
· 1 teaspoon pure vanilla extract or ½ teaspoon almond extract
· ¼ teaspoon salt
· Powdered sugar, for dusting
· Whipped cream or crème fraîche, for serving (optional)
Essential Equipment
· 9-inch (23cm) springform pan
· Food processor
· Electric hand mixer or stand mixer
· Large mixing bowls
· Fine grater/zester (if using citrus zest)
· Spatula
· Wire cooling rack
Step-by-Step Baking Instructions
Step 1: Preparing the Pan and Preheating
Preheat your oven to 350°F (175°C). Generously butter the bottom and sides of a 9-inch springform pan. For extra insurance against sticking, you can line the bottom with a round of parchment paper after buttering. The springform is crucial for easily removing this delicate cake.
Step 2: Transforming Pistachios into “Flour”
This is the most important preparatory step. Place the shelled pistachios in the bowl of a food processor. Pulse them repeatedly until they are very finely ground, resembling a coarse flour. Be vigilant—process in short bursts and shake the processor bowl occasionally to ensure even grinding. You must stop before the nuts release too much oil and turn into a paste; this should take about 1-2 minutes. Set your beautiful green pistachio “flour” aside.
Step 3: Creating the Yolk Base
In a large mixing bowl, or the bowl of a stand mixer, combine the softened butter and granulated sugar. Beat on medium-high speed with the paddle attachment for 3-4 minutes, until the mixture is very pale, fluffy, and creamy. Scrape down the sides of the bowl. Add the four egg yolks one at a time, beating well after each addition. Mix in the citrus zest (if using) and vanilla or almond extract. The mixture should be smooth, thick, and glossy.
Step 4: Incorporating the Pistachio Flour
Add the finely ground pistachios and the salt to the yolk-butter mixture. Using a spatula or the mixer on low speed, fold and mix until the nuts are fully and evenly incorporated. The batter will be very thick, almost like a paste. Set this mixture aside while you tackle the egg whites.
Step 5: Whipping the Egg Whites to Perfect Peaks
In a completely clean, dry, and grease-free bowl, whip the four egg whites. Using a whisk attachment on a stand mixer or a hand mixer, start on low speed until the whites become frothy, then increase to medium-high. Whip until stiff, glossy peaks form. This means when you lift the whisk, the peak of egg white stands straight up without curling over. Do not overwhip to a dry, crumbly state.
Step 6: The Delicate Art of Folding
This step is critical for the cake’s texture. Add about one-third of the whipped egg whites to the thick pistachio batter. Using your spatula, stir vigorously to lighten the dense batter. This initial mix makes the two components more similar in consistency. Now, gently add the remaining egg whites. Using a folding motion—cutting down through the center of the bowl, sliding along the bottom, and turning the mixture over onto itself—incorporate the whites. Rotate the bowl as you go. Be patient and gentle; the goal is to retain as much of that precious air as possible. Fold just until no large streaks of white remain.
Step 7: Baking for the Perfect Cracked Top
Pour the batter into the prepared springform pan and smooth the top with your spatula. Bake in the preheated oven for 40-50 minutes. The cake is done when the top is golden brown, feels firm to a gentle touch in the center, and a toothpick inserted into the center comes out with a few moist crumbs (but not wet batter). The top will have formed a beautiful, rustic crack—this is characteristic and desirable.
Step 8: Cooling with Patience
Place the pan on a wire cooling rack and let the cake cool completely in the pan. This is non-negotiable. The cake is extremely fragile when hot and needs time to set its structure as it cools. It will sink slightly in the center, which is normal and creates a lovely rustic appearance. Once completely cool, carefully run a thin knife around the edge of the pan before releasing the springform clasp.
Finishing, Serving, and Expert Tips
Finishing: Place the cooled cake on a serving plate. Just before serving, dust the top generously with powdered sugar using a fine-mesh sieve. For added flair, garnish with a few whole or roughly chopped pistachios.
Serving: This cake is rich. Serve in modest slices. A dollop of lightly sweetened whipped cream, crème fraîche, or a side of fresh berries provides a lovely, cutting contrast to the cake’s dense richness.
Troubleshooting & Tips:
· Why is my cake greasy? This can happen if the nuts were processed into a paste, releasing too much oil. Pulse, don’t run, the food processor.
· Why did it collapse dramatically? The egg whites were likely under-whipped or deflated during folding. Ensure whites are at stiff peaks and fold with a gentle hand. Also, avoid opening the oven door during the first 30 minutes of baking.
· Can I make it ahead? Absolutely. In fact, the flavors deepen and the texture becomes even more moist and cohesive the next day. Wrap the cooled cake tightly in plastic wrap and store at room temperature for up to 3 days.
· Enhancing the Green Color: For a more vibrant green, you can add a tiny drop of green food coloring gel to the yolk mixture, but high-quality pistachios will impart a naturally beautiful hue.
Conclusion: A Celebration of Pure Flavor
The Pistachio Caprese Cake is more than a dessert; it is a testament to the power of simplicity and the elegance of ingredient-focused baking. It proves that limitations—like the absence of flour—can inspire unparalleled creativity, leading to textures and flavors that standard cakes cannot match. Baking this cake is a lesson in patience and precision, from the careful grinding of nuts to the gentle folding of egg whites, each step a quiet ritual building towards a spectacular result. To serve a slice of this moist, nutty cake is to offer a moment of genuine, unadulterated pleasure. It speaks of Italian dolce vita and modern gluten-free sophistication with equal fluency. So, preheat your oven, ready your food processor, and prepare to create a dessert that is as surprising in its method as it is satisfying in every bite. Your journey into the world of flourless Italian baking, crowned with the glory of pistachios, begins now.