The Magic 3 Ingredient Soufflé Cake How to Make the Ultimate Fluffy Japanese Style Sponge
In the world of high-end patisserie, there is one dessert that consistently captures the imagination of food lovers everywhere: the Japanese-style cotton sponge cake. Known for its impossibly airy texture, gentle sweetness, and “jiggle,” it has become a global sensation. However, for the home baker, these cakes often seem intimidating, requiring complex water baths, precise temperatures, and professional-grade equipment. But what if you could achieve that same cloud-like consistency using only three simple ingredients and a blender? This “soufflé cake” is a revolutionary approach to baking that strips away the complexity while maintaining the luxury. By focusing on the structural integrity of eggs and the creaminess of a fermented dairy base, you can create a centerpiece dessert that looks like it came from a boutique bakery in Tokyo. This article will guide you through the science of fluffiness and provide a foolproof method for mastering this 3-ingredient miracle at home.
The Science of the Soufflé: How Three Ingredients Create Magic
Baking is often described as chemistry, and this cake is the perfect experiment. When you limit your ingredients to eggs, a creamy base (like yogurt or cream cheese), and a starch or sweetener, every component must work overtime to provide structure, flavor, and lift. Understanding how these elements interact is the key to ensuring your cake doesn’t collapse the moment it leaves the oven.
The Power of Aerated Eggs
The true secret to the “cloud” texture lies in the eggs. Eggs are unique because their proteins can trap air bubbles when beaten or blended. In this specific recipe, the blender acts as a high-speed aerator, incorporating tiny micro-bubbles into the batter. These bubbles expand during the baking process, acting as a natural leavening agent. Unlike traditional cakes that rely on baking powder or soda, the lift in a soufflé cake is purely mechanical. This results in a much finer crumb and a texture that literally melts on the tongue.
Choosing Your Base: Yogurt vs. Cream Cheese
The secondary ingredient provides the moisture and the “tang” that balances the richness of the eggs. Using a thick, strained Greek yogurt results in a lighter, more refreshing cake with a profile similar to a delicate chiffon. Using softened cream cheese moves the recipe toward the famous “Japanese Cheesecake” territory—richer, creamier, and slightly more decadent. Both options work beautifully, but the key is ensuring the ingredient is at room temperature before blending to prevent lumps and ensure a silky-smooth batter.
The Role of the Stabilizer
Whether you use a small amount of cornstarch, flour, or condensed milk, the third ingredient serves as the stabilizer. It “grabs” onto the moisture and the air bubbles, providing enough skeletal structure to allow the cake to rise and hold its shape. Without this third element, you would simply have a very fluffy omelet. With it, you have a sophisticated sponge.
Step-by-Step Guide to the Perfect Blender Soufflé Cake
The beauty of this recipe is that it bypasses the need for multiple bowls and whisks. A high-powered blender or food processor does the heavy lifting, ensuring the batter is perfectly emulsified and aerated.
Ingredients and Preparation
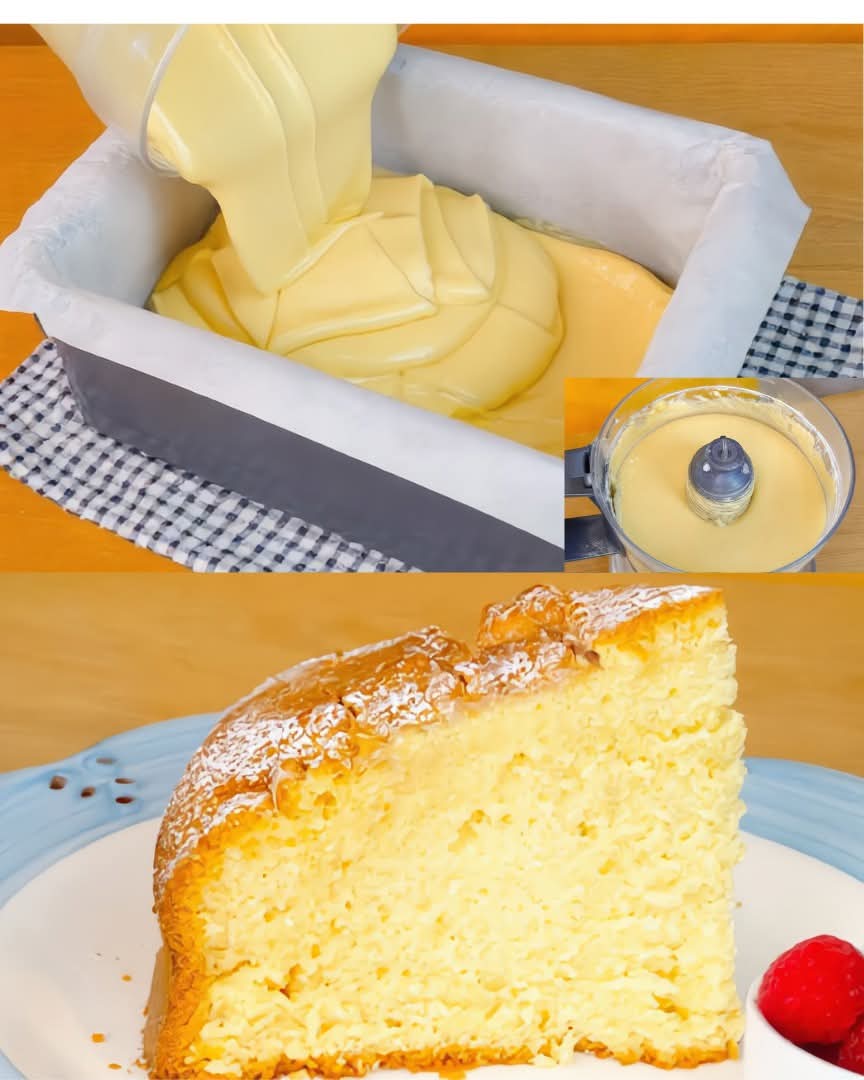
To make this cake, you will need: 3 large eggs, 1 cup of thick Greek yogurt (or 8oz of softened cream cheese), and 1/2 cup of condensed milk (which acts as both the sweetener and the stabilizer). Before you begin, preheat your oven to 320°F (160°C). Prepare a deep loaf pan or a round cake tin by lining it with parchment paper. Pro tip: ensure the parchment paper rises at least two inches above the rim of the pan, as this cake will rise significantly during the baking process.
The Blending Process
Add the eggs, your chosen creamy base, and the condensed milk into the blender. Blend on high speed for approximately 1 to 2 minutes. You want to see the mixture become pale, thick, and covered in tiny bubbles. This step is crucial because the more air you incorporate now, the fluffier the result will be. Once blended, pour the batter into your prepared pan. You should see a thick, ribbon-like consistency as it fills the mold.
The Low and Slow Bake
Place the pan in the center of the oven. If you want an even more moist “jiggle” cake, you can place the loaf pan inside a larger baking dish filled with an inch of hot water (a bain-marie). Bake for 40 to 50 minutes. The top should be golden brown and the cake should feel springy to the touch. Once the timer goes off, turn off the oven but leave the door slightly ajar for 10 minutes. This gradual cooling prevents the drastic temperature shock that often causes soufflés to deflate.
Troubleshooting: Why Your Cake Might Fall
Even with only three ingredients, things can go wrong. If your cake comes out flat or dense, it is usually due to one of three factors.
Temperature Shock
The most common mistake is removing the cake from the hot oven into a cold kitchen immediately. The air trapped inside the cake is what holds it up; when that air cools too quickly, it shrinks, causing the cake to sink. Always use the “ajar door” method to let the temperature stabilize.
Over-Blending or Under-Blending
While you want air bubbles, you also don’t want to break the protein chains of the eggs. Stop blending as soon as the mixture is uniform and aerated. Conversely, if you don’t blend long enough, the cake won’t have enough lift. Look for the “ribbon stage” where the batter leaves a visible trail when poured.
Moisture Content
If using yogurt, make sure it is a thick, Greek-style variety. Traditional plain yogurt is often too watery, which can weigh down the egg proteins and lead to a soggy bottom. If your yogurt seems thin, strain it through a paper filter for an hour before using.
Creative Variations and Serving Suggestions
Once you have mastered the base 3-ingredient recipe, you can start to customize the flavor profile without compromising the texture.
Flavor Infusions
A teaspoon of vanilla extract or the zest of a fresh lemon can be added to the blender for a classic flavor. For a more modern twist, add a tablespoon of matcha powder or cocoa powder to the third ingredient. These powders also act as extra stabilizers, often resulting in a slightly sturdier cake.
Toppings and Presentation
The classic way to serve this cake is with a simple dusting of powdered sugar. However, the mild sweetness of the sponge makes it the perfect canvas for fresh fruit. A side of tart raspberries or a dollop of whipped cream can turn this simple bake into a gourmet experience. For a truly professional look, serve the cake while it is still slightly warm to maximize the “soufflé” effect.
The Nutritional Side: A Lighter Way to Treat Yourself
One of the hidden benefits of the 3-ingredient soufflé cake is that it is naturally much lower in fat and flour than traditional cakes. By using yogurt as a base, you are incorporating protein and probiotics into your dessert. For those following a gluten-free lifestyle, using condensed milk or a gluten-free starch as the third ingredient makes this a safe and delicious option. It is a “guilt-free” indulgence that focuses on quality ingredients and air rather than heavy butter and refined sugars.
Conclusion: Elevate Your Baking with Minimal Effort
The 3-ingredient soufflé cake is proof that complexity does not always equal quality. In a world of over-complicated recipes, there is something deeply satisfying about creating a masterpiece from the most basic items in your refrigerator. This cake celebrates the structural power of the egg and the creamy versatility of dairy, resulting in a dessert that is as beautiful to look at as it is to eat. Whether you are an experienced baker looking for a quick “wow” factor or a beginner wanting to experiment with textures, this blender method is your gateway to success. Turn on your oven, grab your blender, and prepare to be amazed by the fluffy, golden cloud you’re about to create. Your afternoon tea will never be the same again.