The Ultimate Turkish Vegan Bread Soft Fluffy Bazlama Recipe
There is a specific kind of magic that happens when simple pantry staples—flour, water, and yeast—meet a hot cast-iron skillet. In the heart of Turkish cuisine, this magic is known as Bazlama. Often referred to as “village bread,” Bazlama is a traditional Turkish flatbread that is naturally vegan, incredibly soft, and famous for its ability to puff up like a balloon during cooking. Unlike many Western breads that rely on butter or milk for tenderness, this Turkish vegan bread achieves a pillowy, cloud-like texture through a high-hydration dough and a unique stovetop technique.
For those looking for a versatile bread that fits a plant-based lifestyle, Bazlama is the gold standard. It is thicker than a tortilla, softer than a pita, and more flavorful than a standard sandwich loaf. Whether you are using it to scoop up a rich lentil soup, stuffing it with roasted vegetables and hummus, or simply enjoying it warm with a drizzle of olive oil and herbs, this bread is a testament to the beauty of Mediterranean baking. In this comprehensive guide, we will dive into the history, the science of the “puff,” and a foolproof step-by-step method to creating authentic Turkish vegan bread in your own kitchen.
Why Bazlama is the Perfect Turkish Vegan Bread
The genius of Turkish Bazlama lies in its simplicity. Traditionally, it was baked over wood fires in villages across Anatolia, providing a quick and filling staple for families. Because it doesn’t require an oven, it remains one of the most accessible breads for home cooks today. What makes it particularly special for the vegan community is that it requires absolutely no animal products to reach its peak form.
The soft crumb is achieved by allowing the dough to remain slightly sticky, which traps moisture. When that moisture hits the intense heat of a pan, it turns into steam, pushing the dough upward and creating that iconic hollow center. This natural pocket makes it ideal for sandwiches, while the charred, smoky exterior provides a depth of flavor that store-bought breads simply cannot replicate. It is a bread that celebrates the earth, utilizing ancient grains and fermentation to provide nourishment and comfort.
Ingredients: Keeping it Simple and Plant-Based
To make the perfect Turkish vegan bread, you only need five basic ingredients. However, the quality of these ingredients and how you handle them will determine the final texture of your Bazlama.
The Foundation: All-Purpose or Bread Flour
While you can use bread flour for a chewier result, high-quality All-Purpose flour is the traditional choice for Bazlama. It provides the perfect balance of softness and structure. If you want to experiment with ancient grains, you can substitute a portion of the flour with spelt or einkorn, but keep in mind that these flours absorb water differently, so you may need to adjust your ratios.
The Lifespan: Active Dry Yeast and Warm Water
Yeast is the engine of this recipe. For a successful rise, your water must be “blood warm”—roughly 105°F to 115°F. If the water is too hot, it will kill the yeast; if it’s too cold, the yeast won’t activate. A small teaspoon of sugar or maple syrup is often added to the water to “feed” the yeast, ensuring a vigorous fermentation that leads to those beautiful air bubbles.
The Texture Secret: Olive Oil and Salt
Fine sea salt is essential for regulating the yeast and bringing out the nutty flavor of the wheat. To keep the bread supple, we incorporate a small amount of extra virgin olive oil into the dough. This fat coats the gluten strands, ensuring the bread remains soft even after it cools down, preventing it from becoming tough or leathery.
Step-by-Step Guide to Crafting Turkish Vegan Bread
Mastering Bazlama is all about the feel of the dough. It is a tactile process that rewards patience and a gentle hand.
1. Activating the Yeast
Start by whisking your yeast and sugar into warm water. Let it sit for about 10 minutes. You are looking for a thick, frothy foam to form on the surface. If the water remains clear, your yeast is likely inactive, and you should start again with a fresh packet to ensure your bread actually rises.
2. Mixing the Hydrated Dough
In a large bowl, combine your flour and salt. Create a well in the center and pour in the yeast mixture and olive oil. Using a wooden spoon or your hands, bring the flour into the liquid until a shaggy, sticky dough forms. Do not be tempted to add too much extra flour at this stage; a wetter dough is the key to a softer bread.
3. The Kneading Process
Turn the dough onto a lightly floured surface. Knead for about 8 to 10 minutes. You want the dough to transition from shaggy and sticky to smooth and elastic. It should still feel slightly tacky—if it’s too dry, your bread will be dense. If you are using a stand mixer, use the dough hook attachment on medium-low speed for about 6 minutes.
4. The First Rise (Bulk Fermentation)
Place your dough in a lightly oiled bowl and cover it with a warm, damp cloth. Let it rest in a draft-free area for 1 to 1.5 hours. In Turkish villages, this dough is often left near a warm stove. You want it to at least double in size. This is when the flavor develops as the yeast produces carbon dioxide and complex organic compounds.
Shaping and Preparing for the Pan
Once your dough has risen, it’s time to shape your individual flatbreads. This part of the process requires a gentle touch so you don’t collapse all the air bubbles you worked so hard to create.
Dividing the Dough
Gently deflate the dough and turn it out onto a floured surface. Divide it into equal portions—usually about 6 to 8 pieces depending on how large you want your Bazlama. Roll each piece into a smooth ball by tucking the edges under.
The Rolling Technique
Use a rolling pin to flatten each ball into a circle about 1/2 inch thick. In Turkey, Bazlama is typically thicker than pita bread. This thickness is what allows it to maintain a soft, moist interior while the outside gets that perfect char. Let the rolled-out circles rest for another 15 to 20 minutes under a towel; this “second proof” is the secret to getting a massive puff in the pan.
Mastering the Stovetop Bake
The final and most exciting step is the bake. You don’t need a pizza stone or a fancy oven—just a reliable skillet.
Choosing Your Pan
A cast-iron skillet is the best tool for the job because it retains heat exceptionally well. However, a heavy-bottomed non-stick pan will also work. Set your burner to medium heat. You want the pan to be hot enough to sear, but not so hot that it burns the bread before the center is cooked through.
The Cooking Process
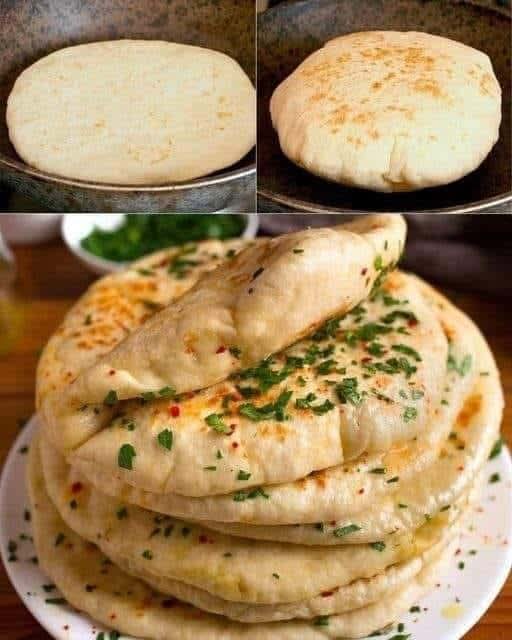
Place a dough circle into the dry, hot pan. Do not add oil to the pan. Cook for about 1 minute until you see small bubbles forming on the surface. Flip the bread over. On the second side, you should start to see the bread “inflate.” It might start at one edge and gradually fill the whole bread. This is the “balloon effect.” Flip it one more time to ensure even browning. Each side should have beautiful golden-brown or dark leopard spots.
The Finishing Touch: Vegan Garlic and Herb Topping
While authentic Bazlama is often eaten plain, many enjoy a “garlic butter” style finish. To keep it vegan, we use a flavorful herb oil infusion.
Preparing the Herb Oil
Finely mince fresh parsley and garlic. Mix these into a high-quality extra virgin olive oil or a melted vegan butter alternative. Add a pinch of Aleppo pepper or red chili flakes for a subtle Turkish kick.
Dressing the Bread
As soon as the bread comes out of the pan, brush the herb oil generously over the top. The heat of the bread will slightly toast the garlic and release the aroma of the parsley. Stack the hot breads on top of each other and wrap them in a clean kitchen towel. The steam from the stack will further soften the crusts, making them melt-in-your-mouth tender.
Troubleshooting Common Bazlama Issues
- My bread didn’t puff up: This is usually caused by the pan not being hot enough or the dough being rolled too thin. It can also happen if there is a small tear in the dough where steam can escape.
- The outside is burnt but the inside is raw: Your heat is too high. Lower the flame and allow the bread to cook more slowly so the heat can reach the center.
- The bread is tough: You likely added too much flour during the kneading process or overcooked it in the pan. Remember, Bazlama should be cooked quickly to retain moisture.
How to Serve and Enjoy Your Turkish Vegan Bread
This bread is a versatile workhorse in the kitchen. Here are some traditional and modern ways to serve it:
- The Turkish Breakfast: Serve warm with olives, sliced cucumbers, tomatoes, and a variety of jams or vegan “honey” (agave or date syrup).
- The Meze Platter: Use it as the primary vessel for dipping into Muhammera (roasted red pepper dip), Hummus, or roasted eggplant salad.
- The Vegan Gyro: Fold the bread around grilled oyster mushrooms, pickled cabbage, and a tahini-based garlic sauce for a satisfying plant-based wrap.
- Soup Companion: There is nothing better than a piece of thick Bazlama soaked in a spicy Turkish red lentil soup (Mercimek Çorbası).
Conclusion: A Staple for Every Vegan Kitchen
The Turkish vegan bread, or Bazlama, is more than just a recipe; it is a connection to a long tradition of simple, honest cooking. It proves that you don’t need expensive ingredients or complex machinery to create something truly world-class. By mastering the balance of hydration and heat, you can bring a piece of the Turkish village into your home.
Whether you are a seasoned baker or a complete novice, the sight of your first flatbread puffing up in the pan is guaranteed to bring a smile to your face. It is healthy, cost-effective, and most importantly, incredibly delicious. So, clear off your counter, find your favorite skillet, and begin your journey into the soft, fluffy world of authentic Turkish Bazlama. Your dinner guests—and your taste buds—will thank you.