The Ultimate Homemade Japanese Milk Bread Shokupan Recipe
There is nothing quite like the aroma of freshly baked bread wafting through a home. While many varieties of bread exist, Japanese Milk Bread, also known as Shokupan, stands in a league of its own. It is famously soft, impossibly fluffy, and possesses a delicate sweetness that makes it the perfect vessel for everything from thick-cut honey toast to the ultimate egg salad sandwich. If you have ever wondered how professional bakeries achieve that signature “cloud-like” texture that pulls apart in silky strands, the secret lies in a simple yet transformative technique called Tangzhong.
In this comprehensive guide, we will walk you through the science of Japanese Milk Bread, the essential ingredients you need, and a foolproof step-by-step process to recreate this bakery masterpiece in your own kitchen. Whether you are a seasoned baker or a beginner looking for your first successful loaf, this recipe is designed to deliver consistent, high-quality results every single time.
What Makes Japanese Milk Bread So Special?
The hallmark of Japanese Milk Bread is its unique texture. Unlike rustic sourdough or crusty baguettes, Shokupan is defined by its soft, thin crust and an interior that feels like a marshmallow. This texture isn’t just luck; it is the result of the Tangzhong method.
Understanding the Tangzhong Method
Tangzhong is a starter made by cooking a small portion of flour and liquid (usually water or milk) into a thick, pudding-like paste before adding it to the rest of the dough ingredients. By pre-gelatinizing the starches in the flour, the dough is able to hold significantly more moisture without becoming sticky and difficult to handle.
During the baking process, this internal moisture creates steam, which helps the bread rise higher and stay soft for days longer than standard white bread. It is a natural way to extend shelf life and improve crumb structure without the need for artificial softeners or preservatives.
Essential Ingredients for the Perfect Loaf
To achieve the authentic flavor and texture of Shokupan, you need high-quality ingredients that provide the necessary protein and fat content.
High-Protein Bread Flour
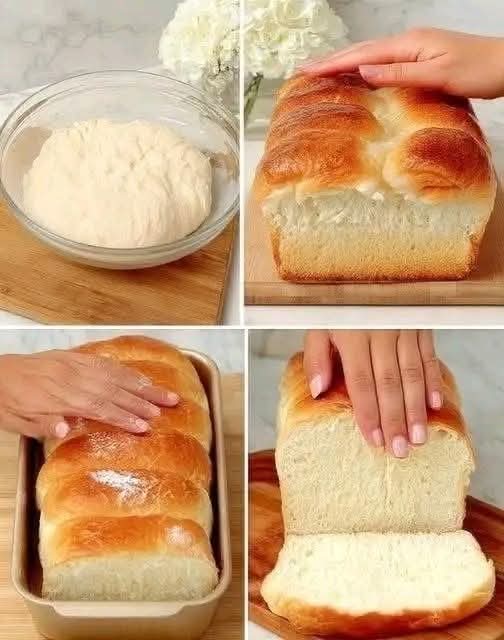
While all-purpose flour can work in a pinch, bread flour is highly recommended for this recipe. The higher protein content (typically 12-14%) is crucial for developing a strong gluten network. This network traps the air bubbles produced by the yeast, allowing the bread to reach that impressive height shown in the images.
Whole Milk and Heavy Cream
Authentic Japanese Milk Bread often uses a combination of whole milk and sometimes a touch of heavy cream. The fats in these dairy products enrich the dough, contributing to a tender crumb and a rich, milky flavor profile that differentiates it from standard sandwich bread.
Unsalted Butter
Fat is a tenderizer. By incorporating softened unsalted butter into the dough, we coat the gluten strands, preventing them from becoming too tough. This results in the “melt-in-your-mouth” quality that makes this bread so addictive.
Step-by-Step Guide to Baking Japanese Milk Bread
Creating this bread is a labor of love, but the process is straightforward once you understand the stages.
Step 1: Preparing the Tangzhong Starter
In a small saucepan, whisk together 20 grams of bread flour and 100ml of whole milk. Cook over medium-low heat, stirring constantly, until the mixture thickens into a translucent paste (similar to mashed potatoes). Remove from heat and let it cool to room temperature. You can also make this ahead of time and keep it in the fridge, but ensure it is brought back to room temperature before mixing.
Step 2: Mixing the Main Dough
In the bowl of a stand mixer, combine 350 grams of bread flour, 50 grams of granulated sugar, 7 grams of instant yeast, and a teaspoon of salt. Add the cooled Tangzhong, one large egg, and approximately 120ml of lukewarm milk.
Using the dough hook attachment, mix on low speed until a shaggy dough forms. Once the flour is fully hydrated, increase the speed to medium and knead for about 5 minutes.
Step 3: Incorporating the Butter
Add 30 grams of softened, unsalted butter one tablespoon at a time. Continue to knead for another 10 to 12 minutes. The dough will initially look greasy and messy, but keep going. Eventually, it will become smooth, elastic, and slightly tacky to the touch.
Step 4: The Windowpane Test
To ensure your gluten is properly developed, perform the windowpane test. Take a small piece of dough and gently stretch it out. If you can stretch it thin enough to see light through it without it tearing, your dough is ready. If it snaps, continue kneading for another few minutes.
The First Rise and Shaping Techniques
Proper proofing and shaping are what give Shokupan its iconic “lobed” appearance in the pullman pan.
Primary Fermentation
Place the dough in a lightly greased bowl, cover with a damp cloth or plastic wrap, and let it rise in a warm, draft-free spot for about 60 to 90 minutes, or until it has doubled in size.
Dividing and Degassing
Gently punch down the risen dough to release excess gas. Turn it out onto a lightly floured surface and divide it into three or four equal portions. Using a kitchen scale is the best way to ensure your loaf rises evenly across the top.
The Roll and Fold Method
Flatten each portion into a long oval. Fold the sides toward the center, then roll it up tightly into a cylinder. This “jelly roll” method creates internal tension, which helps the bread rise vertically and creates those beautiful swirls you see when the bread is pulled apart.
Second Proofing and Baking to Golden Perfection
Once shaped, place the rolls side-by-side in a greased loaf pan.
The Second Rise
Cover the pan and let the dough rise again for 45 to 60 minutes. The dough should reach about 1 inch below the rim of the pan. During this time, preheat your oven to 350°F (175°C).
The Egg Wash
For that deep, golden-brown shine seen in the photos, lightly brush the top of the dough with an egg wash (one egg beaten with a splash of milk). This adds a beautiful luster and a slightly crisp finish to the otherwise soft crust.
Baking Time
Bake for 30 to 35 minutes. If the top starts browning too quickly, you can loosely tent it with aluminum foil. The bread is done when the internal temperature reaches 190°F (88°C) or when the bottom sounds hollow when tapped.
Tips for Storing and Serving Your Milk Bread
One of the best parts about Japanese Milk Bread is its versatility. However, because it is so moist, you must handle it correctly after it leaves the oven.
Cooling is Crucial
As tempting as it is to slice into a hot loaf, wait! The bread needs to cool completely on a wire rack to allow the internal structure to set. Slicing too early can squash the delicate crumb and make the bread gummy.
Storage Best Practices
To keep your bread fresh, store it in an airtight bag at room temperature for up to 3 or 4 days. If you cannot finish it by then, slice the loaf and freeze the slices individually. They toast beautifully straight from the freezer.
Creative Ways to Enjoy Shokupan
While a simple swipe of salted butter is heaven, Shokupan excels in more elaborate preparations:
- Honey Toast: A popular Japanese cafe treat. Hollow out a thick block of the bread, toast it with honey and butter, and top with ice cream and fruit.
- Katsu Sandwiches: Use thick slices to sandwich a crispy pork or chicken cutlet with shredded cabbage and tonkatsu sauce.
- French Toast: Because the bread is so sturdy yet absorbent, it makes the best French toast you will ever eat.
Troubleshooting Common Bread Baking Issues
If your loaf didn’t turn out exactly like the pictures, don’t worry. Baking is a science that takes practice.
Why is my bread dense?
This usually happens if the yeast was expired or if the dough didn’t proof long enough. Ensure your liquids are warm (not hot, which kills yeast) and give the dough plenty of time to double in size.
Why did the top collapse?
Over-proofing is the most common culprit for a collapsing loaf. If the dough rises too far past the rim of the pan, the air bubbles become too large and weak, causing them to burst in the heat of the oven.
Conclusion
Mastering the art of Japanese Milk Bread is a rewarding journey that brings a touch of artisanal bakery quality into your own kitchen. By using the Tangzhong method and focusing on high-quality ingredients, you can produce a loaf that is far superior to anything found on a grocery store shelf. This bread is more than just a staple; it is an experience of texture and flavor that will quickly become a favorite in your household.
So, grab your bread flour, start your Tangzhong, and get ready to enjoy the softest, fluffiest bread you’ve ever baked. Happy baking!