The Ultimate Giant Apple Slab Pie The Easiest Way to Feed a Crowd
When you are hosting a large gathering, a traditional round pie rarely feels like enough. You find yourself cutting tiny slivers just to make sure everyone gets a taste, or worse, baking three separate pies to keep up with demand. Enter the Apple Slab Pie. This “giant” dessert takes everything you love about a classic apple pie—the flaky crust, the tender cinnamon-spiced fruit, and the sweet glaze—and scales it up into a rectangular masterpiece that can easily serve 15 to 20 people. By using a standard sheet pan (jelly roll pan) instead of a deep-dish pie plate, you get a higher crust-to-filling ratio, which means every bite is perfectly balanced. It is rustic, impressive, and surprisingly simple to assemble.
Why Slab Pie is the Superior Party Dessert
Aside from its impressive size, the slab pie offers several practical advantages for the home baker:
- Easy Slicing: Because it is rectangular, you can cut neat, uniform squares or bars. No more struggling with crumbling wedges or messy first slices.
- Finger-Food Friendly: A slab pie is sturdier than a traditional pie. It can be eaten on a small plate with a fork, or even picked up like a bar if sliced small enough.
- Shortcut Friendly: This recipe is designed to be approachable. By using high-quality refrigerated pie crusts, you save hours of chilling and rolling dough without sacrificing that buttery, flaky finish.
- Better Texture: The shallow depth of a sheet pan allows the apple filling to cook evenly and the bottom crust to crisp up better than in a deep, crowded pie dish.
The Essential Ingredients
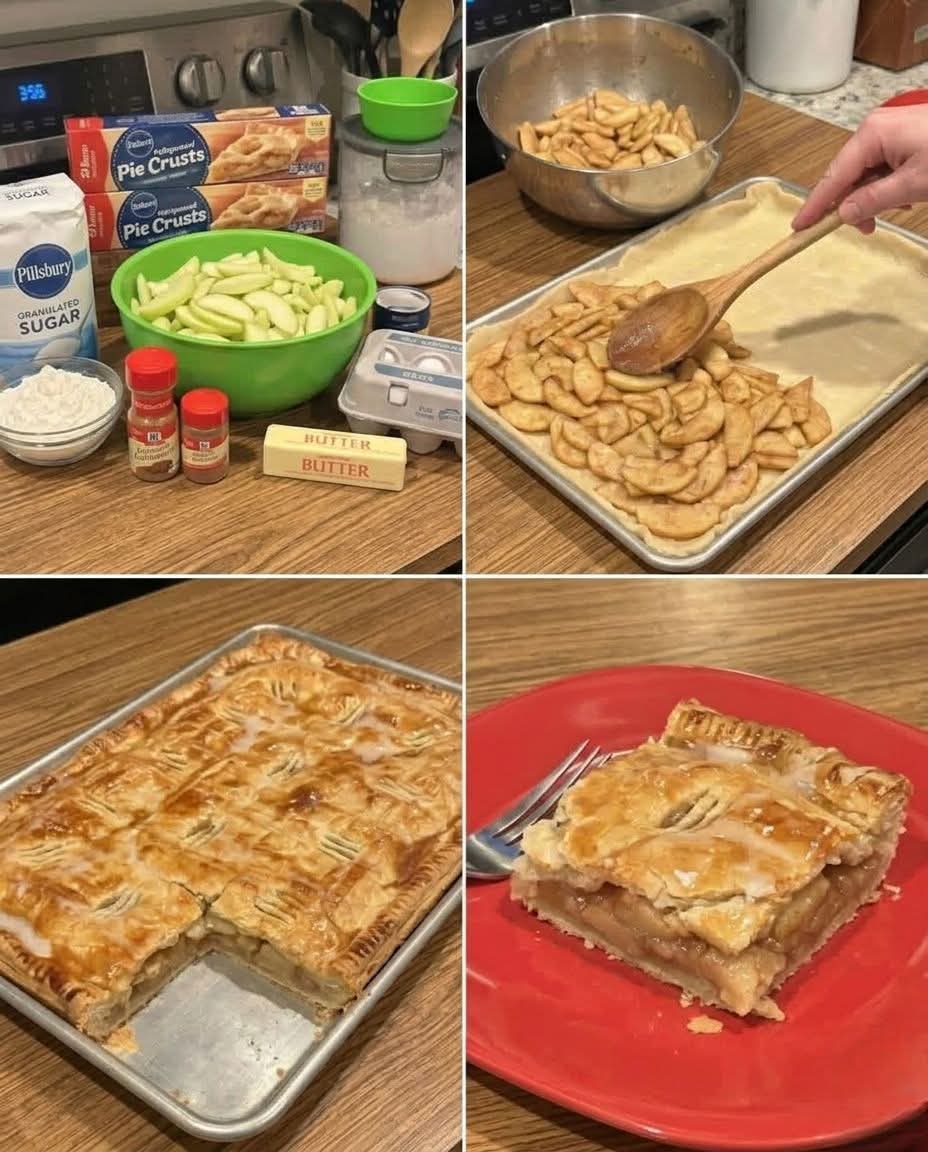
To create a giant slab pie that tastes like it came from a professional bakery, you will need:
- Refrigerated Pie Crusts: You will need two boxes (four crusts total). Two will be joined for the bottom and two for the top.
- Fresh Apples: About 6 to 8 large apples. A mix of Granny Smith (for tartness and structure) and Honeycrisp or Gala (for sweetness) works best.
- Granulated Sugar: To sweeten the fruit and help create the syrup.
- Flour & Cornstarch: These act as thickeners to ensure your filling isn’t watery.
- Butter: Small pats of butter tucked under the top crust add richness.
- Warm Spices: Ground cinnamon and a pinch of nutmeg or all-pie spice are non-negotiable for that classic autumn flavor.
- Egg Wash: One egg beaten with a splash of water for that golden, glossy sheen.
- Simple Glaze: A mix of powdered sugar and a little milk or cream to drizzle over the warm pie.
Step-by-Step Preparation
This recipe is all about assembly-line efficiency.
- Prep the Apples: Peel, core, and thinly slice your apples. In a large bowl, toss them with the sugar, flour, cinnamon, and spices. Let them sit for about 10 minutes; this allows the juices to start flowing and the sugar to dissolve.
- Prepare the Bottom Crust: On a lightly floured surface, unroll two pie crusts. Overlap them slightly and roll them out into one large rectangle that is about 2 inches larger than your 15×10-inch jelly roll pan. Gently transfer the dough to the pan, pressing it into the corners and allowing the excess to hang over the edges.
- Fill the Pie: Spread the apple mixture evenly over the bottom crust. Be sure to include any juices that have pooled at the bottom of the bowl. Dot the top of the apples with small pieces of butter.
- Top and Seal: Roll out the remaining two pie crusts into another large rectangle. Place it over the apples. Fold the bottom crust overhang over the top crust and pinch or crimp with a fork to seal the edges tightly.
- Vents and Wash: Use a sharp knife to cut several small slits in the top crust to allow steam to escape. Brush the entire top crust with your egg wash.
- Bake to Perfection: Bake at 375°F (190°C) for 40 to 45 minutes, or until the crust is a deep golden brown and you can see the apple filling bubbling through the vents.
- The Glaze: While the pie is still warm (but not hot), whisk together your powdered sugar and milk. Drizzle it generously over the top in a zig-zag pattern.
Pro-Tips for Success
- Slice Thin: The key to a great slab pie is thinly sliced apples. If the slices are too thick, the crust will bake long before the fruit is tender. Aim for about 1/4-inch thickness.
- Don’t Overfill: It might be tempting to pile the apples high, but a slab pie is meant to be relatively flat. If it’s too thick, the top crust will dome and potentially crack or leak.
- Cool Before Slicing: Resist the urge to cut into it immediately! Letting the pie cool for at least 30 minutes allows the filling to set, ensuring clean, beautiful squares.
Serving Suggestions
This pie is a showstopper on its own, but you can elevate it with:
- Vanilla Bean Ice Cream: A warm square of apple pie with a melting scoop of cold vanilla ice cream is the ultimate pairing.
- Caramel Drizzle: For an extra decadent touch, swap the simple glaze for a warm salted caramel sauce.
- Cheddar Cheese: For a traditional savory-sweet twist, serve a sharp slice of cheddar cheese on the side.
Conclusion
The Giant Apple Slab Pie is the ultimate “host’s secret.” It delivers the nostalgic comfort of a homemade pie with the efficiency of a sheet-pan meal. Whether you are celebrating a holiday, a family reunion, or a neighborhood potluck, this recipe ensures that everyone gets a generous slice of home-baked goodness. It is proof that sometimes, bigger really is better!