Homemade Crunchwrap Supreme The Ultimate Copycat Recipe That Beats Takeout
There’s something undeniably satisfying about a Crunchwrap Supreme—the golden, crispy tortilla exterior giving way to a symphony of seasoned beef, warm nacho cheese, crisp lettuce, juicy tomatoes, and that signature crunchy tostada shell in the center. It’s the kind of meal that feels like a special treat when you order it from the drive-thru, but what if you could make it at home with fresher ingredients, less grease, and exactly the way you like it? This homemade Crunchwrap Supreme recipe delivers all the nostalgia and flavor of the fast‑food favorite while giving you complete control over every layer. Whether you’re feeding a hungry family, meal prepping for the week, or simply craving something indulgent yet surprisingly easy to assemble, this step‑by‑step guide will walk you through creating a Crunchwrap that’s even better than the original. With a perfectly crisped tortilla, a warm, melty center, and the satisfying crunch in every bite, this recipe is destined to become a regular rotation in your kitchen.
What Is a Crunchwrap Supreme and Why Make It at Home?
Before diving into the ingredients and techniques, it helps to understand what makes a Crunchwrap Supreme so beloved. At its core, it’s a large flour tortilla folded around a carefully layered filling that includes a protein (usually seasoned ground beef), a creamy sauce, nacho cheese, a crunchy tostada shell, and fresh toppings like shredded lettuce, tomatoes, and sour cream. The genius lies in the folding technique—the tortilla is pleated into a hexagonal shape and seared on a griddle until golden and crisp, sealing all the components inside so that each bite delivers a little bit of everything.
Making Crunchwraps at home isn’t just about saving money; it’s about elevating the experience. You can choose high‑quality ingredients, adjust spice levels to your preference, add extra vegetables, or even swap the protein for chicken, black beans, or plant‑based crumbles. Plus, homemade versions travel well, reheat beautifully, and allow you to serve a crowd without the last‑minute rush of a fast‑food run. Once you master the folding technique, you’ll wonder why you ever waited in line for one.
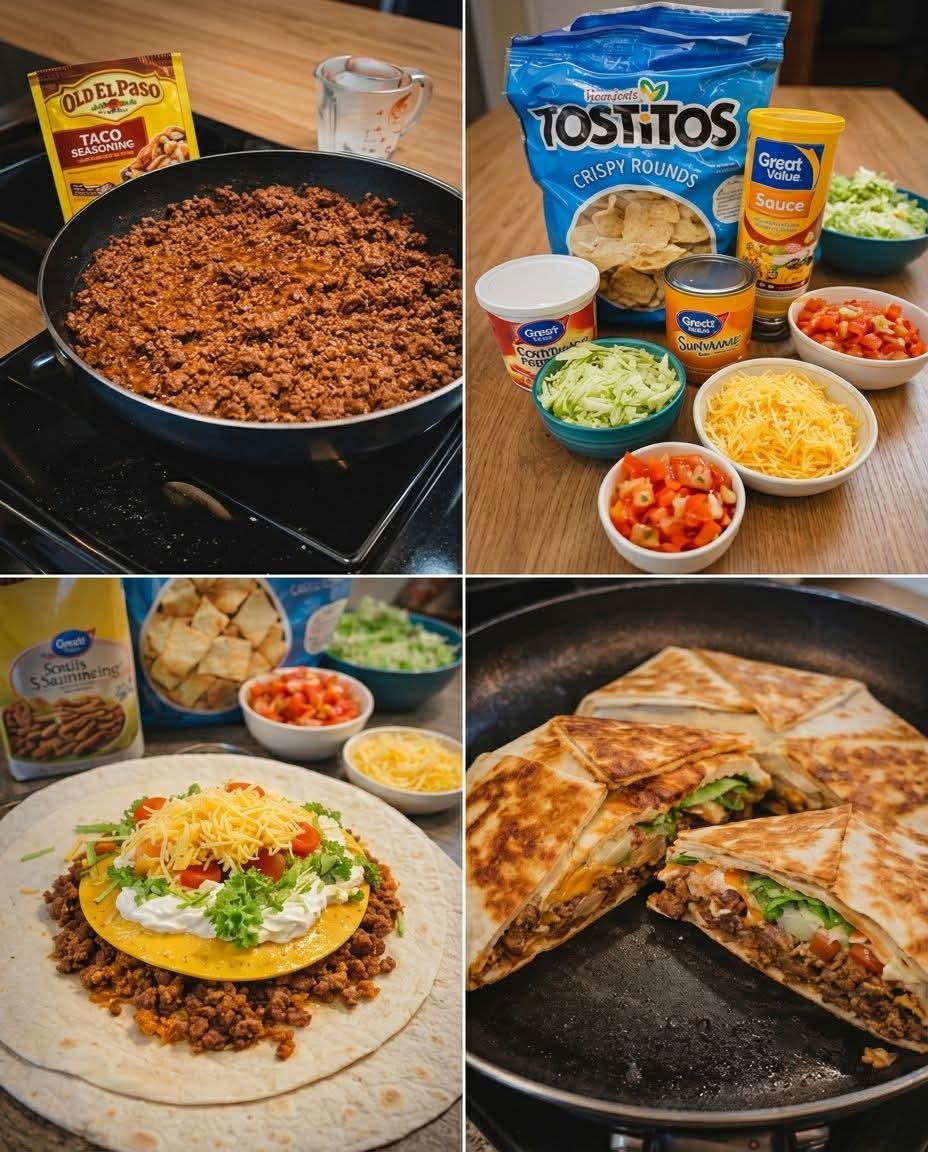
Ingredients for the Perfect Homemade Crunchwrap Supreme
To build a Crunchwrap that holds together beautifully and bursts with flavor, you’ll need to gather a few key components. The beauty of this recipe is its flexibility—feel free to substitute based on dietary needs or what you have on hand.
For the Seasoned Beef
· 1 lb (450 g) lean ground beef (85/15 works well)
· 1 small yellow onion, finely diced
· 2 cloves garlic, minced
· 2 tablespoons homemade or store‑bought taco seasoning (see note below for a DIY blend)
· ¼ cup water
· Salt and black pepper to taste
For the Nacho Cheese Sauce
· 1 tablespoon unsalted butter
· 1 tablespoon all‑purpse flour
· ½ cup whole milk
· 1 cup shredded sharp cheddar cheese (or a mix of cheddar and Monterey Jack)
· ¼ cup shredded American cheese or a few slices of processed cheese (for ultra‑smooth texture)
· Optional: 2 tablespoons canned diced green chiles or a dash of hot sauce
For Assembly
· 4 large burrito‑size flour tortillas (10 to 12 inches)
· 4 tostada shells (or corn tortillas fried until crisp)
· 1 cup sour cream
· 1 cup finely shredded iceberg or romaine lettuce
· 1 cup diced Roma tomatoes (seeds removed)
· ½ cup finely chopped red onion (optional)
· 1 cup shredded Monterey Jack or cheddar cheese (for the outer layer)
· Cooking oil or butter for the skillet (avocado oil or vegetable oil work well)
Optional Toppings and Variations
· Pickled jalapeños for heat
· Sliced black olives
· Avocado or guacamole
· Cilantro lime crema instead of sour cream
· Black beans or refried beans for a vegetarian version
Step‑by‑Step Instructions: Building the Ultimate Crunchwrap
The process unfolds in three main phases: preparing the fillings, assembling each Crunchwrap with precision, and finally crisping them to golden perfection. Taking your time with the assembly ensures that nothing spills out during cooking.
- Make the Seasoned Ground Beef
Heat a large skillet over medium‑high heat. Add the ground beef and cook, breaking it up with a wooden spoon, until browned and no longer pink, about 6 to 8 minutes. Drain off excess fat if needed. Add the diced onion and cook for another 3 to 4 minutes until softened. Stir in the garlic and cook for 30 seconds until fragrant. Sprinkle the taco seasoning over the meat, add the water, and stir well. Let the mixture simmer for 3 to 5 minutes until most of the liquid has evaporated and the beef is coated in a rich, flavorful sauce. Remove from heat and set aside. - Prepare the Nacho Cheese Sauce
In a small saucepan, melt the butter over medium heat. Whisk in the flour and cook for 1 minute to form a roux, stirring constantly. Slowly pour in the milk while whisking to prevent lumps. Continue whisking until the mixture thickens slightly, about 2 minutes. Reduce the heat to low and add the shredded cheddar and American cheese. Stir until completely melted and smooth. If desired, stir in diced green chiles or a dash of hot sauce. Keep the sauce warm or reheat gently before assembly. - Set Up Your Assembly Station
Arrange all the components within easy reach: the seasoned beef, nacho cheese sauce, sour cream, shredded lettuce, diced tomatoes, tostada shells, and the extra shredded cheese for the outer layer. Have your large flour tortillas ready. If your tostada shells are not already crisp, you can quickly fry corn tortillas in a little oil until golden and drain on paper towels. - Assemble Each Crunchwrap
Lay one large flour tortilla on a clean work surface. Visualize the center—this is where you’ll build the layers. Start by spooning about ⅓ cup of the seasoned beef into the center, spreading it into an even circle slightly smaller than the tostada shell. Drizzle a generous tablespoon of nacho cheese sauce directly over the beef. Place a tostada shell on top, pressing down gently to set it into the cheese and beef. Spread about 2 tablespoons of sour cream over the tostada shell. Top with a handful of shredded lettuce, a sprinkle of diced tomatoes, and if using, a few pickled jalapeños. Finally, add a small handful of shredded Monterey Jack or cheddar cheese—this will help seal the folds.
Now comes the crucial folding technique: carefully fold the edges of the large tortilla up and over the central filling, working your way around to create pleats. The tortilla should cover the entire filling. If there’s a small gap in the center, you can press it closed with your fingers. The key is to create a tight, sealed packet. Repeat with the remaining tortillas and fillings.
- Crisp the Crunchwraps
Heat a large non‑stick skillet or griddle over medium heat and add a small amount of oil or butter. Carefully place one Crunchwrap seam‑side down into the skillet. Cook for 2 to 3 minutes until the bottom is golden brown and crispy. Using a spatula, gently flip and cook the other side for another 2 to 3 minutes until equally golden. The cheese inside will melt, and the structure will set, making the Crunchwrap easy to handle. Transfer to a cutting board and let rest for 1 minute before slicing in half. Repeat with the remaining Crunchwraps, adding more oil as needed.
Secrets to a Perfectly Sealed and Crispy Crunchwrap
Even with the right ingredients, a few small details can make the difference between a Crunchwrap that holds together and one that leaks. First, avoid overfilling. It’s tempting to pile on extra toppings, but too much filling makes folding difficult and can cause the tortilla to tear. Second, press the tostada shell firmly into the beef and cheese layer—this creates a stable base for the toppings above. Third, when folding, make sure the pleats overlap slightly; if the tortilla seems too small, you can gently stretch it. Finally, cooking seam‑side down first is non‑negotiable: it seals the folds and prevents the Crunchwrap from opening during the flip. Using a heavy spatula to press down lightly during the first minute of cooking also helps set the shape.
Customizations and Dietary Swaps
One of the greatest joys of homemade Crunchwraps is the ability to tailor them to any palate or dietary need. For a lighter version, use ground turkey or chicken instead of beef, and swap sour cream for Greek yogurt. To make it vegetarian, substitute the beef with seasoned black beans, refried beans, or a plant‑based crumble; just be sure to still include a nacho cheese sauce or use a vegan cheese sauce for a fully plant‑based meal. If you’re craving heat, add a layer of sliced jalapeños or use a spicy chipotle crema in place of sour cream. For a breakfast twist, replace the beef with scrambled eggs, breakfast sausage, and hash browns, keeping the tostada for crunch.
What to Serve with Homemade Crunchwraps
While a Crunchwrap Supreme is a complete meal on its own, it pairs beautifully with a few simple sides. A fresh Mexican street corn salad, black bean and corn salsa, or a tangy lime‑cilantro slaw adds brightness and color. For dipping, extra nacho cheese sauce, guacamole, or a smoky chipotle ranch are always welcome. If you’re serving a crowd, consider setting up a Crunchwrap bar where guests can assemble their own—pre‑cook the beef and warm the tortillas, then let everyone choose their own toppings before you crisp them to order.
Storage, Reheating, and Meal Prep Tips
These Crunchwraps are ideal for meal prep because they reheat beautifully without becoming soggy. To store, let any assembled but uncooked Crunchwraps rest on a parchment‑lined baking sheet and cover tightly with plastic wrap; they can be refrigerated for up to 2 days. For longer storage, wrap individually in foil and freeze for up to 3 months. When ready to cook, there’s no need to thaw—simply place a frozen Crunchwrap seam‑side down in a skillet over medium‑low heat and cook for 5 to 6 minutes per side, covering the skillet for the first few minutes to ensure the interior heats through. Leftover cooked Crunchwraps can be reheated in a skillet, air fryer, or toaster oven to restore the crisp exterior; microwaving is convenient but will soften the shell.
Frequently Asked Questions About Homemade Crunchwraps
Can I use small tortillas instead of large ones?
Large burrito‑size tortillas (10 to 12 inches) are essential for the classic folding method. If you only have smaller tortillas, you can make “mini” Crunchwraps using two small tortillas—one as the base and a second cut to size to cover the top—but the folding technique will differ.
What if I don’t have tostada shells?
You can easily make your own by frying corn tortillas in about ½ inch of oil until golden and crisp, then draining on paper towels. Alternatively, you can use a crunchy taco shell broken in half, or even a thick layer of tortilla chips, though the structural integrity may be slightly different.
Why did my Crunchwrap fall apart?
This usually happens if the tortilla isn’t large enough, the filling is too wet, or the folds weren’t pressed tightly. Make sure to cook the beef until the liquid evaporates, drain any excess oil, and pat tomatoes dry before adding. Also, cooking seam‑side down first is critical to sealing the folds.
How do I get that iconic hexagonal shape?
The hexagonal shape emerges naturally when you fold the edges toward the center. As you work your way around, you’ll create a series of pleats; after cooking, those pleats form the characteristic flat‑sided shape. Don’t worry if it’s not perfect—it will still taste incredible.
Conclusion: Why This Homemade Crunchwrap Supreme Deserves a Spot in Your Kitchen
Bringing the Crunchwrap Supreme into your home kitchen is more than just a copycat recipe—it’s an invitation to enjoy a beloved fast‑food classic with the quality and customization that only homemade can offer. The contrast of warm, seasoned beef against cool sour cream and lettuce, the unexpected crunch of the tostada shell, and the golden, buttery tortilla all come together in a handheld package that feels both nostalgic and fresh. Once you’ve tried this method, you’ll find countless ways to adapt it, whether you’re making a weeknight dinner, packing lunches, or feeding a crowd on game day. The folding technique becomes second nature, and the reward is a meal that consistently delivers satisfaction. So preheat your skillet, gather your favorite toppings, and get ready to enjoy a Crunchwrap that’s truly supreme—made exactly the way you like it, right in your own kitchen.