The Ultimate Guide to Fluffy Skillet Bazlama: Your Homemade Turkish Flatbread Dream
There’s a special kind of magic in bread-making, a primal satisfaction that comes from transforming simple flour and water into something nourishing and delicious. Yet, for many, the thought of yeast, proofing times, and hot ovens feels daunting. What if you could create a bread that’s pillowy-soft, irresistibly flavorful, and requires no oven, no lengthy techniques, and no special equipment? Enter Bazlama, the humble yet magnificent Turkish flatbread. Cooked to golden perfection in a simple skillet, Bazlama is a revelation. With its soft, fluffy interior and slightly chewy, spotted exterior, it’s the perfect vessel for dipping, wrapping, or simply slathering with butter. This isn’t just bread; it’s a warm, edible hug, and today, we’re unlocking the secrets to making perfect, fluffy skillet-cooked Bazlama in your own kitchen.
What is Bazlama? A Taste of Turkish Tradition
Bazlama is a traditional yeast-leavened flatbread from Turkey, commonly enjoyed fresh and warm. Unlike thinner lavash or cracker-like crackers, Bazlama is known for its substantial yet soft texture—think a thicker pita bread or a fluffier tortilla. It’s a staple of rural Turkish cuisine, often cooked on a sac (a convex griddle) over an open fire, but it adapts beautifully to a modern home kitchen on a cast-iron skillet or non-stick pan. Its beauty lies in its simplicity and versatility. Tear it apart to scoop up hummus or haydari (yogurt dip), use it to wrap grilled meats and vegetables for a hearty dürüm, or enjoy it as a side to stews and salads. The process is straightforward, the ingredients are pantry staples, and the result is nothing short of spectacular.
Why This Skillet Bazlama Recipe Works
This recipe is meticulously crafted for reliability and sublime texture. We use a balanced hydration level for a dough that’s easy to handle yet results in a supremely fluffy crumb. The combination of a short yeast rise and a hot, dry skillet creates the signature steam pockets and beautiful browning. Unlike oven-based breads, the skillet method gives you direct control, allowing you to achieve that perfect combination of a cooked interior and a beautifully blistered exterior. We’ll also cover key tips—from dough consistency to skillet temperature—that are the difference between good flatbread and transcendent flatbread.
Ingredients for Authentic Fluffy Bazlama
Gathering your ingredients is the first step to success. You’ll be pleasantly surprised by the short list.
For the Dough:
· 500 grams (about 4 cups) all-purpose flour, plus extra for dusting
· 2 teaspoons (7g) instant yeast (or active dry yeast)
· 1 tablespoon granulated sugar
· 1 ½ teaspoons fine sea salt
· 250 ml (1 cup) warm water (approximately 110°F/43°C)
· 125 ml (½ cup) plain yogurt (full-fat preferred for richness)
· 2 tablespoons extra-virgin olive oil, plus more for coating
You Will Also Need:
· A large mixing bowl
· A clean kitchen towel or plastic wrap
· A rolling pin
· A cast-iron skillet, griddle, or heavy non-stick frying pan
· Tongs or a spatula
Step-by-Step Instructions for Perfect Flatbread
Follow this process closely, paying attention to the texture and feel of the dough, which is your best guide.
Step 1: Activate the Yeast & Mix the Dough
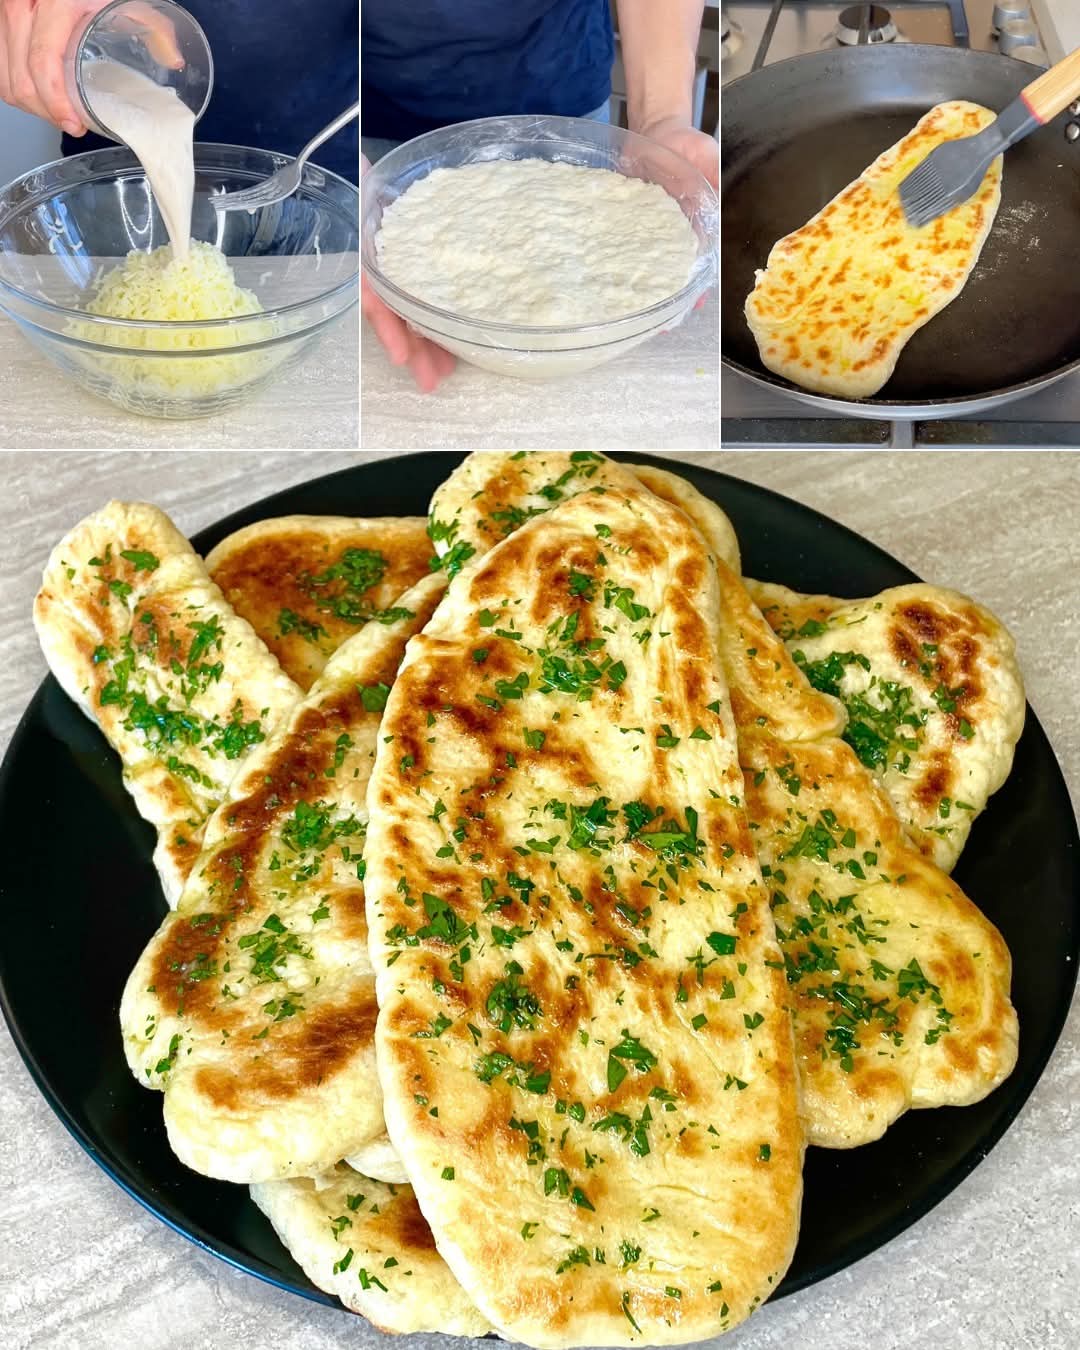
In your large mixing bowl, combine the warm water, sugar, and yeast. Give it a gentle stir and let it sit for 5-7 minutes until it becomes frothy and active. This step confirms your yeast is alive and ready, even if using instant yeast. Once frothy, add the yogurt and olive oil, and whisk to combine. In a separate bowl, whisk together the flour and salt. Gradually add the flour mixture to the wet ingredients, stirring with a wooden spoon or your hands until a shaggy dough forms.
Step 2: Knead to Perfection
Turn the dough out onto a lightly floured surface. Begin kneading. The dough will start sticky but will become smooth and elastic as you work. Knead for a full 8-10 minutes by hand (or 5-7 minutes in a stand mixer with a dough hook). You’re looking for a soft, slightly tacky dough that springs back slowly when you poke it. This kneading develops the gluten, which is crucial for creating those fluffy air pockets.
Step 3: The First Rise (Bulk Fermentation)
Place the smooth dough ball in a lightly oiled bowl, turning it once to coat it in oil. This prevents a skin from forming. Cover the bowl tightly with a damp kitchen towel or plastic wrap. Let it rise in a warm, draft-free place for 1 to 1.5 hours, or until it has roughly doubled in size. The time will vary with room temperature.
Step 4: Divide and Shape
Once risen, gently punch down the dough to release the air. Turn it out onto a lightly floured surface. Divide it into 6 equal pieces (for medium-sized bazlama) or 8 pieces for smaller ones. Shape each piece into a smooth ball by pulling the edges underneath and pinching them together. Cover the balls with your towel and let them rest for 15 minutes. This “bench rest” relaxes the gluten, making the dough much easier to roll out without springing back.
Step 5: Roll Out the Dough
Heat your skillet over medium heat. Do not add any oil or butter; the skillet should be dry. Take one dough ball and, on a lightly floured surface, roll it out into a circle about ¼-inch (6mm) thick. Don’t roll it too thin, or you’ll lose the fluffy interior. It’s okay if they are not perfect circles—rustic is part of the charm. Repeat with the remaining balls, but only roll them out right before cooking.
Step 6: Cook in the Skillet
Ensure your skillet is properly heated (a drop of water should sizzle and evaporate quickly). Place one rolled-out dough round onto the hot, dry skillet. Cook for 2-3 minutes on the first side. You’ll see bubbles forming on the surface and the bottom developing beautiful golden-brown spots. Flip it with tongs or a spatula. Cook the second side for another 1-2 minutes, pressing down gently with your spatula to encourage even cooking. The bread should puff up in places, creating a lovely interior pocket. Transfer the cooked bazlama to a plate and cover it with a clean kitchen towel to keep it soft and warm. Repeat with the remaining dough.
Pro Tips & Troubleshooting for Bazlama Mastery
My dough isn’t rising: Ensure your yeast was fresh and your liquid was warm, not hot, as high heat can kill yeast. Also, check that your rising spot is warm enough.
My bread is dense and didn’t puff: The skillet may have been too cool, preventing a quick steam burst. Make sure it’s properly preheated. The dough may also have been rolled too thin or over-kneaded.
The bread is cooking too fast or burning: Lower your heat. Medium heat is usually ideal, but all stoves vary. Aim for a steady, even cook that gives the interior time to set before the exterior over-browns.
Keeping them soft: The critical step is covering them with a towel as they come off the skillet. This traps steam and keeps them pliable. For longer storage, place them in a sealed plastic bag once cooled.
Serving & Storing Your Homemade Bazlama
Serving Suggestions: Serve bazlama warm, ideally within an hour of making. They are fantastic with:
· Dips: Classic hummus, baba ganoush, haydari (yogurt with herbs and garlic), or muhammara.
· Wraps: Fill with grilled chicken, lamb kofta, fresh vegetables, and a drizzle of yogurt sauce.
· Breakfast: Enjoy with fried eggs, cheeses like feta or beyaz peynir, olives, and tomatoes.
· Simple Bliss: Brush with melted butter and a sprinkle of garlic powder or dried herbs like oregano.
Storing Instructions: Bazlama is best enjoyed fresh. However, you can store completely cooled bread in a plastic bag at room temperature for 1-2 days. Reheat gently in a skillet or toaster. For longer storage, freeze them in a single layer then transfer to a freezer bag for up to 2 months. Reheat from frozen in a skillet or oven.
Conclusion: The Simple Joy of Homemade Bread
In a world of complex baking techniques and obscure ingredients, Bazlama stands as a beautiful testament to the power of simplicity. This skillet-cooked Turkish flatbread demystifies the art of bread-making, proving that with flour, yeast, yogurt, and a bit of heat, you can create something extraordinary. The process is tactile and rewarding, the aroma that fills your kitchen is intoxicating, and the final product—a stack of warm, fluffy, golden breads—is a triumph. It connects you to generations of home cooks who have shared this simple, nourishing food. So, dust off your skillet, gather your ingredients, and embark on this delicious journey. Your search for the perfect, easy, and utterly satisfying homemade flatbread ends right here, with this fluffy skillet Bazlama.