The Ultimate NoBake Woolworth Icebox Cheesecake A Slice of Nostalgic Perfection
There is a certain magic in a dessert that requires no oven, a treat that comes together with a mix, a chill, and a wait filled with delicious anticipation. The Icebox Cheesecake, a staple of mid-century American diners and home kitchens, epitomizes this simple joy. And among its many iterations, the legendary Woolworth’s lunch counter version holds a hallowed place in culinary memory. This isn’t the dense, New York-style baked cheesecake; this is its lighter, airier, and refreshing cousin. A crisp graham cracker crust gives way to a cloud-like filling that’s tangy, sweet, and ethereally smooth, often crowned with a vibrant layer of fruity topping. It’s a dessert that feels both nostalgic and timelessly appealing, perfect for hot summer days, potlucks, or when you crave something spectacular without turning on the oven. This article will guide you through creating the ultimate No-Bake Woolworth Icebox Cheesecake, capturing that classic taste and foolproof texture that made it an American icon.
Decoding the Icebox Cheesecake: Why This Recipe Stands the Test of Time
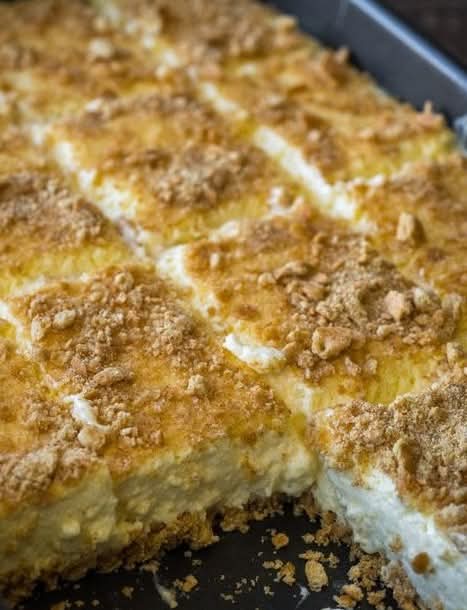
The “icebox” in the name is a charming relic, referring to the precursor to the modern refrigerator. It signifies a dessert that sets and chills, rather than bakes. The genius of this recipe lies in its simplicity and its clever use of stabilization. The filling typically relies on whipped cream or whipped evaporated milk folded into a sweetened cream cheese base, sometimes with the help of gelatin for a guaranteed firm set. The result is a texture that is impossibly light yet rich, melting on the tongue. The Woolworth’s version was famous for its consistency and its cheerful presentation, often served in a tall wedge with a bright red cherry or strawberry topping. Our recipe honors that tradition, focusing on a velvety, stable filling and the classic contrast of a buttery crust and sweet-tart fruit glaze. It’s a celebration of ease and flavor, a testament to the fact that the most beloved desserts are often the simplest.
Gathering Your Ingredients: The Foundation of a Classic
For an authentic taste and perfect texture, quality ingredients are key. This recipe makes one 9-inch cheesecake, serving 10-12.
For the Graham Cracker Crust:
· 1 ½ cups graham cracker crumbs (about 12 full sheets): For the best flavor, crush them yourself in a bag with a rolling pin or in a food processor.
· ⅓ cup granulated sugar
· 6 tablespoons unsalted butter, melted: The binder that creates the crisp, cohesive crust.
· A pinch of salt
For the Dreamy No-Bake Filling:
· 2 (8-ounce) blocks full-fat cream cheese, completely softened to room temperature: This is non-negotiable for a lump-free filling.
· 1 cup granulated sugar
· 1 teaspoon pure vanilla extract
· ¼ teaspoon fine salt (enhances all the flavors)
· 1 tablespoon fresh lemon juice: The secret touch of brightness that cuts the sweetness.
· 1 (¼-ounce) packet unflavored gelatin (optional but recommended for a guaranteed clean slice)
· ¼ cup cold water (for the gelatin, if using)
· 1 cup heavy whipping cream, very cold
For the Classic Woolworth-Style Topping:
· 1 (21-ounce) can cherry pie filling OR strawberry pie filling: The iconic, glossy finish. You can also use blueberry or raspberry.
· Optional for garnish: Fresh whipped cream and maraschino cherries.
Essential Equipment for Effortless Assembly
You will need a 9-inch springform pan (ideal for easy removal) or a deep 9-inch pie dish. A stand mixer or hand mixer is essential for whipping the cream and beating the cream cheese to smooth perfection. Also have ready a medium bowl, a small saucepan (if using gelatin), a spatula, and plastic wrap or foil.
Step-by-Step Instructions: Crafting Your Icebox Masterpiece
Step 1: Creating the Perfect Graham Cracker Crust
In a medium bowl, combine the graham cracker crumbs, sugar, and salt. Pour the melted butter over the mixture and stir with a fork until all the crumbs are evenly moistened and resemble wet sand. Press this mixture firmly and evenly into the bottom and about halfway up the sides of your 9-inch springform pan. Use the bottom of a measuring cup to pack it down tightly. Place the crust in the refrigerator to set while you make the filling. This chills the butter, solidifying the crust.
Step 2: Preparing the Gelatin (The Stabilizer Secret)
If you are using gelatin for a firm, sliceable texture: In a very small saucepan, sprinkle the packet of gelatin over the ¼ cup of cold water. Let it sit for 5 minutes to “bloom” and become spongy. Then, place the saucepan over very low heat, stirring constantly, just until the gelatin dissolves completely and the liquid becomes clear. Do not let it boil. Remove from heat and let it cool slightly to room temperature, but not so much that it sets.
Step 3: Making the Luxurious Cheesecake Filling
In the bowl of a stand mixer fitted with the paddle attachment (or using a hand mixer), beat the softened cream cheese on medium speed until completely smooth and creamy, about 2-3 minutes. Scrape down the bowl. Add the sugar, vanilla, salt, and lemon juice. Beat again until fully combined and smooth, scraping the bowl as needed. If using the gelatin, with the mixer on low, slowly pour in the liquid gelatin in a thin stream until fully incorporated into the cream cheese mixture. Scrape this mixture into a large bowl and set aside. Important: Clean your mixer bowl and beaters thoroughly. Pour in the cold heavy cream. Using the whisk attachment (or clean beaters), whip the cream on medium-high speed until stiff peaks form. Be careful not to over-whip into butter.
Step 4: The Delicate Folding Process
Using a large rubber spatula, gently fold about one-third of the whipped cream into the cream cheese mixture to lighten it. Once incorporated, carefully fold in the remaining whipped cream until no white streaks remain. The goal is to maintain as much air as possible for a light, mousse-like texture. Be gentle and patient.
Step 5: Chilling to Set (The “Icebox” Step)
Remove the chilled crust from the refrigerator. Pour the fluffy filling into the crust, smoothing the top with an offset spatula or the back of a spoon. Cover the pan tightly with plastic wrap. Refrigerate for a minimum of 6 hours, but ideally overnight. This extended chilling is critical for the flavors to meld and the filling to set completely.
Step 6: The Final Flourish: Topping and Serving
Just before serving, carefully run a thin knife around the edge of the springform pan before releasing the clamp. If using a pie dish, you can serve directly from it. Spread the entire can of cherry or strawberry pie filling evenly over the top of the set cheesecake. For the full Woolworth’s experience, garnish each slice with a dollop of fresh whipped cream and a maraschino cherry. Slice with a clean, sharp knife dipped in hot water for the cleanest cuts.
Pro Tips and Flavor Variations
· Room Temperature is Key: Soft cream cheese is the #1 rule for a smooth filling without lumps.
· Chill Your Bowl: For best whipping results, chill your mixer bowl and beaters for 10 minutes before whipping the cream.
· The Gelatin Guarantee: While the cheesecake will set somewhat without it, the gelatin ensures it holds its shape perfectly when sliced, especially in warm weather.
· Go Citrus: Add 1 tablespoon of orange or lemon zest to the filling for a bright, citrus-forward version.
· Chocolate Twist: Add ½ cup sifted cocoa powder to the cream cheese mixture and use an Oreo cookie crust.
· Tropical Style: Top with canned crushed pineapple (well-drained) or a mango puree instead of cherry.
· Storage: Keep covered in the refrigerator for up to 4 days. The crust will soften slightly over time but will still be delicious.
Serving Suggestions: A Trip Down Memory Lane
Serve this cheesecake cold, straight from the refrigerator. It’s a complete dessert on its own, but for a true diner-style experience, pair it with a cup of good coffee or an ice-cold glass of milk. It’s the perfect finale to a backyard barbecue, a light summer lunch, or a retro-themed dinner party. Present it on a vintage cake stand to complete the nostalgic vibe.
Conclusion: The Timeless Joy of a Chilled Classic
The No-Bake Woolworth Icebox Cheesecake is more than a recipe; it’s an edible heirloom. It connects us to a simpler time of soda fountains and lunch counters, while delivering a dessert that is perpetually in style. Its brilliance lies in its contrast of textures and its foolproof method, offering immense reward for minimal effort. By following these steps, you’re not just making a cheesecake—you’re preserving a piece of American culinary history and creating new memories around a dessert that is guaranteed to bring smiles. So, whip that cream, fold with care, and let your refrigerator do the rest of the work. The first bite of that cool, creamy, tangy-sweet slice will transport you and prove that some classics are simply irreplaceable.