The Ultimate Cornish Beef Pasty A Flaky Savory Handheld Taste of History
There is a unique magic in a meal you can hold in your hand, a complete and comforting parcel of warmth and flavor that travels with you. At the pinnacle of this portable food tradition sits the Cornish pasty (pronounced PASS-tee, not PAYS-tee), a humble yet magnificent creation born from the tin mines of Cornwall, England. More than just a “beef turnover,” the true Cornish pasty is a masterpiece of practical culinary design: a hearty filling of beef, potato, swede (rutabaga), and onion, encased in a sturdy, golden, and beautifully flaky shortcrust pastry, all sealed with a distinctive crimped edge. It’s a handheld pie built for sustenance, flavor, and durability. This article is your ultimate guide to creating authentic, unforgettable Cornish beef pasties from scratch. We’ll delve into the history that informs the technique, break down the perfect pastry, and build a filling that balances simplicity with deep, savory satisfaction. Get ready to bake a piece of history that is as delicious today as it was centuries ago.
Understanding the Cornish Pasty: More Than Just Ingredients
To bake a great pasty, you must first understand its soul. The traditional pasty was the lunchbox of Cornish miners and farmers. Its design was brilliantly functional: the thick, crimped edge served as a handle that could be held with dirty hands and discarded, ensuring the main body of the pasty remained clean to eat. The robust pastry shell kept the filling hot for hours and protected it from the gritty environment. The filling itself was a complete meal—protein, starch, and vegetable—wrapped in a durable, edible container. Our recipe honors this tradition. We focus on a sturdy, buttery shortcrust that can hold its shape, a chunky (not minced) filling for texture, and the classic vegetable trio. The result is a pasty that is authentic in spirit and extraordinary in taste, perfect for a modern-day lunch, picnic, or freezer-friendly meal prep.
Gathering Your Ingredients: The Foundation of Flavor
Authenticity lies in simplicity and quality. Here’s what you’ll need to make 6 generous, traditional-sized pasties.
For the Shortcrust Pastry (the key to structure & flakiness):
· 500g (about 4 cups) all-purpose flour, plus extra for dusting: The backbone of a sturdy yet tender crust.
· 1 tsp fine sea salt: Enhances flavor.
· 250g (1 cup + 2 tbsp) very cold unsalted butter, diced: Cold fat is non-negotiable for a flaky texture.
· 120-150ml (1/2 to 2/3 cup) ice-cold water: Added gradually to bind the dough without developing gluten, which would make it tough.
For the Classic Cornish Filling:
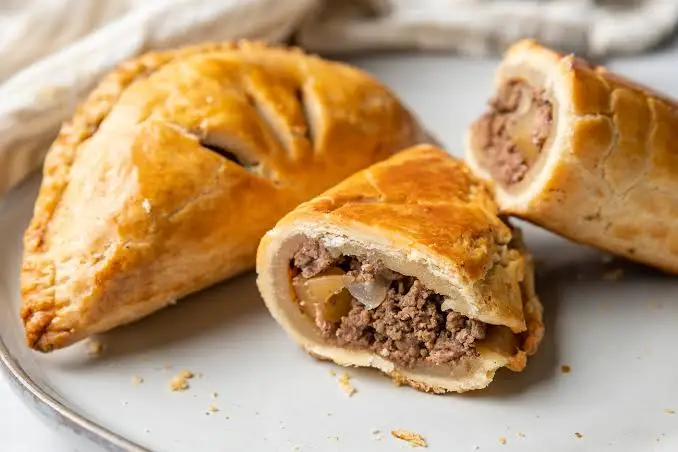
· 400g (14 oz) beef skirt steak or good quality braising steak, cut into 1cm cubes: Skirt is traditional for its rich flavor and texture. Chuck roast is an excellent alternative.
· 300g (10 oz) waxy potatoes (like Maris Piper or Yukon Gold), peeled and diced into 1cm cubes: They hold their shape during baking.
· 200g (7 oz) swede (rutabaga), peeled and diced into 1cm cubes: The essential, slightly sweet root vegetable that defines a true Cornish pasty.
· 150g (5 oz) brown onion, finely chopped:
· Salt and freshly ground black pepper: Be generous.
· A knob of butter, cut into 6 small pieces (optional, but traditional): Placed inside for added richness.
For the Egg Wash:
· 1 large egg, beaten with 1 tbsp milk or water, for a glossy, golden finish.
Essential Equipment for Pasty Perfection
You don’t need specialty tools, but a few basics are key: a large mixing bowl, a pastry cutter or your fingertips for the butter, a rolling pin, a small bowl for the egg wash, a pastry brush, and a baking sheet lined with parchment paper. A dinner plate (about 8 inches/20cm) makes a great template for cutting perfect pastry circles.
Step-by-Step Instructions: Crafting Your Handheld Masterpiece
Step 1: Making the Shortcrust Pastry – A Gentle Touch
In your large bowl, whisk together the flour and salt. Add the diced, very cold butter. Using a pastry cutter, two knives, or your fingertips, work the butter into the flour until the mixture resembles coarse breadcrumbs with some pea-sized lumps of butter remaining. These bits will create flakiness. Gradually add the ice water, a tablespoon at a time, mixing with a cold knife or your hand until the dough just begins to clump together. Be careful not to overwork it. Turn the shaggy dough out onto a lightly floured surface and gently knead it 2-3 times just to bring it together into a ball. Flatten it into a disc, wrap tightly in cling film, and refrigerate for at least 1 hour (or up to 2 days). This resting period is crucial; it allows the gluten to relax and the butter to re-solidify, ensuring a tender, easy-to-roll crust.
Step 2: Preparing the Filling – Chunky & Simple
While the dough chills, prepare your filling. The key is to ensure all components are cut to a similar, small-dice size so they cook evenly. In a large bowl, combine the cubed beef, diced potato, diced swede (rutabaga), and chopped onion. Season very generously with salt and black pepper—this is the only seasoning in the traditional filling, and it must be enough to flavor the vegetables and meat throughout. Toss everything together until evenly mixed. Set aside.
Step 3: Rolling, Cutting, and Filling – The Art of Assembly
Preheat your oven to 220°C (425°F). This high initial heat is vital for setting the pastry and creating a strong, flaky structure. Remove your chilled dough and divide it into 6 equal portions. On a floured surface, roll one portion out into a circle roughly 22-25cm (8-10 inches) in diameter and about 3mm thick. Use a plate as a guide to trim it into a neat circle if desired.
Place a generous mound of the filling mixture (about a sixth of the total) onto one half of the pastry circle, leaving a 2cm border. If using, place a small piece of butter on top of the filling. Brush the exposed border with a little egg wash. This acts as glue.
Step 4: The Signature Crimp – Sealing with Tradition
Now, for the iconic pasty crimp. Carefully lift the empty half of the pastry over the filling to create a semi-circle. Press the edges together firmly to seal. Starting at one end, fold and twist the sealed edge over itself, creating a thick, roped border along the curved side. This is the traditional “D-shape” crimp. It’s not just decorative; it’s a robust seal that prevents the pasty from bursting open during baking. Transfer the crimped pasty to your lined baking sheet. Repeat the process with the remaining dough and filling.
Step 5: Baking to Golden Perfection
Brush the tops of all the pasties liberally with the remaining egg wash. Using the tip of a sharp knife, make 2-3 small slits in the top center of each pasty. This allows steam to escape, again preventing bursts. Place the baking sheet in the hot oven and bake at 220°C (425°F) for 20 minutes. Then, without opening the door, reduce the oven temperature to 160°C (325°F) and continue to bake for another 40 minutes. This two-stage baking ensures a well-cooked, tender filling without burning the pastry. The pasties are done when they are a deep, uniform golden brown all over.
Step 6: The Essential Rest
Remove the pasties from the oven and let them cool on the tray for at least 15-20 minutes before eating. They will be piping hot inside! This rest allows the filling’s juices to be reabsorbed, making them less messy to eat and allowing the flavors to settle.
Pro Tips and Authentic Considerations
· Keep Everything Cool: Cold butter, cold water, cold hands. Heat is the enemy of flaky pastry.
· The Swede is Non-Negotiable: For authenticity, do not substitute turnip. Swede (rutabaga) has a sweeter, earthier flavor that is essential to the classic taste.
· Season Boldly: The seasoning in the raw filling may taste strong, but it mellows and seasons the entire pasty during baking. Don’t be shy with the salt and pepper.
· Don’t Pre-cook the Filling: A true Cornish pasty filling is assembled raw. The vegetables and meat steam and cook together inside the pastry, exchanging flavors and creating a rich, natural gravy.
· Freezing Instructions: Unbaked, crimped pasties freeze beautifully. Freeze them solid on a tray, then transfer to a bag. Bake from frozen, adding 15-20 minutes to the lower-temperature baking time.
Serving Suggestions: The Traditional & The Modern
A true Cornish pasty is a complete meal in itself and is traditionally eaten held in the hand. In Cornwall, it’s often served with a side of ketchup or a rich, brown gravy for dipping. For a simple, authentic experience, enjoy it with a crisp, cold salad or pickled onions or beetroot on the side. A pot of English mustard is also a classic accompaniment. For a hearty modern meal, serve it alongside a bowl of tomato soup or mushy peas.
Conclusion: Baking a Legacy, One Crimp at a Time
Making a traditional Cornish beef pasty is more than following a recipe; it’s participating in a centuries-old culinary tradition. It’s an act of patience and care that yields an immensely rewarding result: a portable, durable, and deeply delicious piece of food history. The contrast of the crisp, buttery pastry with the savory, tender, and steaming hot filling is a timeless combination that never fails to satisfy. By mastering the pastry, honoring the simple filling, and perfecting that iconic crimp, you’re not just baking lunch—you’re keeping a beautiful culinary artifact alive. So, take your time, crimp with pride, and savor the unparalleled joy of biting into a homemade Cornish pasty, a perfect pastry package where every element tells a story of necessity, ingenuity, and flavor.