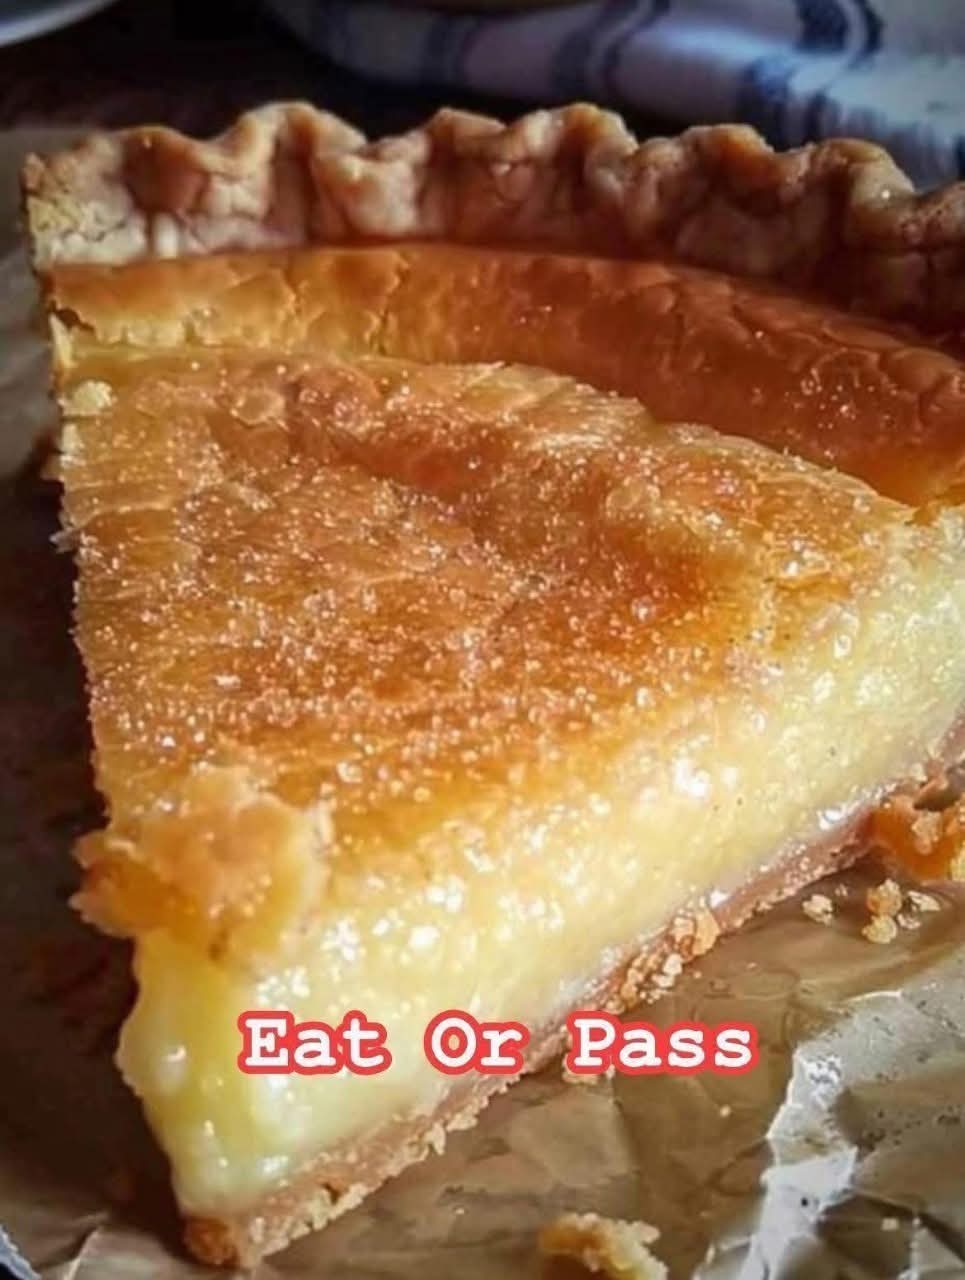
The Ultimate Buttermilk Pie A Simple Soul Soothing Southern Classic
Imagine a pie so deceptively simple in its ingredients, yet so profoundly delicious in its result, that it seems to hold a secret. Buttermilk Pie is exactly that—a cherished staple of Southern baking that transforms everyday pantry items into a dessert of sublime contrast: a crisp, flaky crust giving way to a filling that is at once custardy, tangy, and richly sweet, with a signature sugary top that crackles slightly under your fork. This is the pie of church suppers, family reunions, and grandmothers’ kitchens—a humble yet elegant dessert that requires no fancy techniques or exotic additions. Its magic lies in the alchemy of buttermilk’s bright acidity balancing the sweetness of sugar and the richness of eggs and butter. In this guide, we will demystify this classic, providing you with a foolproof path to baking a buttermilk pie with a velvety-smooth filling and a perfect golden finish, a pie that tastes like comfort itself.
The Humble Elegance of Buttermilk Pie: Understanding Its Charm
Buttermilk Pie belongs to a family of “desperation pies” or “cheese-less cheesecakes,” born from the necessity of creating a special dessert with limited, shelf-stable ingredients. Unlike its cousin, the vinegar pie, buttermilk pie offers a more nuanced tang and a luxurious texture reminiscent of a baked custard or a cheesecake without the cheese. The filling bakes into two distinct textures: a firm, creamy base and a delicately caramelized, almost brûléed top. Its flavor profile is uniquely its own—not overly eggy, not cloyingly sweet, but a perfect, refreshing balance that makes it impossible to stop at one slice. This pie perfectly matches user intent for an easy, impressive, and uniquely American dessert that feels both nostalgic and timelessly appealing.
Gathering Your Ingredients: Pantry Simplicity at Its Best
The beauty of this pie is in its short, simple list. The quality of these basic ingredients directly impacts the final result.
For a 9-inch Single Pie Crust:
· 1 homemade or store-bought 9-inch pie crust, fitted into a pie plate
· Pie weights or dried beans for blind baking (highly recommended)
For the Buttermilk Filling:
· 1 ½ cups (300g) granulated sugar
· ½ cup (115g or 1 stick) unsalted butter, softened to room temperature
· 3 large eggs, at room temperature
· 3 tablespoons all-purpose flour
· A pinch of salt
· 1 cup (240ml) full-fat buttermilk, at room temperature
· 1 teaspoon pure vanilla extract
· Freshly grated nutmeg (about ¼ teaspoon) OR 1 tablespoon lemon juice or zest (optional, but traditional)
Essential Equipment for Success
· 9-inch Pie Plate
· Electric Mixer (Hand or Stand): For properly creaming the butter and sugar.
· Large Mixing Bowl
· Whisk and Rubber Spatula
· Parchment Paper and Pie Weights
Step-by-Step Instructions: The Path to Silky Perfection
The method is straightforward, but precision in a few key steps ensures a flawless pie.
Step 1: Preparing and Blind Baking the Crust
Preheat your oven to 350°F (175°C). If using a homemade crust, roll it out and fit it into your pie plate, crimping the edges. Line the crust with parchment paper or foil and fill with pie weights. Blind bake for 15-20 minutes, until the edges are set and just starting to color. Carefully remove the parchment and weights. This step is crucial to prevent a soggy bottom. Return the crust to the oven for 5 more minutes to dry the bottom. Remove and set aside to cool slightly. Leave the oven on.
Step 2: Creaming the Base for the Filling
In the bowl of a stand mixer fitted with the paddle attachment (or using a hand mixer), cream the softened butter and granulated sugar together on medium speed for 3-4 minutes, until the mixture is light, fluffy, and pale yellow. This step incorporates air, contributing to the pie’s texture.
Step 3: Incorporating Eggs and Dry Ingredients
Add the eggs one at a time, beating well after each addition and scraping down the sides of the bowl. The mixture may look slightly curdled at this point—this is normal. In a small bowl, whisk together the flour and salt. With the mixer on low, add the flour mixture to the butter-sugar-egg mixture, mixing just until combined.
Step 4: The Final Mix: Buttermilk and Flavor
With the mixer still on low, slowly pour in the room-temperature buttermilk and the vanilla extract. Mix only until the liquid is fully incorporated and the filling is smooth. Do not overmix. If using lemon juice or zest, add it now. The filling will be quite thin, like heavy cream.
Step 5: Baking to Set the Custard
Place the par-baked pie shell on a baking sheet (this makes it easier to handle and catches any potential drips). Pour the filling into the still-warm crust. Grate a light dusting of fresh nutmeg over the entire surface. Carefully transfer the baking sheet with the pie to the oven.
Step 6: The Two-Stage Bake
Bake at 350°F (175°C) for 45 to 55 minutes. The pie is done when the edges are firmly set and puffed, the center jiggles slightly like Jell-O when gently shaken (it will set fully as it cools), and the top is a beautiful, even golden brown. If the crust is browning too quickly, tent the edges with strips of aluminum foil.
Step 7: The Crucial Cooling Process
Remove the pie from the oven and place it on a wire cooling rack. Allow it to cool completely to room temperature—this will take at least 2-3 hours. This step is non-negotiable. Cutting into a warm buttermilk pie will result in a runny filling. For the best texture and cleanest slices, refrigerate the cooled pie for at least 2-4 hours, or overnight, before serving.
Pro Tips for the Perfect Buttermilk Pie
· Room Temperature is Key: Using room-temperature eggs, butter, and buttermilk ensures they emulsify properly, preventing a greasy or separated filling.
· Blind Bake the Crust: Skipping this step is the most common mistake. A pre-baked shell is essential for texture contrast.
· Don’t Overbake: The center should have a slight, gentle jiggle. Overbaking will cause the filling to crack and become rubbery.
· The Nutmeg Touch: A whisper of freshly grated nutmeg is the traditional flavoring and adds a warm, complex note that complements the tang perfectly.
· Patience for Slicing: The long, slow cooling and chilling period is what gives the pie its perfect, sliceable, custard consistency.
Flavor Variations and Twists
· Lemon Buttermilk Pie: Add the zest of one lemon and 2 tablespoons of fresh lemon juice to the filling for a brighter, more pronounced tang.
· Coconut Buttermilk Pie: Stir 1 cup of toasted sweetened shredded coconut into the filling before pouring it into the crust.
· Brown Sugar Buttermilk Pie: Substitute ¾ cup of the granulated sugar with packed light brown sugar for a deeper, more caramel-like flavor.
· Berry Compote Topping: Serve each slice with a spoonful of fresh strawberry, blueberry, or raspberry compote for a vibrant contrast.
Conclusion: A Timeless Testament to Simple Baking
Buttermilk Pie is a testament to the elegance of simplicity. It proves that extraordinary desserts don’t require complex formulas or expensive ingredients—just an understanding of how fundamental components like butter, sugar, eggs, and buttermilk interact. The result is a dessert that is at once unassuming and spectacular, comforting and sophisticated. Its creamy, tangy-sweet filling and crisp crust create a harmony that has stood the test of time for generations. By mastering this recipe, you’re not just baking a pie; you’re preserving a piece of culinary heritage and creating a delicious, foolproof dessert that will earn you rave reviews and become a requested favorite for years to come. So, preheat your oven, whisk that buttermilk, and prepare to bake a pie that tastes like pure, sweet Southern hospitality.