A Homemade Dessert in 5 Minutes That I Never Get Tired Of
If you are searching for a quick, foolproof dessert that feels indulgent yet requires almost no effort, this homemade dessert in 5 minutes is exactly what you need. Perfect for busy weekdays, last-minute guests, or those moments when a sweet craving hits unexpectedly, this creamy layered dessert has become a favorite in countless kitchens. With minimal ingredients, no baking, and a rich, satisfying texture, it delivers maximum flavor with minimal time investment. This recipe is designed for real life: fast, affordable, and consistently delicious. Whether you are a beginner or an experienced home cook, this dessert will quickly earn a permanent place in your recipe rotation.
Why This 5 Minute Homemade Dessert Is So Popular
The appeal of this dessert goes far beyond its speed. It combines simplicity with comfort, making it suitable for all ages and occasions. From family dinners to casual gatherings, it always impresses without demanding hours in the kitchen.
Ready in Just Minutes
One of the biggest reasons people love this recipe is how fast it comes together. In just five minutes of active preparation, you can assemble a dessert that looks and tastes like it took far longer to make. There is no oven to preheat, no complicated techniques, and no waiting for dough to rise.
Minimal Ingredients, Maximum Flavor
This dessert relies on just a handful of pantry staples. Each ingredient plays an important role, creating layers of creamy sweetness and soft texture that melt in your mouth. Because the ingredient list is short, quality matters, and even small upgrades can make a noticeable difference.
No Baking Required
For anyone who dislikes baking or wants to avoid turning on the oven, this recipe is ideal. It is a completely no-bake dessert, making it perfect for warm weather or small kitchens.
What This Dessert Tastes Like
The flavor profile of this homemade dessert is rich, creamy, and gently sweet without being overwhelming. The layers balance softness with structure, creating a spoonable treat that feels light yet indulgent. It is the kind of dessert that satisfies cravings without leaving you feeling overly full.
Creamy and Smooth Texture
The creamy layers are the heart of this recipe. They provide a silky mouthfeel that pairs beautifully with the softer base layer, creating a contrast that keeps each bite interesting.
Balanced Sweetness
Unlike many store-bought desserts, this one allows you to control the sweetness. You can easily adjust sugar levels to suit your preference, making it ideal for both adults and children.
Ingredients You Need for This Easy Homemade Dessert
One of the biggest advantages of this recipe is its simplicity. You likely already have most of these ingredients at home, which makes it perfect for spontaneous dessert-making.
Core Ingredients
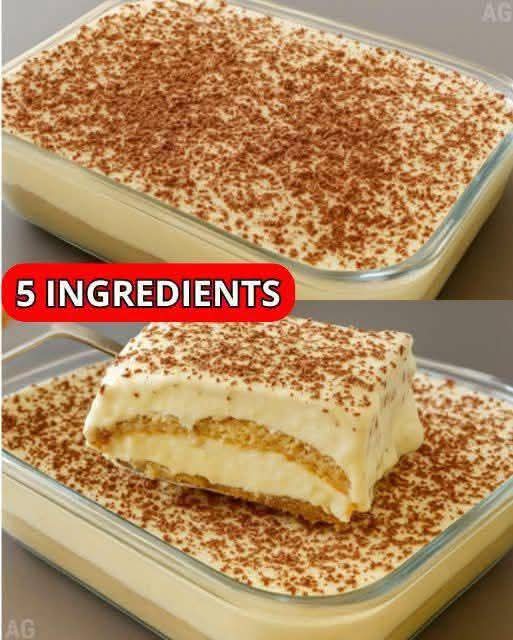
You will need a creamy base such as heavy cream or whipped topping, a sweetened dairy element like condensed milk or cream cheese, a soft layering component such as biscuits or cookies, and a light dusting ingredient like cocoa powder or grated chocolate. These five simple ingredients come together to create a surprisingly elegant dessert.
Optional Flavor Enhancements
If you want to customize the recipe, you can add vanilla extract, coffee, citrus zest, or a splash of flavored syrup. These additions allow you to tailor the dessert to different tastes without complicating the process.
Step-by-Step Guide to Making This Dessert in 5 Minutes
This dessert is all about layering and balance. The process is straightforward and forgiving, making it nearly impossible to mess up.
Step 1: Prepare the Creamy Mixture
In a bowl, combine your creamy base with the sweetened ingredient. Mix until smooth and well blended. The texture should be thick but spreadable, ensuring it holds its shape when layered.
Step 2: Assemble the Layers
In a serving dish, spread a thin layer of the cream mixture on the bottom. Add a layer of biscuits or cookies, gently pressing them down. Continue alternating layers until all ingredients are used, finishing with a smooth cream layer on top.
Step 3: Add the Final Touch
Lightly dust the top with cocoa powder or grated chocolate. This finishing touch adds visual appeal and a subtle bitterness that balances the sweetness of the cream.
Tips for Perfect Results Every Time
Even though this recipe is incredibly simple, a few small tips can elevate the final result.
Use Chilled Ingredients
Cold cream whips and sets better, giving your dessert a firmer, more luxurious texture.
Don’t Overmix
Mix just until smooth. Overmixing can cause the cream to lose its lightness.
Let It Rest if Possible
While the dessert can be eaten immediately, allowing it to rest in the refrigerator for 15 to 30 minutes improves texture and flavor by letting the layers settle.
Variations to Try
One of the best things about this homemade dessert is how versatile it is. You can easily adapt it to suit different preferences or occasions.
Chocolate Lovers Version
Add melted chocolate to the cream mixture or use chocolate cookies for the layers to intensify the cocoa flavor.
Coffee-Inspired Dessert
Lightly soak the biscuits in coffee before layering to create a dessert reminiscent of classic tiramisu.
Fruit-Infused Option
Add sliced bananas, strawberries, or berries between layers for a fresh, fruity twist that adds natural sweetness and color.
Serving Suggestions
This dessert is incredibly flexible when it comes to presentation. You can serve it family-style in a single dish or portion it into individual cups for a more elegant look.
Ideal Occasions
It works well for casual dinners, holiday gatherings, potlucks, and even as a quick weeknight treat. Because it requires no baking, it is also a great choice for summer events.
Pairing Ideas
Serve it with coffee, tea, or a glass of cold milk. The creamy texture pairs beautifully with warm beverages.
Storage and Make-Ahead Tips
Another advantage of this dessert is how well it stores.
Refrigeration
Keep the dessert covered in the refrigerator for up to three days. The flavors often improve over time, making it an excellent make-ahead option.
Freezing
While it can be frozen, the texture may change slightly. If freezing, allow it to thaw slowly in the refrigerator before serving.
Why This Dessert Fits Modern Lifestyles
In today’s fast-paced world, recipes that save time without sacrificing flavor are invaluable. This homemade dessert in 5 minutes perfectly aligns with modern cooking needs. It is quick, affordable, customizable, and requires no special equipment.
Budget-Friendly and Accessible
With simple ingredients and no specialty tools, this dessert is accessible to everyone. It proves that great taste does not require expensive ingredients or complicated methods.
Perfect for Beginners
If you are new to cooking, this recipe builds confidence. The steps are easy to follow, and the results are consistently satisfying.
Frequently Asked Questions
Many people have questions before trying this recipe for the first time, and the answers are reassuring.
Can I Make It Healthier
Yes, you can use reduced-sugar options or lighter dairy products to create a healthier version without compromising too much on flavor.
Can I Customize the Sweetness
Absolutely. Adjust the amount of sweetened ingredient to suit your taste.
Final Thoughts on This 5-Minute Homemade Dessert
This homemade dessert in 5 minutes is proof that delicious food does not need to be complicated or time-consuming. With just a few ingredients and minimal effort, you can create a dessert that feels comforting, indulgent, and endlessly adaptable. Whether you are making it for yourself, your family, or guests, it delivers consistent results and universal appeal. Once you try it, you will understand why it is a dessert you never get tired of, and why it deserves a permanent spot in your WordPress recipe collection.